Basic Terminology
The App is made up of grids and topics. Grids can be defined as a community where all of your topics are housed. For example, you might want to create a Period 1 grid, where all of your topics (discussion topics) are housed. Topics are discussion topics that you want your students to discuss via Flipgrid.
How Does It Work?
Step 1: Create a Flipgrid Account
First, you will want to visit Flipgrid and sign up for a free account!
Step 2: Create a Grid
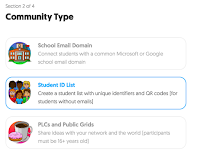
Next, you will want to visit Grids to create your first grid or community. For example, you might want to create a grid for each of your different classes, homerooms, etc. When you create a grid, you will also want to decide how you want students to enroll in your grid.
- School Email Domain - if you students have Microsoft or G Suite accounts, they can use their email address to get in. Only students with the same domain (usually after the @ in an email address) can login to your class.
- Student ID List - you can manually enter in the names of students. You will need to include their first and last name. You will also need to include an identifier, which acts like a username / password to log students into your grid. It also provides you with a unique QR code to login via the mobile application. This is a helpful tool for elementary students.
- PLC's and Public Grids - are great ways to collaborator with colleagues and lead professional development.
Step 3: Create a Topic
Then, you will want to post a Topic or discussion topic for students to respond to. To customize the topic to the needs of your students, there are several different sections to help customize your assignment. When you are ready to post your topic, choose create.
The Topic Details section is where you can provide important details about your assignment, adjust the video response time from 15 seconds to five minutes, and decide when your topic should post.
The Topic Privacy section is useful if you want to moderate student responses before student videos are posted.
Use the Topic Resource and Attachment sections to add helpful resources like links, documents, videos, and emojis to your topics.
The Video Features and Feedback sections help create another layer of customization in how videos are presented and how students respond.
Step 4: Have Students Join
 You can share your grid a variety of different ways, such as giving students a URL, code, or scan a QR Code.
If you chose a grid that requires users to be a part of your school domain, your students will be required to login with their Microsoft or Google accounts.
If you chose a grid that requires a Student ID list, students can login using a QR Code or entering in their unique identifier.
If you choose the PLC and Public Grid option, you can share your URL with others. In order to participate in the grid, you will need to have a Microsoft or Google account.
How Does It Meet Needs?
Learners need flexible options for participating in learning because not every student learns the same way. Some of our students could excel through verbal discussion, while others may not. Some of our students are shy by nature and this platform can provide students with a "voice" without the social pressure associated with participating in class.


No comments:
Post a Comment