Create a Checklist in Google Sheets and Force an Individual Copy

If you are not used to online learning, it can be overwhelming for students, parents, and teachers. How can you help students complete assignments in a virtual environment?

It may be helpful to create a visual for students to keep everything organized for the entire week. Google Sheets is a great tool that you can use, plus it uses checkboxes. How could it work?

Check out my video below on how to do this and tips / tricks for forcing an individual copy in Google Classroom:


Step 1 - Create Your Document

It will be important for you to put together a list of assignments / activities, plus additional scaffolds and supports for students, such as websites, videos, screencasts, and virtual office hours.


Step 2 - Add Checkboxes
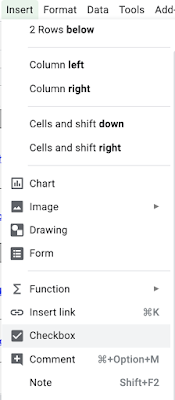
Add checkboxes to your Google Sheet for students to check off their progress. How do you do this?

  • Select the cell (or cells) that you want to place a checkbox in
  • Choose the Insert Menu
  • Choose Checkbox


Step 3 - Distribute to Students

Send your checklist to students using your favorite learning management system or tool. Google Classroom allows you to make a copy for each student, which could be very helpful for students to use the checkbox feature in Sheets. 

Don't have the ability to make a copy for each student? Here is a simple trick for creating a link that forces a copy of any Google Document. 


Bonus Idea: Force a Copy of Any Google Doc

Need a quick and easy way to force students to make a copy of any Google Doc? This is a great trick to force a copy and make a "template" for students.

Here is how it works:

1. Open up your item (Doc, Sheet, Slide, or Drawing)

2. At the end of your item's URL, you should see the word "edit." Change the word "edit" to "copy."
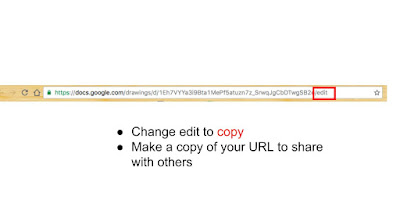

3. Make a copy of your URL and share with your audience

Now you have a quick and painless way to help your viewers make a copy of a document, presentation, spreadsheet, or drawing.


Crash Course on Doing Screencasts

Are you new to screencasting and need help? Check out my free webinar below on how to screencast. You will learn a variety of different tools like Screencastify, Screencastomatic, and QuickTime.


Take Classkick to the Next Level with Virtual Manipulatives

Want to take your Classkick use to the next level? Why not try out the virtual manipulatives feature? This tool provides students with hands-on learning opportunities to manipulate virtual objects. How does it work?

Check out my brief video below:


3 Things to Keep in Mind

First, it may be helpful to choose a background, upload a graphic organizer, or draw your own object for a location that students can drag, drop, and categorize objects. Classkick has some amazing pre-made Venn diagram and t-chart backgrounds that you can choose from!


Next, it might be helpful to provide instructions for students by drawing a textbox. Do your students need additional scaffolds and supports? It might be helpful to include links to helpful websites or videos. You could also add a voice recording explaining the directions or giving hints. If you have students that require accommodations, this is the perfect tool to have on tap; however, it may be helpful to think that the accommodations for one student may benefit other students too.


Finally, create your virtual manipulatives. You will need to have an already created PDF, JPG, or PNG file available with your objects. I would recommend using Microsoft Word, Google Docs, or Google Drawings to create your graphic. I created the following in Microsoft Word. Notice how I changed the color of the text and added a picture. This can be helpful for some students to process and categorize information. I saved the document as a PDF and took pictures of each object using the manipulatives feature in Classkick. See my video for more information.


Virtual Morning Meetings with Flipgrid

Morning meetings are an important component of building a strong classroom community. In a virtual environment, it can be difficult to maintain a strong sense of community; however, Google Slides and Flipgrid could offer a good solution.

Need a video? Scroll down to the video below to see this in action! 

What are the Components of Morning Meetings? 

Morning meetings are generally comprised of several different components:

  • Greeting
  • Sharing opportunity for students
  • Group activity
  • Announcements / Teacher Message
Step 1: Create a Slide with Your Meeting Information

I tend to use Google Slides to communicate information; however, you could use PowerPoint, Keynote, etc. to share your agenda or information with students. 


Step 2: Create Your Morning Meeting in Flipgrid

Next, you will want to create a new topic in Flipgrid to create your morning meeting. It may be helpful to title your meeting as the date and set a 1 - 2-minute time limit for students sharing. You will also want to include a description, instructions, and shareable link to Google Slides in your Flipgrid too! 


It may be helpful to use Flipgrid to record a sample video greeting students and explaining how the meeting will work. 


Step 3: Share with Your Students

Finally, you will want to share the link to your FlipGrid with your students. You can do this a variety of ways. If you already have a tool like Google Classroom, Schoology, or another LMS, I would recommend sharing the link directly through that. 


Want to see it in action?  Check out my how-to video: 


Need a tutorial on how to use FlipGrid? Check out my video below:


Have Students Create Their Own Music Through Google Song Maker

Looking for something for your students or your own children to do while they are out of school? Google Songmaker is a great tool for creating your very own music on any device that can access the Internet!

I have to admit that I am not the most musically talented person in the world, but this platform is made easy! When you are finished, you can record and share your music via a link.


This might be a perfect resource to give students something to "create" instead of mindlessly using technology.

Check out a sample song of "Bad Guy" below:


5 Minute Crash Course on Google Classroom

Google Classroom is an excellent platform for virtual learning to take place if you don't already have a learning management system. Is your school using it, but you are unfamiliar with how to use it? No sweat! I have created the following 5-minute crash course on Google Classroom.


Crash Course in Classkick!

Classkick is an excellent interactive tool that you can use for students to type, draw, highlight, and take quizzes. You are in control as a teacher, as you can watch and monitor student progress in real-time through self-grading tools, student feedback tools, and the ability to answer student questions the moment that they happen.
Need a crash course in Classkick? Check out Matt's video below:


6 Minute Crash Course in Flipgrid!

Want to use Flipgrid, but don't know how? Here is a 6 minute tutorial on how to use this powerful video response tool that can be used on any device that has a webcam and Internet connection.


Create Booksnaps with FlipGrid

Booksnaps take a literacy twist to the idea of Snapchat! Students will be using FlipGrid instead of Snapchat for this activity; however, the idea is that they do the following:

Step 1: Take a Picture! 

Have students use their camera to take a picture of a passage from their book. 

Step 2: Create Your Booksnap

Booksnaps should have the following three components:
  • Identify - Highlight or underline a sentence or phrase that stood out to you in the text.
  • Reflect - Add a sentence or phrase with a brief comment on what stood out to you from your highlighted sentence.
  • Graphic - Add a graphic, drawing, or additional photo that represents something about your passage. 

Step 3: Present! 

Record a brief 15 to 30-second video of yourself presenting your booksnap. When you are ready, post to FlipGrid! 

Need a video explanation? Check out Matt's video below:


Create a Booksnap with Seesaw

Booksnaps take a literacy twist to the idea of Snapchat! Students will be using Seesaw instead of Snapchat for this activity; however, the idea is that they do the following:


Step 1: Take a Picture! 
Have students use their camera to take a picture of a passage from their book. 


Step 2: Create Your Booksnap

Booksnaps should have the following three components:
  • Identify - Highlight or underline a sentence or phrase that stood out to you in the text.
  • Reflect - Add a sentence or phrase with a brief comment on what stood out to you from your highlighted sentence.
  • Graphic - Add graphic, drawing, or additional photo that represents something about your passage. 
Step 3: Present! 

Record a brief 30-second video of yourself presenting your book snap. Read the sentence and explaining what it means to you in 30 seconds or less. When you are ready, post to Seesaw! 

Need a video explanation? Check out Matt's video below:


5 Minute Crash Course on Google Classroom

Everywhere I turn, it seems like we are all learning about virtual learning on the fly! I have had several questions from teachers, asking how do I use Google Classroom? Here is a quick 5-minute crash course on getting started with Google Classroom!

Don't Forget About Forms! Create Exit Tickets and Self-Grading Quizzes for Virtual Instruction with Google Forms

Don't forget about Google Forms as a way to assess students for virtual instruction!

Need a refresher on how to create an exit ticket or self-grading quiz? Check this out:


Google Meet: 4 Tips for Teaching Virtually

Many teachers across the country have been forced to teach virtually due to the Coronavirus outbreak. Need some help with establishing protocols and getting started? Here are some quick tips:
  • Tip # 1: Proactively Set Your Expectations for Students
  • Tip # 2: Reduce Distractions
  • Tip # 3: Virtual Learning is Interactive
  • Tip # 4: Image is Everything

Want more of an explanation? Check out my video below: 


Getting to Know the Google Meet Dashboard in 3 Minutes

Class not in session and need a virtual option for working with students? Google Meet might be a good alternative for you, especially if you are a G Suite School.

Need to get up to speed on how to use Google Meet? Here is a 3 minute tutorial on the Google Meet dashboard.


Need an Online Whiteboard for Live or Recorded Instruction? AWW App is a Great Tool

Need a whiteboard option for live or recorded instruction? AWW App may be a good tool for you to use. Whether you need to write your own content (much like Khan Academy videos) or upload a picture, PDF, or PowerPoint, this could be a good tool for you to use.


Need more help? Check out my quick tutorial video here:


Storyline Online: Celebrities Reading Children's Stories

While many schools are closing due to the Coronavirus, many parents and teachers are struggling for things for children to do while they are out of school.


Storyline Online is a free literary resource, where you can listen and watch celebrities reading some of your favorite children's books on your computer or mobile device. The service is free and safely plays videos through YouTube, SchoolTube, or Vimeo.


Not only do celebrities read books, but there is a study guide for parents to facilitate discussion about the book. It is also a great resource for teachers, who may need to facilitate online learning with students.


Create Your Own Custom Maps with the Project Feature in Google Earth

Google Earth recently unveiled a really cool feature called Projects! This feature allows you to create your own custom maps and presentations using the power of Google Earth. Users can add placemarks of existing places, create their own placemarks, add lines or drawings on their map.


The best part is that you can add additional text, custom icons, and embed photos or videos. This is the perfect tool for students to:
  • Map out historical places in Social Studies 
  • Create a tour of the Civil Rights Movement and embed historical video clips and descriptions of key places
  • Show the different settings in a book
  • Outline points along the Great Barrier Reef
  • Mark out distances in math class
  • Showcase cultural areas in the foreign language class
  • Create a guided tour of Rome

Because it is powered by Google, students can share their creations with a link, save their maps in Google Drive, and collaborate with other students on their project!

Want to see how it works? Check out my tutorial below:


10 Tips for Building Better Learning Goals

Goals are not just the foundation; they are the roadmap for effectively planning a UDL lesson. They often serve as a roadmap, providing stud...