Want to see a sample book? Check out this sample!
1. Publish Slides
 If you decide to create an online text, you may want to consider publishing your Slides presentation to the web so that it will function much like an actual book. When you do this, your students will only see only content appearing on slides (not presenter notes) and have the ability to interact with content, such as embedded links and videos. This feature is a great way of sharing presentation, which can be viewed through a browser and not Slides App.
Go to the File Menu > Publish to the Web
2. Embed Videos from Google Drive and YouTube
Videos can be used to supplement student learning. You can easily embed YouTube of Google Drive videos into your Slides. Whether you want to share a video showcasing a movie clip or flipping your classroom, videos can help expand on topics and create an interactive experience.
3. Add Hyperlinks
Have you ever thought about the power of a hyperlink? Hyperlinks are valuable tools for providing scaffolds and supports to help students learn. For example, you may predict several vocabulary terms that students will not understand. To support student learning, you decide to hyperlink to definitions of the terms. Perhaps you are talking about a specific location in the world. Instead of showing a picture, you decide to hyperlink to an interactive map in Google Earth.
4. Add Images
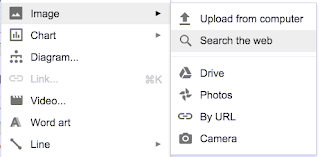
 Images are the perfect tool for helping our visual students understand material; however, textbook companies often use images that don't have much meaning to your specific students. Why not add images from your classroom to your presentation? It may help students make deeper connections to content by uploading personal examples of images from your classroom or using Google Photos, Drive, or your webcam.
If you are having problems finding content, then you may want to search for Google Images in Slides. All images are copyright free and are able to be reused.
5. The Most Up-to-Date Content
The best part of having your own book via Google Slides is that you have the most up-to-date content. You can add current events, links to the latest content, provide real-life examples of content in action. Having the most accurate and up-to-date information makes content relevant and engaging. Once you update content in Google Slides, it will be automatically updated in your published slides.


No comments:
Post a Comment