3 Tricks for Inserting Audio Into Google Slides

Everyone is trying to find new ways of presenting information to students in remote settings. Have you considered inserting audio into your Google Slides presentations? Scroll to the very bottom to check out 3 tricks for inserting audio into Google Slides.

But first, check out how to actually record and embed audio. 


How Do You Insert Audio? 

Step 1: You will want to install the Audio Voice Recorder Chrome extension.

Step 2: Launch Audio Voice Recorder to record content for your slide. Remember, you will need to embed an audio file for each slide that you want audio. if you have four slides needing audio, then you will need four different audio records (1 for each slide).


Step 3: Download your audio clip and save it to your Google Drive.


Step 4: Open up Google Slides and insert your audio file.


Here are 3 tricks for inserting Audio into Google Slides:
  • Your slideshow should be in presentation mode for students to listen to it.
  • If you are worried about students not understanding how to put it in presentation mode, consider publishing your presentation. 
  • Have your audio automatically playing when students arrive on the slide. 
Want to see all of this in action? Check out my video below:


Insert Icons on Seesaw Activities

Did you know that you can add icons to your Seesaw Activities for an extra scaffold and support for students? It's extremely easy to do. Check out my video below:


Do you need a list of all of the available icons that you can add to Seesaw? Check out this awesome article or the list of icons below:


Virtual Teaching Best Practices: Dedicated Question Space in Google Classroom

A best practice in many online courses is to have a dedicated space for students to ask questions and receive responses. It may be helpful to have a discussion question designed for students to ask your questions and where you can provide feedback. Often if one student is confused, there are often other students with similar questions. This dedicated question space can also benefit students who are too shy to ask, because they are able to see your responses to other students. 


Want to see how to do this? Check out my brief tutorial video below:


Google Jamboard

Have you used Google Jamboard? It is a free web application that you can use as an interactive whiteboard. You can access Jamboard through the Apps launcher, visiting Jamboard.google.com, or accessing the iOS or Android App.

With a simplistic interface, Jamboard is easy to use for anyone who would like to try it out! Users have a variety of tools at their disposal, such as:

  • Pen, marker, highlighter tool
  • Eraser
  • Virtual post-it notes (much like Padlet)
  • Upload images
  • Laser pointer

How Can I Use This Tool?

You could easily use this tool live through Google Meet or through a recorded screencast. You can easily share your Jamboard with students, much like a Google Doc or Slideshow, to make it collaborative too. 

Here are some ideas:
  • Solving math problems
  • Marking up text
  • Venn Diagrams
  • Annotating processes
  • Tutoring 

Want to See it in Action? 

Check out my tutorial below: 


Gimkit Takes Learning to the Next Level

I'm really starting to like Gimkit! There are so many great tools out there to assess students, like Kahoot and Quizizz; however, Gimkit takes a different spin on assessment.

It provides a gamified approach, where students earn fake money in order to buy and implement certain strategies, such as increasing point values and throwing a monkey wrench into your competition.

Gimkit can be used as a live game (much like Kahoot) or as an assignment (much like NearPod). Plus there are many accessibility features, which makes it easier for students of all abilities and disabilities. Students learn through repetition and at their own pace!

Want a tutorial on how to use it? Check out my crash course below:


7 Proactive Tips for Keeping Students Safe on Zoom

Zoom has come under fire in many school districts and systems around the world, due to reports of hackers and students viewing inappropriate content. Here are some tips to help you:

1. Enable the Waiting Room

The Waiting Room feature is very helpful because it is much like using a Ring Doorbell. It shows you who would like to enter your room and then you can accept or deny their access.

You can find this by visiting your profile and visiting the Meetings section. This is where you can check this item.


2. Disable Joining Meeting Before Host


It's best to leave the "Enable join before host" box unchecked. This will prevent anyone from joining your room before you. This is a default setting in Zoom.

You can find this by visiting your profile and visiting the Meetings section. This is where you can leave this item unchecked.


3. Require a Meeting Password

To restrict who can and cannot access your Zoom chat, enable passwords. Zoom recently made this a default setting on all Zoom accounts to prevent unauthorized attendees.

You can find this by visiting your profile and visiting the Meetings section. This is where you will find the password.


NOTE: Be careful where you are sharing this password too. If you are sharing this on a school webpage, then anyone can access it. If you are sharing this via Google Classroom, Remind, etc. it limits who will have exposure to this password and your link.


4. Mute Participants Upon Entry

There have been reports of inappropriate comments that have been made by participants. You can use the Mute Participants Upon Entry Tool to mute participants when they come into your classroom. They will have to turn on the microphone in order to talk.

You can find this by visiting your profile and visiting the Meetings section and choose Mute Participants Upon Entry.


5. Turn Off Screen Sharing for Participants

There have been reports of people inappropriately sharing pornographic and inappropriate images via Zoom. How can you remedy this? A simple solution is to open your profile, visit the Settings menu and visit Screensharing. Choose Host Only! This will change your default settings for new meetings and prevent others from sharing their screen by default.


NOTE: It might also be helpful to disable desktop/screen share for users too!


6. Lock Your Meeting 

Lock your meeting once everyone arrives so that you don't have any unwanted visitors. You can do this by:

  •  Click on the Manage Participants tab at the bottom of your screen
  • A side-panel will pop up. Choose More
  • Choose Lock Meeting


7. Remove Users Who Cannot Abide by the Rules

Did you know that you can remove participants who are distracting? You can do this by visiting the Participants Panel at the bottom of your screen.
  • If the Participants panel is not visible, click Manage Participants at the bottom of the Zoom window.
  • Next to the person, you want to remove, click More.
  • From the list that appears, click Remove.


Stop the Madness! Keep Your Kiddos Organized with Google Keep

Everyone and I mean EVERYONE is turning to online learning in K - 12 education right now. It's tough enough for our teachers, but what about our students? My daughter is in middle school and she has 8 different subjects, 8 different teachers, 3 different learning platforms, and 4 different ways she receives information about her assignments. It's insane and hard enough for parents to stay organized!


Google Keep is a helpful tool to help your student (or child) keep all of their assignments organized and check-off completed assignments as they occur. Here is a quick video on how it works:


Screen Recording on an iPad! Plus 2 Visual Tools to Help You Reach Students

Need to screen record on an iPad? It's very simple to do. Check out my brief video on how!


Here are some additional tools that you might want to use to enhance your screencast!

1. Keynote - use the drawing tools in Apple's version of PowerPoint, to make your iPad a whiteboard!

2. Photos - use the editing tool in photos to annotate pictures. For example, why not take a picture of a worksheet or text and annotate it?

How You Use Topics in Google Classroom Could Impact Your Sanity!

If you are like many teachers that I am working with, you are trying to adapt to the new online style of learning that most schools are going towards. If you are a Google Classroom user, simple tips and tricks can mean the difference between increased or decreased frustration.

Many teachers that I am working with are saying that using topics to organize content by the date is making life so much easier!

Here is how it works:

Step 1: Visit the Classwork Section of Google Classroom

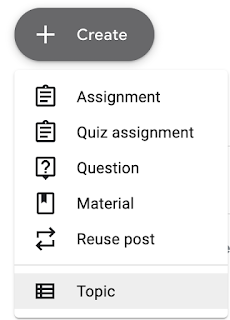
Step 2: Choose the Create button and select "Topic"

Topic are used to organize your content in the Classwork section of Google Classroom.

Step 3: Give Your Topic a Name!

Many teachers use labels to organize by chapter, unit, topic; however, it may be a good idea to organize content by date. This will help reduce any confusion for students.


Step 4: Drag and Drop Your Assignments and Content

Last but not least, you should drag and drop any assignments, materials, etc. underneath your label! This will help everyone stay on the same page.


10-Minute Crash Course on Edpuzzle

Edpuzzle is a great way to create interactive video experiences for students. You can easily embed discussion questions, open-ended questions, and other interactive resources like links, notes, and voice-overs.

It is easy to set-up and works very well if you have an existing Google account. Check out my 10-minute crash course on using Edpuzzle.


10 Tips for Building Better Learning Goals

Goals are not just the foundation; they are the roadmap for effectively planning a UDL lesson. They often serve as a roadmap, providing stud...