Check out my video below for more:

Are You Blockbuster or Netflix? Understanding Blended Learning Through Movies and Water
Do you take a Blockbuster or Netflix approach to education? It's a very important question to ask because it reveals your "why." When you understand your "why," you can begin to understand the need for personalized instruction in your classroom. Blended learning may be a great tool to inspire and adapt to the changing needs of our students.
Check out my video below for more:
Check out my video below for more:
Flip Learning with Flipgrid
Flipgrid is an amazing free tool to provide students with a voice in your classroom! Even the quietest student has a voice in this application.
Basic Terminology
The App is made up of grids and topics. Grids can be defined as a community where all of your topics are housed. For example, you might want to create a Period 1 grid, where all of your topics (discussion topics) are housed. Topics are discussion topics that you want your students to discuss via Flipgrid.
How Does It Work?
Step 1: Create a Flipgrid Account
First, you will want to visit Flipgrid and sign up for a free account!

Step 2: Create a Grid
Next, you will want to visit Grids to create your first grid or community. For example, you might want to create a grid for each of your different classes, homerooms, etc. When you create a grid, you will also want to decide how you want students to enroll in your grid.


Step 3: Create a Topic
Then, you will want to post a Topic or discussion topic for students to respond to. To customize the topic to the needs of your students, there are several different sections to help customize your assignment. When you are ready to post your topic, choose create.
The Topic Details section is where you can provide important details about your assignment, adjust the video response time from 15 seconds to five minutes, and decide when your topic should post.


Step 4: Have Students Join
 You can share your grid a variety of different ways, such as giving students a URL, code, or scan a QR Code.
If you chose a grid that requires users to be a part of your school domain, your students will be required to login with their Microsoft or Google accounts.
If you chose a grid that requires a Student ID list, students can login using a QR Code or entering in their unique identifier.

If you choose the PLC and Public Grid option, you can share your URL with others. In order to participate in the grid, you will need to have a Microsoft or Google account.

How Does It Meet Needs?
Learners need flexible options for participating in learning because not every student learns the same way. Some of our students could excel through verbal discussion, while others may not. Some of our students are shy by nature and this platform can provide students with a "voice" without the social pressure associated with participating in class.
Basic Terminology
The App is made up of grids and topics. Grids can be defined as a community where all of your topics are housed. For example, you might want to create a Period 1 grid, where all of your topics (discussion topics) are housed. Topics are discussion topics that you want your students to discuss via Flipgrid.
How Does It Work?
Step 1: Create a Flipgrid Account
First, you will want to visit Flipgrid and sign up for a free account!

Step 2: Create a Grid
Next, you will want to visit Grids to create your first grid or community. For example, you might want to create a grid for each of your different classes, homerooms, etc. When you create a grid, you will also want to decide how you want students to enroll in your grid.

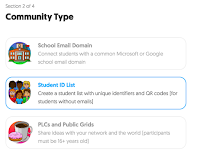
- School Email Domain - if you students have Microsoft or G Suite accounts, they can use their email address to get in. Only students with the same domain (usually after the @ in an email address) can login to your class.
- Student ID List - you can manually enter in the names of students. You will need to include their first and last name. You will also need to include an identifier, which acts like a username / password to log students into your grid. It also provides you with a unique QR code to login via the mobile application. This is a helpful tool for elementary students.

- PLC's and Public Grids - are great ways to collaborator with colleagues and lead professional development.
Step 3: Create a Topic
Then, you will want to post a Topic or discussion topic for students to respond to. To customize the topic to the needs of your students, there are several different sections to help customize your assignment. When you are ready to post your topic, choose create.
The Topic Details section is where you can provide important details about your assignment, adjust the video response time from 15 seconds to five minutes, and decide when your topic should post.

The Topic Privacy section is useful if you want to moderate student responses before student videos are posted.

Use the Topic Resource and Attachment sections to add helpful resources like links, documents, videos, and emojis to your topics.

The Video Features and Feedback sections help create another layer of customization in how videos are presented and how students respond.
Step 4: Have Students Join
 You can share your grid a variety of different ways, such as giving students a URL, code, or scan a QR Code.
If you chose a grid that requires users to be a part of your school domain, your students will be required to login with their Microsoft or Google accounts.
If you chose a grid that requires a Student ID list, students can login using a QR Code or entering in their unique identifier.

If you choose the PLC and Public Grid option, you can share your URL with others. In order to participate in the grid, you will need to have a Microsoft or Google account.

How Does It Meet Needs?
Learners need flexible options for participating in learning because not every student learns the same way. Some of our students could excel through verbal discussion, while others may not. Some of our students are shy by nature and this platform can provide students with a "voice" without the social pressure associated with participating in class.
Easily Share Open Tabs with OneTab
I'm all about simplicity. Sometimes my keep it simple attitude is tested when I find myself multitasking or sharing multiple resources. I was contacted by someone the other day who wanted me to share several URL's to resources.
I have to admit that I was dragging my feet a little because of the effort that it required. Then I remembered a great Chrome Extension called OneTab, which takes all of my open tabs and makes them into an easy to share webpage.

How Does It Work?
First, install the OneTab Chrome Extension.
 Next, open up all of the tabs that you would like to share. Click on the One Tab Chrome Extension icon to save all of your tabs.
One Tab takes all of your open URL's and saves them. You have a variety of ways to use One Tab.

I have to admit that I was dragging my feet a little because of the effort that it required. Then I remembered a great Chrome Extension called OneTab, which takes all of my open tabs and makes them into an easy to share webpage.

How Does It Work?
First, install the OneTab Chrome Extension.

One Tab takes all of your open URL's and saves them. You have a variety of ways to use One Tab.

- Restore all will open up all of your URL's on your screen.
- Delete all will delete your URL's
- Share as a Webpage will allow you to share all of your links via a webpage or QR Code. This is what I did in the example that I described earlier.
Seesaw: Addressing Student Variability One Post at a Time
What Makes Seesaw Great?
First, Brain research is crystal clear that learner variability is the rule and not the exception. Students are very different in how they learn and interact with the world around them.
Seesaw provides students with options for engagement and expressing knowledge. Students can type our a response in a note, share a picture or video, add a drawing or annotate a picture, and add a link to another resource.

Next, teachers have all of the control with how content is posted in Seesaw. Teachers need to approve a student comment or piece of content before it is made visible in Seesaw. Safety is a key feature that makes this tool extremely helpful! This is extremely helpful when working with students under the age of 13.
Families can easily connect with your classroom in Seesaw, only seeing their child's content. If their child posts something, they can get a notification in realtime.
Finally, Seesaw can be accessed on a variety of devices. Whether you have iPads, Chromebooks, or laptops, you can access Seesaw with your students!
Not only can it be accessed on a variety of devices, but it also has additional features that can help safely address variability in the classroom! You might want to check out the Activities and Blogging features too!
Ramp Up for 2018-19 with Class Dojo's Toolkit
 I have to admit that it's been awhile since I have checked out Class Dojo. I recently checked it out again and noticed some teacher-friendly tools that could be very useful for teachers this upcoming school year.
Check out Class Dojo's Toolkit, which contains all sorts of helpful features such as:
- Timer
- Group Maker
- Noise Meter
For instance, have you ever had students that had no idea how loud they were? Class Dojo has a feature called Noise Meter that can help you control the volume level in your classroom. Whether you are using the App or the website, you can use your device's microphone to help monitor your students.

How often do you want students to work on a task for five minutes, which suddenly becomes fifteen minutes? The timer feature is another helpful tool to keep your students and yourself on task.

Want a tool to create random groups? Class Dojo's Group Maker tool makes it easy to create random groups. Simply say how many students you want per group and Class Dojo does the rest!

Subscribe to:
Posts (Atom)
New Learn Lead Grow Home!
Hello readers! Happy New Year! It’s hard to believe that 15 years have passed since I launched my Learn Lead Grow blog. As we step into a n...

-
 Hello readers! Happy New Year! It’s hard to believe that 15 years have passed since I launched my Learn Lead Grow blog. As we step into a n...
 -
 I am a big fan of Eduprotocols. If you are not familiar with this innovative and engaging way of infusing technology and pedagogy together, ...
 -
 Whether you are planning a face-to-face lesson or remote learning experience, it is important to design learning experiences with accessibil...