Creating Engaging Google Docs Activities with Dropdown Menus and Emoji Reactions

Have you seen some of the new features in Google Docs lately? I have seen a lot of ideas swirling around on social media about using the Dropdown menu and Emoji Reactions features on Google Docs. One of my favorites is a Cloze Reading activity by Eric Curts. If you haven't seen this, you should totally check it out! 

If you are not familiar with these features, here is a brief overview. 

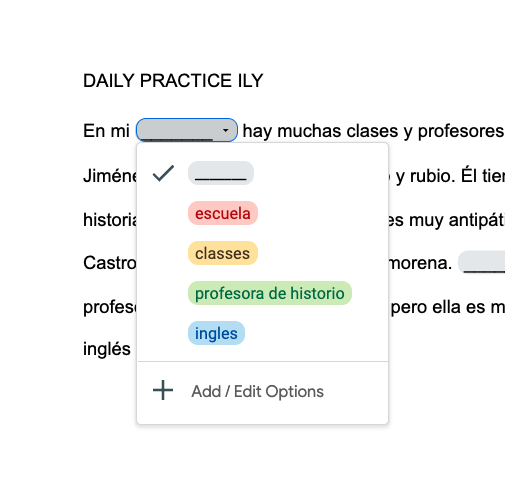
  • The Dropdown feature is a great way of providing students with scaffolds and support for correct terms, numbers, symbols, etc. I decided to take the plunge and see how this could be applied in the foreign language (or any) classroom. Here is an example of this in action: 

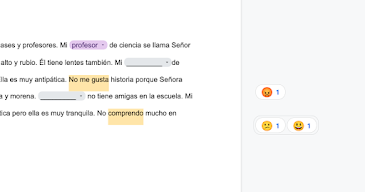
  • The Emoji Reactions feature is a great way for checking for understanding! Emojis could be used to demonstrate understanding of a term, analyze the emotional state of a character, or summarize a paragraph. The best part is that this feature has a collaborative component. In other words, you could ask students to work in groups and have each member add their own Emoji reaction to


I thought about how I could combine both of these features into an engaging and rigorous activity for a colleague's Spanish class.  Check out my video below for how I did it: 


Matt Bergman (2022)


Amazing Google Lens Trick! Copy Printed Text with Your Phone and Paste in Google Docs on Another Device

Did you know that you can use the Google Search App on your phone to scan, copy, and even translate a printed text on another device? You can literally scan a printed text from your phone and send it to your laptop with a few taps. This is a game-changer if you want to Universally Design your classroom and make printed text more accessible to ALL students!  

Printed Text Limitations

We know that learners differ in how they interact and perceive different media and printed text does have several limitations. First, you are limited in how you can manipulate and interact with printed text. For instance, you cannot change the font size or style. Secondly, hyperlinks to additional resources and tools cannot be embedded in printed documents. Finally, printed text does not have built-in speech-to-text tools. 


Educators are sometimes limited by budgets and resources, creating barriers to creating accessible learning environments. This simple trick is free and how students learn in your classroom! 

How Does It Work? 


Here is a brief tutorial on copying text, pasting it into Google Docs, and changing the font to Lexend.


Extreme Makeover UDL Edition! Making a Self-Pace Google Slides Activity Accessible and Even Better!

I recently saw an awesome self-paced activity using Google Slides by the Sprinktop Teacher! It was engaging and well designed. As someone constantly thinking about the importance of design and accessibility, I thought..."how could I make this amazing activity even more amazing and accessible for ALL students?" 

UDL Makeover: Making An Amazing Activity Even More Amazing and Accessible 

Check out my video below to learn:

1. How to create your own self-directed slides in Google Slides

2. How to make your activity accessible

  • Making your fonts more accessible with Lexend
  • Publishing your presentation and providing a QR-code generated from Chrome


 Conclusion

When we identify high-probability barriers to accessing learning activities and design with accessible options in mind, we can create highly engaging learning activities for all students. Check out more about the UDL framework and Matt's Lesson Planning with a POP framework below:


Making Reading Accessible Through Lexend

Researchers have found that reading fluency is one of the factors that distinguishes good readers from poor readers; however, many of our students and even adults struggle with reading throughout their careers. In fact, according to the US Department of Education, over 70% of the population struggles with some form of reading difficulty. 

What if the problem was more than fluency and literacy? 

In 2001, Dr. Bonnie Shaver-Troup discovered and designed a new font called Lexend to reduce visual stress and improve reading performance for struggling readers and those with dyslexia.


Shaver-Troup found that the Lexend not only makes reading more for struggling readers and those with dyslexia, it actually benefits ALL readers. Researchers have found some powerful evidence for Lexend:

  • Reading fluency is calculated to find the correct number of words spoken per minute. Researchers discovered that 90% of readers had better fluency scores with Lexend font than Times New Roman. 
  • Reading fluency performance improved by 19.8% for readers using Lexend versus Times New Roman

Lexend is an example of how design is an important aspect of teaching and learning. We can make reading assignments more accessible for our students by changing the font!

How Can I Use Lexend in Chrome and G Suite?  

Check out the following website for Lexend to find out more information. 

If you would like to add Lexend to Google Chrome, I recommend checking out the following Chrome Extensions HelperBird and ReaderMode

Adding Lexend to G Suite (Docs, Slides, Sheets, etc.) is very easy! Check out the following video on how to do it: 


10 Tips for Building Better Learning Goals

Goals are not just the foundation; they are the roadmap for effectively planning a UDL lesson. They often serve as a roadmap, providing stud...