FlipGrid makes it easy for you to record video instructions, share resources, hyperlink to important resources and tools, emphasize key points, and increase student accountability. Learn how to do that, as well as some tools for making your plans accessible to students, your sub, other teachers, and parents!

Learning Shouldn't Stop When You are Sick: Use FlipGrid for Sub Plans
Learning shouldn't have to stop when you are sick! Why not use FlipGrid to house your sub plans?
FlipGrid makes it easy for you to record video instructions, share resources, hyperlink to important resources and tools, emphasize key points, and increase student accountability. Learn how to do that, as well as some tools for making your plans accessible to students, your sub, other teachers, and parents!
FlipGrid makes it easy for you to record video instructions, share resources, hyperlink to important resources and tools, emphasize key points, and increase student accountability. Learn how to do that, as well as some tools for making your plans accessible to students, your sub, other teachers, and parents!
Make FlipGrid Accessible for ALL with the Immersive Reader Feature
Accessibility begins with proactive design, which is designed for some, but beneficial for ALL! I love FlipGrid's immersive reader tool, which provides users with several amazing accessibility features!
 1. Text-to-Speech Capabilities
The text-to-speech capabilities when reading instructions or discussion prompts. This is the perfect tool for struggling readers, ELL students, or students who like to "hear" instructions.
2. Change Font Features
FlipGrid provides you with the ability to increase change font, font size, and the color of the font to make it easier to see for students with visual difficulties or need visual modifications.
3. Break Down Parts of Speech
Want to break things down by parts of speech? FlipGrid provides a color-coded tool to break down parts of speech by verb, noun, adjective, etc.

4. Line Focus
The line focus tool magnifies text one line at a time so that students can concentrate on the text. There is also a visual dictionary tool, which provides extra layers of scaffolds and supports for unfamiliar words. Plus there is the ability to translate the document into different languages.

Want to see it in action? Check out my video below:
FlipGrid's Whiteboard Feature!
I love FlipGrid's whiteboard feature, which has been out for a few months now. This makes it much easier for students to demonstrate their understanding in any classroom; however, it is extremely helpful in the math classroom. Want to see how it works? Check out my video below:
Increase Student Engagement During the Holidays with a 30 Second Book Talk Challenge
December is here and many of our students are already ready for another break! How can you use FlipGrid to inspire students to stay engaged during the holidays?
Here is an awesome idea that I have found from the Barrow Media Center blog. It's a 30-second book talk challenge! I absolutely love how this blog post took a basic idea of making a book talk and turning it into a competition!
30-seconds might not sound like a lot of time, but it is perfect for getting students to plan out their ideas and share key points in a succinct and efficient way. I created the following video, taking this amazing idea and adding a few customizations to work for my school. Check this out!
New to FlipGrid? Check out how to use FlipGrid in less than 5 minutes:
Self-Regulation with G Suite: Tools to Create Daily Check-Ins
With so much emphasis on self-regulation and understanding emotions in today's classrooms, it can be difficult to find a system that works best for you. Self-regulation involves understanding, managing, and acting or not acting upon one's emotions.
Having your students "check-in" and share how they are feeling is a great way of developing important socio-emotional learning skills. There are a variety of tools and strategies to use, but here is a quick way to use Google Forms to gauge the emotional temperature in your room.
Check out my video on how to do this:
How Do I Do This?
Step 1: Create a Google Form
First, create a Google Form with questions aimed at helping students check-in. You might want to think about:
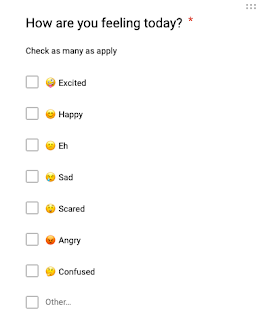
To make things simple, I created the following Google Form with an emoji check-in.
Step 2: Add Emojis for Flair
Want to add an additional flair for your questions? You might want to consider using the Emoji Keyboard Chrome Extensions.

Here's a quick tip! Add emojis BEFORE your text, which serves as a placeholder. If you try ending your emoji after your text, it sometimes disappears.
Step 3: Gather Your Data!
I love adding emojis because they download to the spreadsheet, which collects your data. This makes data collection more visual!

Having your students "check-in" and share how they are feeling is a great way of developing important socio-emotional learning skills. There are a variety of tools and strategies to use, but here is a quick way to use Google Forms to gauge the emotional temperature in your room.
Check out my video on how to do this:
How Do I Do This?

Step 1: Create a Google Form
First, create a Google Form with questions aimed at helping students check-in. You might want to think about:
- How are you feeling today?
- Why do you feel this way?
- What is a goal you have for today?
To make things simple, I created the following Google Form with an emoji check-in.
Step 2: Add Emojis for Flair
Want to add an additional flair for your questions? You might want to consider using the Emoji Keyboard Chrome Extensions.
Here's a quick tip! Add emojis BEFORE your text, which serves as a placeholder. If you try ending your emoji after your text, it sometimes disappears.
Step 3: Gather Your Data!
I love adding emojis because they download to the spreadsheet, which collects your data. This makes data collection more visual!

Paper Cubes, FlipGrid and Amazing Discussion!
If you are looking to create an engaging way to facilitate small group discussion, while still keeping students accountable. You might want to consider using Flipgrid, QR Codes, and a paper cube. Check out my video at the bottom of this post on how to do this!
 Step 1: FlipGrid
First, you will want to create a grid in FlipGrid. This is where all of your topics or discussion questions will be housed.
Step 2: Create Your Topics on FlipGrid and Google Drawings Template
Next, you will want to create six different topics in FlipGrid. You may find it helpful to record a video of yourself giving instructions. Once it is published, you will want to copy and paste the QR Code into the following template. I created this template using Google Drawings!
Step 3: Create Your Cube
Then you will want to print out your cube, cut out, and assemble with tape. NOTE: If you want to use a low-tech version of this activity, you can use text boxes to type in questions instead.
Step 4: Discussion Time!
Finally, have your students roll the cubes and scan the QR codes with FlipGrid. When they scan the QR Code, they will see your video and then have the opportunity to respond.
Learn how to do this in the video below:
21 Things 4 Students By REMC Association of Michigan
I'm always looking for tools and resources to keep students safe online. I recently came across 21 Things 4 Students by REMC. This is a great resource for students in upper elementary and middle school on various topics like digital citizenship, safe searching, STEM, and even career choices!
2 Tips to Make Your Gmail Use Efficient: Create Templates (or Canned Responses) and Schedule Send
Are you a Gmail user? I am always looking for quick ways to make my life easier and more efficient. Here are two tips for Gmail users!
Check out my video or read below:
1. Create Templates
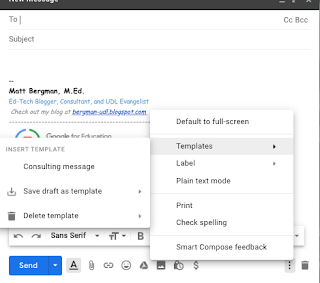
Do you have frequently used canned responses? Creating a template in Gmail is an easy way to create canned responses for frequently used responses. How does it work?
1. Compose your message in Gmail
2. Choose the three dots in the bottom-right corner of your message.
3. Choose Templates and save your template!
When you are ready to use your response, follow steps 1 - 2, choose Templates and select the name of your template.
2. Schedule Sending a Message
Do you want to schedule sending out a message at a specific time or day? You can do this in Gmail too!
1. Compose your message and choose whom you will send your message to
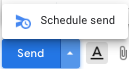
2. Choose the drop-down arrow next to the Send button in Gmail
3. Choose Schedule Send and select the date / time you would like to send your message
Check out my video or read below:
1. Create Templates

Do you have frequently used canned responses? Creating a template in Gmail is an easy way to create canned responses for frequently used responses. How does it work?
1. Compose your message in Gmail
2. Choose the three dots in the bottom-right corner of your message.
3. Choose Templates and save your template!
When you are ready to use your response, follow steps 1 - 2, choose Templates and select the name of your template.
2. Schedule Sending a Message
Do you want to schedule sending out a message at a specific time or day? You can do this in Gmail too!
1. Compose your message and choose whom you will send your message to
2. Choose the drop-down arrow next to the Send button in Gmail
3. Choose Schedule Send and select the date / time you would like to send your message
Classroom Management Checklists with Google Sheets and Checkboxes
 The sheer number of things that most teachers have to manage on a daily basis is insane!
Did you get that permission slip? Did you follow your principal's new initiative to call each student's parents before Thanksgiving? Did each of your students get a book for their upcoming book report?
Google Sheets and checkboxes are a great way to keep everyone informed and organized! Learn how to create a simple spreadsheet with checkboxes below:
Do you like this resource? Click here for your own copy!
Take Your FlipGrid Use to a New Level with the Whiteboard Feature
If you are a fan of FlipGrid, then you might have heard about its recent addition of a built-in whiteboard, which makes it perfect for math, drawing, and problem-solving. We know that students need different ways to show what they know and this is a great way to provide students with hands-on learning opportunities!
How does it work? Check out my helpful video tutorial below:
How does it work? Check out my helpful video tutorial below:
Book Creator's Auto Pen Feature is Great for ALL Abilities
Are you a Book Creator user on iOS?
If you are, then you know that you can add a variety of media to your books, such as images, videos, audio, drawings, and text.
However, what if you are not the best artist? Now there is a built-in Book Creator tool called the Auto Pen. It helps struggling artists or someone who wants things to look a little more professional. Check out how to use it below.
Google Docs Version History as a Classroom Management Strategy
Although it is nothing new to learning, you probably know that many of our students use Google Docs as a way to chat with one another during the day. Collaboration can be a good thing, but it can also be a distraction too. It’s probably a good idea to periodically monitor and talk to students about your expectations of their use of Google Docs.
I developed the following video (2 minutes) for you in case you want to remind students how everything is done on a Google Doc can be seen. The video shows how to use Version History to see everything that was ever done on a document. This can be a helpful tool to have in your toolbelt of classroom management strategies.
NOTE: Version History can only be accessed on a computer or Chromebook. If you are interested in seeing a student’s Version History, just share the document to Google account and access it via a computer.
I developed the following video (2 minutes) for you in case you want to remind students how everything is done on a Google Doc can be seen. The video shows how to use Version History to see everything that was ever done on a document. This can be a helpful tool to have in your toolbelt of classroom management strategies.
Use Google Keep to Create Collaborative Checklists and Reminders Based on Location
Have you ever considered using Google Keep as a tool for students to set goals, monitor progress, create to-do lists, or set up reminders? Here are some creative ways to help students stay organized using Google Keep:
1. Create Checklists
Do you incorporate Project-Based Learning in your classroom? Creating checklists is an extremely helpful scaffolding tool for setting goals or creating checklists. Simply create a new list, click on the three vertical dots, and show checkboxes!

Checklists are extremely helpful for dividing up tasks, creating grocery lists, or creating goals for the week.
2. Collaborate with Others
Did you know that your notes in Google Keep can be shared with others? Simply, click on the collaborator icon and choose who you want to share your note with. This is the perfect tool for sharing ideas, tasks, links, and notes for completing group projects.


Setting goals and measuring progress is an important way for our students to develop important executive functioning skills. Google Keep could be a great tool for students to aid in collaboration, setting goals, and developing checklists.
1. Create Checklists
Do you incorporate Project-Based Learning in your classroom? Creating checklists is an extremely helpful scaffolding tool for setting goals or creating checklists. Simply create a new list, click on the three vertical dots, and show checkboxes!

Checklists are extremely helpful for dividing up tasks, creating grocery lists, or creating goals for the week.
2. Collaborate with Others
Did you know that your notes in Google Keep can be shared with others? Simply, click on the collaborator icon and choose who you want to share your note with. This is the perfect tool for sharing ideas, tasks, links, and notes for completing group projects.

3. Set-Up Reminders Based on Location or Time
Did you know that you can set up reminders for Google Keep based on a date or a particular location? This could be helpful for completing assignments. Perhaps students who struggle with completing homework need a reminder when they get home. Perhaps you need to remind students to complete the final phase of their project next week. Reminders are a great way to do it!

Conclusion
Setting goals and measuring progress is an important way for our students to develop important executive functioning skills. Google Keep could be a great tool for students to aid in collaboration, setting goals, and developing checklists.
3 Visual Learning Google Keep Tools
How often do you use Google Keep? I have to admit, I don't have as much time or experience using Google Keep as I would like to. Therefore, I have decided to dedicate my next few posts on how you can use Google Keep inside and outside of the classroom.
What is Google Keep?
First of all, what is Google Keep? If you are not familiar with this tool, it is a digital notepad, where you organized and add digital notes, checklists, drawings, and images. You can access Google Keep via the web or a smart device, like a phone or iPad.
Here are three helpful features for using Google Keep to represent content visually.
1. Labels
Do you use hashtags on social media? Labels are very similar, in the sense that they help categorize your notes by subject or keyword. The best part is that you can filter your notes by the labels that you use. Organize your research by keywords, so that you can filter out unnecessary notes.

2. Note with Drawings
If you are a visual learner, who needs to draw out a concept or illustrate an idea, this feature is for you. Add single or multiple drawings to your note. Plus you can add additional text and/or links describing your content.

3. Note with a Picture
 Do you have a picture of an idea? Google Keep lets you attach a single image to your note. You can add additional text and/or links describing your content.
Bonus Tool! Grab Text from Image
The Grabe Text from Image feature is a really neat way of using technology to "read" and search for text within your drawing or image. Here's how it works. Google uses Artificial Intelligence to look for content within your pictures. Once it finds it, it places content in the notes section of your note.
Sorting Activities with Post-It Plus
 Throughout my career in the classroom, I have found it highly effective to provide students with opportunities to predict content and information. Sorting activities provide students with a certain amount of rigor and relevance to create engaging learning environments.
Want to provide students with an easy, yet highly engaging activity? Why not write down characteristics on post-it notes and have students use the Post-It Plus iOS App to scan, sort, and edit content.
This is a great way for students to recognize patterns, make connections with content, analyze background knowledge, and build upon new knowledge.
Want to see this in action? Check out my video below on how this might work with characterizing mammals and reptiles:
Creating and Sharing a TIP Vocabulary Chart in Google Sheets
Vocabulary is an essential component of learning; however, many of our students struggle with understanding vocabulary terms. A lack of background experience often creates barriers to learning new vocabulary terms. How can we provide our students with effective ways to access and understand new vocabulary terms?
What is the TIP Chart?
In her book, Learning the Fast Lane, author Suzie Pepper Rollins describes a vocabulary method called a TIP Chart, which stands for:

What is the TIP Chart?
In her book, Learning the Fast Lane, author Suzie Pepper Rollins describes a vocabulary method called a TIP Chart, which stands for:
- Term
- Information
- Picture
Using a TIP Chart provides students with multiple means of representing vocabulary terms so that students have the foundational knowledge and experiences to understand terms. Here's an example of the term bridge:

Make Your TIP Chart Interactive!
I like the idea of using a TIP Chart to help students learn important terms. Here are some suggestions to make it even better!
1. Make an electronic version of a TIP Chart in Google Docs, Slides, or Sheets. This will allow students to have access to it inside and outside of the classroom. If we want students to use vocabulary outside of the classroom, then we need to provide ways for them to access terms. Using technology is a great way to make it portable.
2. Share Your TIP Chart with a QR Code, shortened URL, or post it to your Google Classroom. The idea is to provide students with access.
3. Add links to additional videos and websites to provide different exposures to the term. Sites like YouTube, YouTube 360, Flocabulary and Quizlet provide students with great visuals and videos to better understand terms.
Creating and Sharing a TIP Chart in Google Sheets
Want to see how I created mine in Google Sheets? Check out my video below:
Google Docs Quick Create Chrome Extension
It's often the little things that get overlooked! That's why I would love to share a quick and easy Chrome Extension called Google Docs Quick Create.
Use this extension to quickly create a new Google Doc, Sheet, Slides presentation, Drawing, or Form. It is a great way to save time and effort for students and teachers alike.
How Does It Work?


It's that easy!
Benefits
There are so many benefits. First, it is extremely easy to use and install. Secondly, it could be a great way to provide an extra layer of support for teachers, who may struggle with navigating through G Suite. Finally, it helps save time. Students and teachers can quickly create new documents with the click of a button.
Use this extension to quickly create a new Google Doc, Sheet, Slides presentation, Drawing, or Form. It is a great way to save time and effort for students and teachers alike.
How Does It Work?

- Then, click on the Chrome Extension icon and choose which type of Google App that you want to use. Once you click on the application that you would like to use, a brand new Doc, Sheet, Slide, Drawing, or Form appears.
It's that easy!
Benefits
There are so many benefits. First, it is extremely easy to use and install. Secondly, it could be a great way to provide an extra layer of support for teachers, who may struggle with navigating through G Suite. Finally, it helps save time. Students and teachers can quickly create new documents with the click of a button.
Are You Accidentally Oversharing When You Take a Picture?
Are you sharing too much information when you take a picture? You might want to consider taking off the geotagging feature on your iPhone or iPad. Geotagging allows someone to see the location of where you took your picture, the date, and time. This could be a dangerous scenario for your students, family, and yourself.
Learn how to turn this feature off in less than 2 minutes:
Learn how to turn this feature off in less than 2 minutes:
Use QuickTime to Green-Screen!
Over the past week, I have shared different ways to use green-screening with iMovie on your Mac or iPad. Have you ever thought of using QuickTime as another green-screening tool? Check out how you can use it in the video below:
Giving Students the Power to Green Screen with an iPad and iMovie
Did you know that you can record a green screen video with just an iPad and iMovie?
This is a great feature that many teachers do not realize exists! Many devices already have iMovie preloaded, which makes it extremely easy to access and a powerful way to create a video. The following video shows you how easy it is for students to create their own green screen videos!
This is a great feature that many teachers do not realize exists! Many devices already have iMovie preloaded, which makes it extremely easy to access and a powerful way to create a video. The following video shows you how easy it is for students to create their own green screen videos!
Don't have an iPad or iPhone? Check out the following tutorial on how to use your MacBook instead!
Green Screen with iMovie on Your MacBook
Green screening is a simple, yet amazing way, to take video production to the next level.
The technique involves recording video with a solid green or blue background. Then replacing that green or blue background with an image or video.
If you have a MacBook, then you can easily use its free iMovie software to record and produce a green screen video within minutes. Want to learn how? Check out this quick tutorial:
How to Make an Interactive Worksheet or Timeline in Google Drawings?
Want to take your Google Drawings skills to the next level? Check out my brief video on how to create an interactive worksheet or timeline using Google Drawings.
Need a Review on Creating a Quiz in Google Forms?
Need a review in creating a quiz in Google Forms? Here is a quick tutorial to help you get started!
Get Rid of Distractions with the Just Read Extension!
It doesn't take too long to get distracted while reading on the Internet. You are browsing through Twitter and find an amazing blog post, only to get distracted by the Amazon advertisement for that product you have been looking at.
Perhaps you want students to read an article and avoid those distracting ads or links. You can now get rid of these distractions on your Chrome Browser using the Just Read Chrome Extension.
How Does It Work?
First, install Just Read from the Chrome Store.
Then, open up any website of your choice and select the Just Read extension.
Next, Just Read will open a new window containing your webpage. Use the tools in the top-right corner of your screen to create a custom version of your website.

Conclusion
In a highly distracting online environment, Just Read is an excellent tool to help students (and adults) self regulate and focus on reading content online without the distractions.
Perhaps you want students to read an article and avoid those distracting ads or links. You can now get rid of these distractions on your Chrome Browser using the Just Read Chrome Extension.
How Does It Work?
First, install Just Read from the Chrome Store.
 |
| Source: Just Read (2019) |
Next, Just Read will open a new window containing your webpage. Use the tools in the top-right corner of your screen to create a custom version of your website.
- Use the trash can icon to delete advertisements, links, images, text, and any other distractions.
- Use the pencil icon to customize the appearance of text, font color, and text size.
- Use the printer icon to print out your customized page or save as a PDF on a Mac.
Want More Information?
Check out this helpful video created by Just Read.
Conclusion
In a highly distracting online environment, Just Read is an excellent tool to help students (and adults) self regulate and focus on reading content online without the distractions.
Add a Logo to Your QR Codes with QR-Monkey
 QR Codes are very useful in education - especially with the number of mobile devices in today's classrooms. Although QR Codes are helpful, they sometimes get lost in the shuffle because we don't know where they go.
Creating a custom QR Code - with a logo or image inside of it could be a good solution. You can easily upload any image or logo to help students (and even colleagues) to help your audience understand the purpose of the code.
QR-Monkey is a great tool to do so. Check out my brief tutorial on how it works!
Increase Accessibility to Google Slides with Closed Captioning Feature
Google Slides introduced a Closed Captioning feature to make presentations more accessible for all students. Whether you have students who are hearing impaired, English language learners, or just need to see what you are saying, this tool is easy to use and very helpful!
How Does It Work?
First, put your presentation into presentation mode.
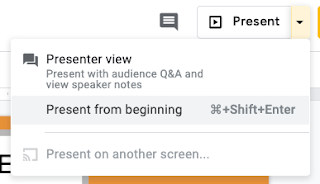
Second, move your cursor to the bottom-left corner of your screen to access a variety of presentation tools.

Next, allow Google Slides to have access to your device's camera.
Finally, start speaking and Google Slides will automatically take spoken language and convert it to closed captioning. Check out my sample below!

Schedule Feature in Gmail
Gmail just launched a new feature to make your life easier and more efficient! You now have the ability to schedule when you send email messages.
How Does It Work?
Step 1: Open up Gmail and compose a message.
Step 2: Look for the "Send" button in the bottom left-corner of your screen. Click on the drop-down arrow and choose "Schedule Send"

Step 3: Choose when you want to send your email and Gmail will do the rest!

How Does It Work?
Step 1: Open up Gmail and compose a message.
Step 2: Look for the "Send" button in the bottom left-corner of your screen. Click on the drop-down arrow and choose "Schedule Send"

Step 3: Choose when you want to send your email and Gmail will do the rest!

Changing the Writing Process with Google Classroom
How does the writing process typically work in many classrooms? Students are assigned a writing piece, they may write a draft, turn in their final copy, and get feedback a week or two later.
Google Classroom as a Solution
What if there was a better way to give students feedback? Google Classroom makes the writing process much easier! Here's how it works:
1. Create an assignment in Google Classroom
2. Have students open the assignment and attach their Google Doc (DO NOT hit "Turn In")
3. Have students complete the assignment. While students are working on their assignment, you can open up their Doc and see what they are doing in real-time. Add feedback and suggestions with just a click of the mouse.
4. When students are finished, they can open up the assignment in Google Classroom and hit "Turn In." This will change the student's permissions within the document from editing to view only.
Check out my video tutorial on how to do this!
Using Emojis to Increase Student Performance
Do you have trouble with students not paying attention to written instructions? You are not alone. This is a big frustration for many teachers. What if there was a solution to capture your student's attention?
Emojis?
 There might be a viable solution right underneath your thumbs! Our students use emojis all of the time for communication; however, why not use emojis to help add meaning to instructions?
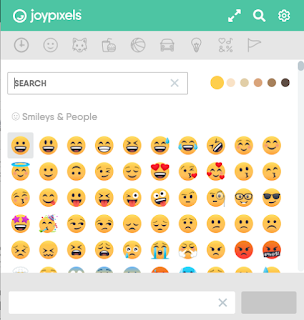
How can you use emojis from a laptop? A great solution is the Emoji Keyboard Chrome Extension from JoyPixels. I like this extension because it makes it easy to copy and paste emojis to tools like Google Classroom, Docs, Slides, etc. Its built-in search tool allows you to easily find emojis that will meet the needs of your students.
How Might This Work?
Many of our students are visual! Using emojis can provide an extra set of scaffolding to capture their attention, improve efficiency, and increase engagement.
For example, let's say that you are having students post an assignment to Google Classroom. Why not use emojis to help students stay on task, keep organized, and complete assignments correctly?
Here's a sample assignment from Google Classroom:

Emojis?
 There might be a viable solution right underneath your thumbs! Our students use emojis all of the time for communication; however, why not use emojis to help add meaning to instructions?
How can you use emojis from a laptop? A great solution is the Emoji Keyboard Chrome Extension from JoyPixels. I like this extension because it makes it easy to copy and paste emojis to tools like Google Classroom, Docs, Slides, etc. Its built-in search tool allows you to easily find emojis that will meet the needs of your students.
How Might This Work?
Many of our students are visual! Using emojis can provide an extra set of scaffolding to capture their attention, improve efficiency, and increase engagement.
For example, let's say that you are having students post an assignment to Google Classroom. Why not use emojis to help students stay on task, keep organized, and complete assignments correctly?
Here's a sample assignment from Google Classroom:

Use Photobooth for Green Screening!
There are a variety of ways to green screen in the classroom; however, you may want to consider using the Photobooth App if you have a MacBook. Want to learn how to do this? Check out my brief tutorial video below!
End of the Year Google Classroom Tips!
It's that time of year! Summer is almost here and many of us are starting to wrap up the school year. If you are a Google Classroom user, don't forget about archiving your classes!
There are several other helpful features that you might want to be aware of, such as accessing your archived classes, permanently deleting your classes, and making a copy for next school year.
Check out this helpful video to get you started!
There are several other helpful features that you might want to be aware of, such as accessing your archived classes, permanently deleting your classes, and making a copy for next school year.
Check out this helpful video to get you started!
Take Google Slides to the Next Level with Peardeck
Peardeck has been around for a while, but I have to admit that I have recently become fascinated with this awesome tool. If you are not familiar with it, Peardeck allows you to create interactive and dynamic presentations using Google Slides.
If you are a NearPod user, then you might be familiar with self-paced and interactive presentations. Peardeck is similar and has some really helpful features!


If you are a NearPod user, then you might be familiar with self-paced and interactive presentations. Peardeck is similar and has some really helpful features!
- Google Slides Add-On - visit Google Slides and install the Peardeck Add-On so that you can create interactive presentations. You can use existing Google Slides presentations so that you don't have to reinvent the wheel! Just use the Peardeck Add-On to make your presentation interactive.

- Make interactive slides at the beginning, during, and end of the lesson. There is a free and paid version, which gives you several different options to create interactive slides! Questions can be customized to the needs of your students and you can quickly receive feedback on student responses!

- Present your lesson and have students access on a variety of devices. Much like Kahoot and Nearpod, students can access your Peardeck through a link and code. Presentations can be teacher-led or student-paced (even if you use the free version!).
Use the Drop-Down Menu Option in Google Sheet to Create Self-Grading Rubric
Have you ever just wanted to create a Google Sheet with a dropdown menu of options? There are a variety of possibilities with this feature.
Several years ago, I had the idea of having my students grade me at the end of the grading quarter. I put together a rubric for my students to complete. To make the process easier, I could have utilized a drop-down menu to quickly tally up points. Here's how it would work? Check out my quick video!
Several years ago, I had the idea of having my students grade me at the end of the grading quarter. I put together a rubric for my students to complete. To make the process easier, I could have utilized a drop-down menu to quickly tally up points. Here's how it would work? Check out my quick video!
4 Tips for Using Backchannels in Class through Yo Teach!
Backchanneling can be a helpful tool in the classroom when used effectively. For instance, if you are having your students watch a video in class, a back channel might be a helpful platform to ask questions, post observations, etc. Perhaps you have a blended classroom and want to use a backchannel as a forum to ask questions or engage in online discussion.
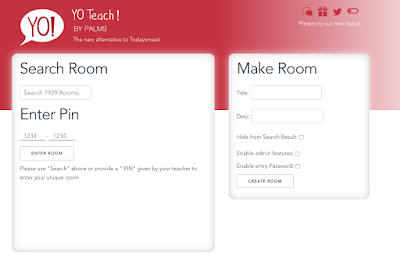 Yo Teach!
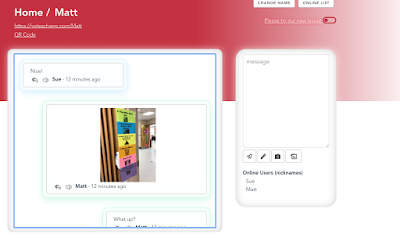
I recently came across a backchannel site called Yo Teach! With the demise of Today's Meet, I have been searching for a viable alternative. This free tool helps you easily create an online chat forum, as well as share with students via a link or QR code.
It is easy to create and takes less than 5 minutes to set-up and share. Plus, there is no account that is needed!
I like the fact that students can share their thoughts in multiple ways, such as through text, a drawing, or upload a picture. Providing students with multiple avenues for participating helps increase engagement in the lesson. Not all students learn the same way - so why should we expect them to backchannel the same way?
4 Tips for Using Backchanneling in Class
Regardless of your strategy or purpose, it is important to consider a few things:
 Yo Teach!
 I recently came across a backchannel site called Yo Teach! With the demise of Today's Meet, I have been searching for a viable alternative. This free tool helps you easily create an online chat forum, as well as share with students via a link or QR code.
It is easy to create and takes less than 5 minutes to set-up and share. Plus, there is no account that is needed!
I like the fact that students can share their thoughts in multiple ways, such as through text, a drawing, or upload a picture. Providing students with multiple avenues for participating helps increase engagement in the lesson. Not all students learn the same way - so why should we expect them to backchannel the same way?
4 Tips for Using Backchanneling in Class
Regardless of your strategy or purpose, it is important to consider a few things:

- Establish expectations with students. What does acceptable dialog look like? Realize that students are going to do and say things that are inappropriate at times. Does this mean you abort the technology or use it as a teachable moment?
- What is the purpose of establishing a backchannel? Is it just to have a "cool" new activity or will it enhance discussion? Knowing your purpose helps provide direction.
- Know your audience. If you are working with a bunch of 1st graders, is this the most appropriate tool for conversation? What is the maturity level of your students? What online experiences have they had in the past? If they haven't had much experience, how can you help them learn how to participate in an online environment.
- Establish a framework. Use a framework to guide your student's through the online discussion. Will they pose questions or share observations? Will they share 2 truths and a lie about the video? Are you using it as a 3-2-1 activity at the end of class? Structure helps keep the majority of students on task because they know the purpose. Without a purpose, students will often create their own purpose - even if it is unproductive.
Using Google Docs to Create a Personalized Learning Profile
Getting to know your students is an important part of building a positive classroom environment, as well as setting the foundation for personalized learning. Whether you are using technology or not, it is important to understand who your students are, their learning preferences, and areas for growth. It may be helpful to develop a learning profile for your students.
Learning Profile
A few months ago, I worked with a school on personalized learning. The school wanted to develop personalized learning profiles for students, based on three different areas:

Learning Profile
A few months ago, I worked with a school on personalized learning. The school wanted to develop personalized learning profiles for students, based on three different areas:

- Access - which resources provided the best options for representing content in different ways?
- Engagement - what best-motivated students? How could we build a dynamic classroom ecosystem that provided voice and choice?
- Expression - which tools helped students best demonstrate their knowledge?
Conclusion
We developed a Google Doc, which students were able to continually add to throughout the course of the year. The questions provided us with their preferences, a better understanding of their personality, and areas of growth.
Want your very own copy? Click on this link.
Cluster Chrome Extension: A More Efficient to Keep Your Browsing Organized
Are you one of those people who have dozens of tabs open all at the same time? If you are like me, you might need a way to keep yourself organized. Cluster is a window and tab manager, which will save you time and energy while browsing in Chrome.
Here are three features that I like about this Chrome Extension:
1 - Window Manager - this is a helpful tool if you want to keep yourself organized by using multiple windows, such as commonly used websites for school. You can use the windows manager for different things.
For example, you can create a window of commonly used websites like a grading system, attendance system, and Google. Y

2 - Save Window - let's say that you have a bunch of tabs open, which are related to your class. Choose the Save Window feature and you can save all open tabs on your screen. Use the Open Window feature to open up your saved tabs!

3 - Suspend or Unsuspend Tabs - Too many tabs open taking up too much memory? You can suspend tabs from loading and taking up too much memory or WiFi. When you want to load it back up, choose unsuspend.
Here are three features that I like about this Chrome Extension:
1 - Window Manager - this is a helpful tool if you want to keep yourself organized by using multiple windows, such as commonly used websites for school. You can use the windows manager for different things.
For example, you can create a window of commonly used websites like a grading system, attendance system, and Google. Y

2 - Save Window - let's say that you have a bunch of tabs open, which are related to your class. Choose the Save Window feature and you can save all open tabs on your screen. Use the Open Window feature to open up your saved tabs!
3 - Suspend or Unsuspend Tabs - Too many tabs open taking up too much memory? You can suspend tabs from loading and taking up too much memory or WiFi. When you want to load it back up, choose unsuspend.
ClassroomScreen: All-in-One Classroom Management Tools
Classroom management can be difficult in the digital age. There are so many tools and resources to keep your students on task, manage student behavior, and keep yourself organized. It can be frustrating to keep it all straight. What if there was a tool to keep everything organized and together?
A colleague of mine (thanks Courtney!) shared an awesome resource called ClassroomScreen with me! This website provides you with a website dashboard of tools that can help you stay organized, increase engagement and provide noise control.
Here's what it does:


A colleague of mine (thanks Courtney!) shared an awesome resource called ClassroomScreen with me! This website provides you with a website dashboard of tools that can help you stay organized, increase engagement and provide noise control.
Here's what it does:
- Random Name Generator - need a tool to randomly call on students? Click "Random Name Generator" and add student name. Then you are all set!

- Sound Level - want an easy tool to provide noise control? The sound level feature is extremely helpful and easy to use. Just give the site permission to use your computer's microphone.

- QR Code - need a quick way to share resources with your students? Use the QR Code tool to generate a QR code to quickly share resources with students on their mobile devices.

- Communication Tools - need to share a quick drawing, provide text instructions, or communicate with students? There are a variety of tools to help you do exactly that. I love the work symbols feature, which provides you with quick icons to communicate how you want students to work (whisper, work together, etc.). There is even a helpful stoplight feature too!

- Clock and Timer - Need to share the time or need a timer? Use the clock and timer features to keep your students on task and on time.

Self-Paced Learning with Google Slides
Personalizing learning is a challenging, yet rewarding way of customizing instruction to meet the needs of all students. Want to create a self-paced learning experience for students? Check out how to use Google Slides to create a self-paced learning experience.
Google Classroom Feature: Get Rid of the Confusion on Stream with "Classwork on the Stream"
If you are a Google Classroom user, you might have grown a little frustrated with the way that the "new" Stream functioned. By default, it lists everything that you do, including posting assignments, questions, and updates. This made things extremely confusing for teachers and students!
To get rid of this feature, Google Classroom recently provided a new option in the Settings menu called "Classwork on the Stream." You now have the ability to hide any notifications that you post from the Classwork tab.

Need to see it in action? Here's a quick video to help you out!

Need to see it in action? Here's a quick video to help you out!
4 Ways to Use YouTube 360 in the Classroom
Have you used YouTube 360? If you haven't had the chance, you might want to check it out! It is YouTube's Virtual Reality channel, which provides you with a 360-degree view of a video with audio, visuals, text, etc.
How might you use this in the classroom?
1. Explore Your World
YouTube 360 provides you with an excellent way to save money and time by taking virtual field trips. For example, take an interactive field trip to Yosemite National Park. Check out some of the most amazing sites accompanied by interactive graphics!

2. Observations
I recently came across a great example by @evagrace89 . She came up with a great way of using YouTube 360 to understand the difference between scientific observation and inferences. Students were asked to watch several YouTube 360 videos and use the following Google Doc (see below) to record their observations!

3. Immersive Storytelling
Watch stories unfold in front of you! One of my favorite videos is called 6 x 9, which takes you inside a prison cell to experience solitary confinement. The YouTube 360 platform changes the dynamic and makes the storytelling experience extremely engaging and unique.

4. Current Events
Check out the events and experiences that are changing the world! YouTube 360 provides a customized way of interacting with the world around you. I really enjoy Inside the World of Prayer Beads, which gives a unique insider look into something that has been around for centuries.

2 Ways to Differentiate Using Google Classroom
Need to differentiate assignments? Google Classroom provides you with a quick tool to differentiate assignments.
How Do I Differentiate in Classroom?
Anytime that you give an assignment in Google Classroom, your assignments are automatically assigned to all students. Choose the box that says "All" and then check the boxes next to the names of students who you want to have access to the assignment.

If you have three versions of an assignment, students will only see the version assigned to them! You will see all three versions in the teacher feed.
How Can I Use This Feature?
1 - Differentiate Assignments
Providing a few different versions of the assignment is one the most common and obvious ways of using this tool. For example, if you were giving an essay assignment, you could have three different versions of the assignment for three different groups of students.
2 - Collaborative Group Platform
Do you do a lot of group work in your classroom? Differentiate discussion questions based on groups. Have students use the differentiated discussion question as a platform to discuss their goals, assign tasks, etc.

Hyperdoc Science Lab Report Template
Hyperdocs are quickly becoming one of my favorite ways of using G Suite. I like to define the term as "a highly engaging and student-centered flexible learning tool, driving instruction through meaningful connections, collaboration, creativity, critical thinking, and communication."
There are many different models out there; however, I wanted to showcase a way of using Google Docs to develop Science Lab Reports. Here is my sample Hyperdoc Science Lab Report Template.
Step 1: Develop a Basic Google Doc Template
First, I developed a template modeled after the Scientific Method in Google Docs. Obviously, this is not a "Hyperdoc" in its current form.
Step 2: Add Interaction, Accountability, and Autonomy
Since a Hyperdoc is more than just a Google Doc with links, I added interactive components and options to make the learning student-centered. For example, students had autonomy to share their hypothesis and conclusion via text or Flipgrid. I also added additional opportunities to share results via their camera application and a Google Form.
Step 3: Share
You could share this resource with students via a classroom management system or a tool like Google Classroom. I like Google Classroom because it automatically makes a copy for students; however, if you don't use Classroom, you could very easily share the link in your LMS.
BONUS TIP: Not a Google Classroom User?
Need a quick and easy way to force students to make a copy of any Google Doc? This is a great trick to force a copy and make a "template" for students.
Here is how it works:
1. Open up your item (Doc, Sheet, Slide, or Drawing)
2. At the end of your item's URL, you should see the word "edit." Change the word "edit" to "copy."
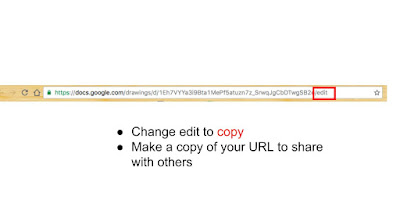
3. Make a copy of your URL and share with your audience
Now you have a quick and painless way to help your viewers make a copy of a document, presentation, spreadsheet, or drawing.
There are many different models out there; however, I wanted to showcase a way of using Google Docs to develop Science Lab Reports. Here is my sample Hyperdoc Science Lab Report Template.
Step 1: Develop a Basic Google Doc Template
First, I developed a template modeled after the Scientific Method in Google Docs. Obviously, this is not a "Hyperdoc" in its current form.
 |
| A basic Google Doc without "Hyperdoc" potential |
Step 2: Add Interaction, Accountability, and Autonomy
Since a Hyperdoc is more than just a Google Doc with links, I added interactive components and options to make the learning student-centered. For example, students had autonomy to share their hypothesis and conclusion via text or Flipgrid. I also added additional opportunities to share results via their camera application and a Google Form.
 |
| Revamped "Hyperdoc" with Interaction, Autonomy, and Flexibility |
Step 3: Share
You could share this resource with students via a classroom management system or a tool like Google Classroom. I like Google Classroom because it automatically makes a copy for students; however, if you don't use Classroom, you could very easily share the link in your LMS.
BONUS TIP: Not a Google Classroom User?
Need a quick and easy way to force students to make a copy of any Google Doc? This is a great trick to force a copy and make a "template" for students.
Here is how it works:
1. Open up your item (Doc, Sheet, Slide, or Drawing)
2. At the end of your item's URL, you should see the word "edit." Change the word "edit" to "copy."

3. Make a copy of your URL and share with your audience
Now you have a quick and painless way to help your viewers make a copy of a document, presentation, spreadsheet, or drawing.
Subscribe to:
Posts (Atom)
New Learn Lead Grow Home!
Hello readers! Happy New Year! It’s hard to believe that 15 years have passed since I launched my Learn Lead Grow blog. As we step into a n...

-
 Hello readers! Happy New Year! It’s hard to believe that 15 years have passed since I launched my Learn Lead Grow blog. As we step into a n...
 -
 I am a big fan of Eduprotocols. If you are not familiar with this innovative and engaging way of infusing technology and pedagogy together, ...
 -
 Whether you are planning a face-to-face lesson or remote learning experience, it is important to design learning experiences with accessibil...