Chat Animator: An Excellent Formative Assessment Alternative

Chat Animator could be an excellent alternative for formative assessments because students can express their understanding through text messaging! When we provide options to recruit student interest, we generate engagement because students are connected to learning in meaningful and relevant ways. Most students use text messaging to connect with their friends and family daily, which makes Chat Animator easy to use and understand.

How Do I Use Chat Animator's Texting Story Maker? 

First, visit the Chat Animator website to create your texting story! 

Then, create your conversation! Chat Animator provides you with customized tools for creating a realistic conversation. Change the names of participants, upload profile pictures, and generate a text messaging conversation in the text boxes. 

Finally, you can record and save your animation as a video (.webm) or as a GIF. 

Scenario

Imagine that you have taught a lesson on the properties of triangles. Chat Animator could be used for students to share 3 things they learned about triangles' properties. Check out my sample conversation below! 

BONUS! Make the experience collaborative by having students download their conversation as a GIF and place it in a shared Google Slides presentation or PowerPoint. 


The Fill-in-the-Blank Definition Template

The Fill-in-the-Blank Definitions template is an excellent tool for scaffolding learning and helping multilingual students or all of your students learn new terms. 
The following template uses:

1. Google Docs
2. Dropdown feature in Google Docs

A drop down menu contains a word bank of terms that can be used to help construct the definition of the term. Additionally, students benefit from using visuals to make connections with new vocabulary. Students can insert images from Google or construct their own using Google AutoDraw! 


Check out my video tutorial or access my template here! 


5 Powerful Vocabulary Strategies for All Students

I was recently listening to a presentation about multilingual or ELL learners. The speaker talked about the progression of language development and the importance of vocabulary and student performance. Then they said something so simple yet profound. They said, "we are all language learners."

Sometimes, I need to remember that language is a progression, and we all have to learn new jargon and terminology anytime we learn something new. For instance, a high school biology student and a business education student must learn new vocabulary and jargon to progress through each course. The new teacher must learn the terminology and acronyms within the building. 

All learning begins with vocabulary, but how often do I emphasize vocabulary during instruction? When I try to universally design my classroom, I need to proactively look at learning barriers and honor the variability in my classroom. For instance, why do my students get confused and bored when I teach vocabulary? One reason is that I may not be honoring their background experiences or providing them with tools for making connections. 

Here are five strategies and templates for connecting a student's background knowledge and vocabulary development. 

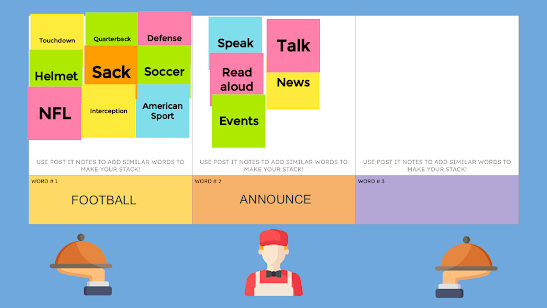
Idea # 1: Word Stacking

I recently saw an infographic from ImpactPlus Whales that described 4 vocabulary strategies for developing schema. Word Stacking was of my favorite strategies because it could be used with or without technology. 

Students begin with a starter word or term. Then they "stack" similar words on top to form the highest stack. The group with the highest stack wins. 

If I were to use this strategy in my classroom, I might offer two different ways for students to participate in this activity. I would offer a low-tech option with post-it notes and perhaps a high-tech option with a tool like Jamboard or Padlet

Here's an example of a Jamboard template I made: 


Would you like the template? Click here!


Idea # 2: Frayer Model 

The Frayer model is one of my favorite tools for building student vocabulary because it provides students multiple ways to represent a term. There are many different variations of the Frayer model; however, I created the following variation to provide students with an opportunity to write, draw, and supply background knowledge. Plus, students can draw their own Frayer model on paper or use an electronic version.


Want the Jamboard template? Click here!


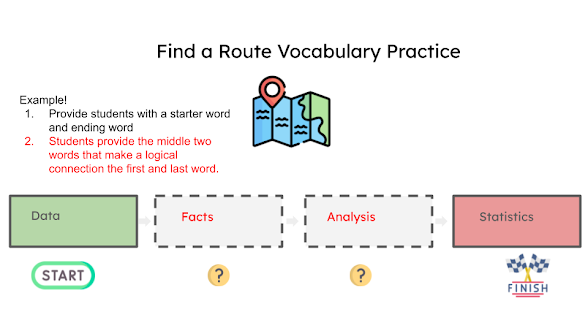
Idea # 3: Find a Route


ImpactPlus Whales shared another great strategy called Find a Route! I love it because of the higher order thinking skills it requires students to exercise. Students see a starting word and an ending word that you supply. They must provide two words in the middle of the sequence that make a logical connection between the first and last word. 

This is a great activity that can be done on paper, a dry erase board, or tool like Google Slides or Classkick. Check out my example below in Google Slides: 


Want the Google Slides template? Click here


Idea # 4: Vocabulary Choice Board


Choice boards are effective tools for creating student engagement. The following Vocabulary Choice Board was developed in Google Slides to provide students with options for demonstrating their understanding. As students complete each task, they will drag the red "X" on top of the task completed. There is an additional slide they can see and mark off vocabulary terms used. 


Want the Google Slides Template? Click here!


Idea # 5: Sketch and Tell Eduprotocol 

The Sketch and Tell strategy developed by Eduprotocols is a great way for students to make connections with vocabulary. Sketching and telling can be used on any device and with almost any application

I developed the following template in Jamboard for students to use different methods to define vocabulary. The bumper sticker template contains two different tasks. First, students need to create a bumper sticker containing the vocabulary term, slogan, and an image or illustration of their term. Much like a Frayer model, this provides students with different ways of sharing the meaning of the word. 

Secondly, the "Tell Us..." section provides students with an opportunity to briefly explain why they chose to do what they did. Reflection is an important aspect of learning because it helps us make deeper connections with learning. 


Want the Jamboard Template? Click here! 


Yippity: Master Study Skills with AI

Studying is such an important skill for students to master; however, many of our students struggle with basic study skills. Why is this? Learners may vary in their executive functioning skills, which help set goals, manage information, and utilize strategies to reach and master goals. 

Our students sometimes need additional tools and resources to help them master study skills. If you do a quick Google Search, you will find tons of resources, tools, and strategies. I want to share with you a tool that I recently came across called Yippity. 

What is Yippity? 

Yippity is a free website that uses Artificial Intelligence (AI) to create a list of questions and answers from a website or notes pasted from a document to help you study! 

Check out this video below or read the text below. 


How Does It Work? 

Step 1: Copy and paste your URL or notes to Yippity. 


Step 2: Click Generate and Yippity will develop a list of questions to study from! 


Step 3: Study time! 

Yippity develops a list of questions to study from called a quiz. You can save this quiz or share the URL with another person. 

Additionally, there are a variety fo features to hide, edit, copy, or delete questions. 


3 Hacks for Creating an Amazing Jamboard Template

I was recently presenting at a webinar when a participant shared with me their frustrations with Jamboard. One of their biggest frustrations was that students can delete the activities they worked so hard to create. I suggested the following hack for making a Jamboard template and bonus interactive activity!

I shared one of my favorite Jamboard templates of all time! The Mood Meter! Click here to make your own copy. 


How Did I Do It? 

Check out the video or text below to learn 3 hacks for creating your own Jamboard template. 


Hack # 1: Create a Jamboard Slide Template in Google Slides

First, make sure that you create a custom page setup of 1920 x 1080. Then, design your Google Slide as you wish your Jamboard background to look like. Finally, download your slide as a JPG or PNG. 


Hack # 2: Set Your New Background

After downloading your Google Slide as a PNG or JPG, you can open up a new Jamboard and upload your new background. 


BONUS Hack # 3: Add Shapes to Make it Interactive

In the example from above, I had students drag and drop stars into a quadrant that best describes how they feel. I used a Google Slide extension (formerly called Add-On) called Insert Icons to copy and paste stars into my Jamboard. 


5 Tips for Engaging Learners with UDL

Phillip Schlechty (2011) theorized that the highest levels of learner engagement require learners' full attention and commitment. While ...