3-Minute Crash Course on Screencastify

As more schools are planning to go remote or use hybrid learning models in the fall, the art of screencasting is going to be an important skill for teachers to master. If you are not familiar with the term screencasting, I am referring to recording videos using your screen, webcam, or both.

What is Screencastify? 

There are a variety of different programs out there to create screencasts; however, I am going to focus on using a tool called Screencastify today. Screencastify is a free Chrome Extension that can be used to record brief (5 min or less) screencasts.  

Here is a crash course (3 min) on how to use this powerful tool!


Conclusion

Although the tool is free, there is a paid version that does give you more options; however, if you are starting out, you might want to check out the free version first. This will help you determine whether or not you should continue using this tool.

Crash Course on Seesaw

Are you new to Seesaw? No worries! Here is a crash course on using this powerful learning journal!


Create Animated GIF's with Screencastify (Perfect for Scaffolding Instructions)

Are you noticing that your students may be skipping certain tasks because they are not fully reading your instructions? Adding animated GIF's could be a helpful idea. This may also help students who are more visual or need an additional scaffold or support for completing a task.

Check out how to do this below:


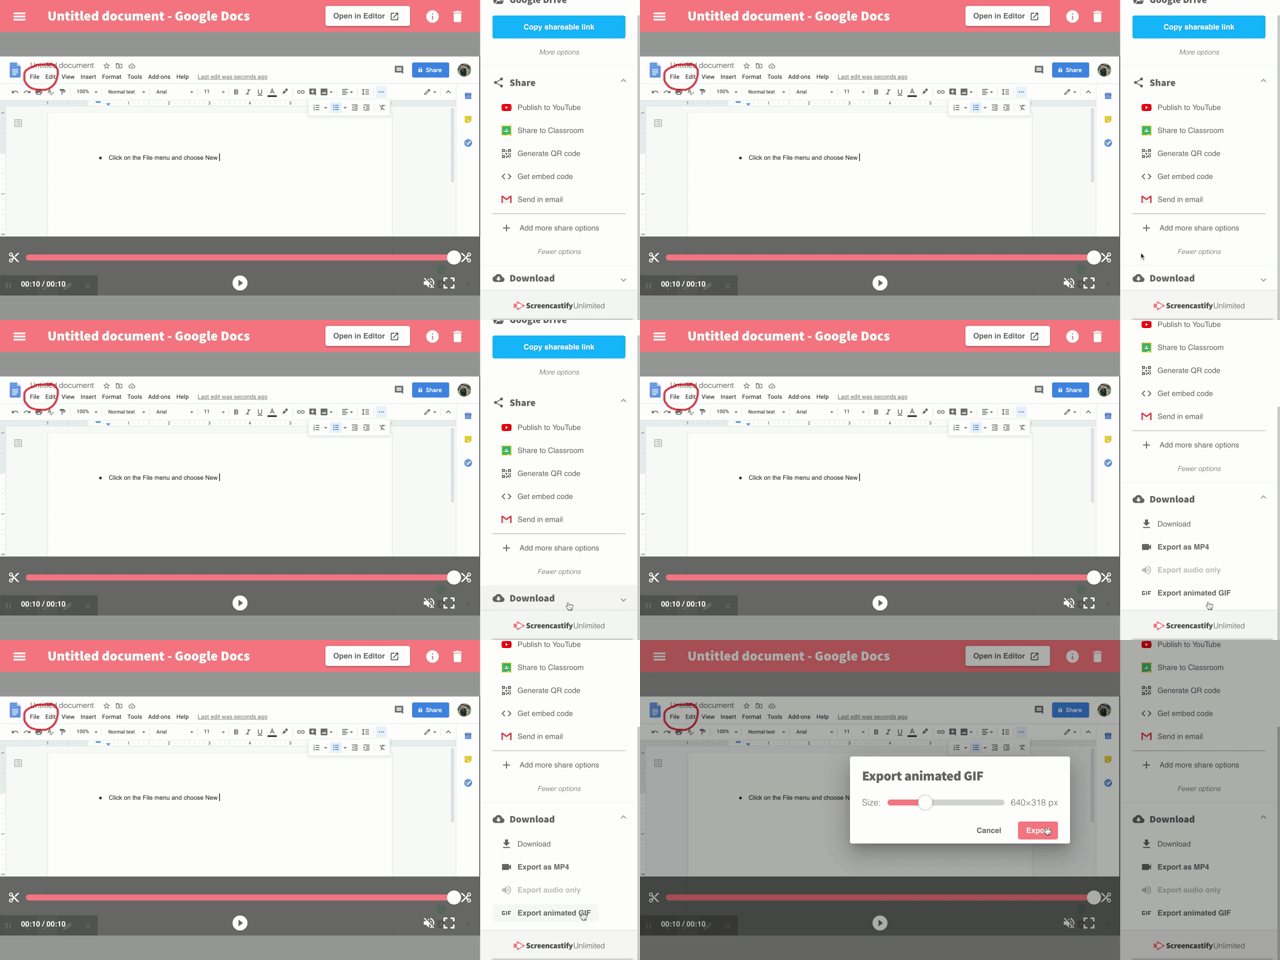
First, you will want to install the free Screencastify extension. Just keep in mind that Screencastify limits you to 50 recordings per month in the free version!

Secondly, you will want to record short clips (less than 10 seconds) of tasks that you want students to complete. In the example that I provided, I recorded how to open up a new Google Doc.


Then, you will download your video as a GIF in Screencastify.


 Finally, you will want to insert your GIF into your Google Doc or Slides presentation. If you want to get rid of unnecessary or distracting parts, you can double-click on your image and use the cropping tools to get rid of the parts you do not need!


Flipgrid Hack to Add Bitmojis to Your Topics and Grid Covers

Have you ever wished that you could add a Bitmoji to your Flipgrid Topic or Grid Cover? Well, you now can with this quick and easy hack!

How does this hack work? First, you will need to use the Bitmoji Chrome extension, Flipgrid, and Google Drawings.

Next, check out my helpful video below:


Plus Minus Interesting (PMI) Protocol for Critical Thinking

In a world full of Internet fluff and fake news, developing important critical thinking skills is an important part of educating our students today. I developed the following template inspired by Inquisitive.com's amazing reservoir of teacher visible thinking activities.

A Plus Minus Interesting or PMI chart is a great tool for students to use whether analyzing a new idea or investigating an article.  Here's how it works:

  • Plus - students list positives or pros associated with the idea. I have found having a certain number of required responses is helpful when working with students. The following template asks students to list 3 positives or pros. 
  • Minus - students list negatives or cons associated with the idea. I have found having an equal number of pros and cons is helpful in developing critical thinking skills. This forces students to think equally about both ideas without unintentional bias. The following template asks students to list 3 positives or pros. 
  • Interesting - students use this section to list 1 - 2 interesting ideas. Whether students feel negatively or positively about an idea, there is always something interesting to learn or observe. 


Conclusion:

I have found this template helpful in any classroom K - 12; however, I recently used this template for a professional development workshop that I am hosting on remote learning. Participants used the template to analyze an article on remote learning.  Want your own copy? Click here for a copy of the Google Doc template.

Create Accessible Learning Opportunities with a POP!

Whether you are planning a face-to-face lesson or remote learning experience, it is important to design learning experiences with accessibility in mind. Accessibility provides ALL students access to learning regardless of ability or disability. This mindset begins with a shift from merely reacting to being proactive towards high-probability barriers that exist in lessons.

I am from the Midwest, so I like to call my soda "pop," which helped inspire my acronym! Whether I am designing a student lesson or professional development opportunity, I plan with a POP! 


How does it work? 

First, I begin by understanding my learning goal. What do I want participants to be able to do or know at the end of my lesson?

Predict

Next, I identify or "predict" high-probability barriers that may exist in my lesson. For example, students may not understand certain vocabulary terms or how to use a certain technology. What do I know that my students are going to struggle with?

Overcome

Then, I brainstorm options or ways to "overcome" many of these high-probability barriers. In other words, I begin to proactively plan on ways to address high-probability barriers through accessibility. Brain research tells us that there are 3 ways we can plan for accessibility (UDL framework):

  • Options for Representing Content - Brain research states that students may need different ways to represent content if students are learning a new concept. For example, if I know that my students may struggle with understanding vocabulary terms, I might need to provide different ways of understanding the terms through Quizlet flashcards and Flocabulary videos.  
  • Options for Expressing Knowlege - If students are demonstrating an understanding of content, I may need to think about being flexible with the product or process.
    • Flexibility in the Product -  If I am asking students to demonstrate their understanding of the causes of the Revolutionary War, I may have the flexibility to have students write a paper or develop a video presentation.  Just be careful! Too much choice is paralyzing. It may be helpful to offer 
    • Flexibility in the Process - If I don't have flexibility in the product (i.e. all students have to write an essay), I could find ways to make the process flexible. For example, students could type out their thoughts on Google Docs or use the built-in Voice Typing feature. I could also provide students with digital or paper graphic organizers to organize their thoughts. 
  • Options for Engagement - In other words, how can I help students connect with the learning experience. When students are engaged, they have opportunities to practice autonomy, choice, self-regulation, and goal setting. For example, I might develop a checklist with helpful reminders for my students prior to turning in a writing assignment. 

Plan

Finally, I begin planning my learning experience with accessibility in mind. I plan for the high-probability barriers with accessible options. In other words, I am proactive in addressing problematic areas so that ALL participants have access to learning and can achieve the learning goal. It's not about "dumbing down" a goal, but providing tools, strategies, and resources for ALL participants to have the opportunity to achieve the goal.




Make Your Own Virtual Field Trips with Google Earth and Screencastify

If you are like most schools, field trips are most likely put on hold because of the COVID-19 crisis. Although you might not be able to visit a physical location, you can very easily create your own custom field trips with Google Earth and screencasting tools like Screencastify.


How Does It Work?

First, you will want to develop your field trip using Google Earth's Project Feature. It's free and very easy to use! Want to learn how it works? Check out my video below:


Next, you will want to determine how you will want to share your project with your students. If you have younger students, it might be helpful to create a screencast of your project through Screencastify or another screencasting tool.

If you want students to have more hands-on experiences, you can share your project as a view-only file for students to explore.  This feature is helpful when you want your students to explore on their own, at their own pace, and explore links and resources that you have shared.

Conclusion

Whether you are creating your own field trip or having students develop their own, the possibilities are endless. This simple strategy can create powerful connections in almost any subject!

2 Learning Profile Templates to Help on the Personalized Learning Journey

Whether you are teaching face-to-face, virtually, or in a hybrid situation next school year, it is important to get to know our student's needs. I like to think of my students as my customer. Why do they need me? I don't just teach a subject, but I serve as a guide to helping them learn and achieve goals. I might be a quick exit on their educational journey, but my actions could have long-lasting benefits or consequences in their lives.

Personalizing learning can be difficult if you do not have an accurate understanding of your student's abilities and challenges; therefore, a learning profile could be a great strategy for getting to know your students better. Here are two examples of profiles that I have made for secondary students, which could easily be adapted to the elementary and middle school classrooms.

Want to learn more? Check out my video below for more information: 


Back to Basics: Interactive Timeline in Google Drawings

Did you know that you can use Google Drawings to make activities like interactive timelines? Although it is easy to do and requires minimal effort, it creates a highly engaging activity for students to complete face-to-face or virtually.

Check out how it works below:


Back to Basics: Using Jamboard

How do you use Jamboard (Google's collaborative whiteboard program)? Check out my brief tutorial below to get started!


Back to Basics: Collaborative Google Slides Presentation

Want to step up collaboration in your remote or face-to-face classroom? A collaborative Google Slides Presentation for the entire class could be the answer! Check out how to create a collaborative presentation, share with students, share on Google Classroom, and manage student work!

Get to Know You Activity - Create a Dropdown Emoji Question in Google Sheets

In a few weeks, I am going to be preparing a virtual professional development day with a group of teachers. As a way to get to know one another, I created a Google Sheet with a few questions and a drop-down emoji question. 


How did I do this? I simply created a Google Sheet and used the Data Validation feature to create a drop-down menu and the Joypixels Emoji Keyboard for my emojis! Want to see it in action? Check out my video below: 


Back to Basics: Use Google Drawings and Classroom to Create a Drag and Drop Activity

Want to make a drag and drop activity for students? Check out my tutorial on how to use Drawings and Google Classroom to create your very own matching activities!

You may also want to consider using Google Drawings to make a timeline! This is a great way for students to interact with content.


Back to Basics: How to Create a Google Drawing

Are you new to Google Drawings? Check out this 5 minute tutorial on how to use Drawings.


Back to Basics: How to Create a Basic Survey in Google Forms

Are you new to using Google Forms? Here is a brief tutorial on how to create a basic survey.


10 Tips for Building Better Learning Goals

Goals are not just the foundation; they are the roadmap for effectively planning a UDL lesson. They often serve as a roadmap, providing stud...