A Worksheet is a Worksheet, But...4 Tips to Enhance #Worksheets

I was recently perusing through Twitter and read an interesting comment that was made many times. "An electronic worksheet is still a worksheet" and "if you can do it on paper, then why waste the electricity to do it electronically."


Don't get me wrong, I do see the logic; however, are we forgetting about the students in the margins? The students who need adaptations made to materials based on disability? Are we forgetting the students who prefer to work with an electronic copy rather than a paper copy? Are we forgetting about how an electronic copy creates functional improvements with hyperlinks, video clips, and editing features?


Why It's Good to Give Electronic and Paper Options:

Several years ago, I had a student in my class who refused to bring his glasses to school. It seemed like every time we had a reading assignment, I had to trudge down to the copier to make a 200% copy. One day the copier broke and I was out of luck. What did I do? I shared a PDF copy of the text with the student. He could easily zoom in and out of the text.

My accidental experiment became an example of Universal Design for Learning in action. I planned for barriers my students would experience and frontloaded my instruction with materials that would provide them multiple ways to represent, express, and engage with content. To learn more, check this out. 


4 Tips to Enhance Electronic Worksheets

One of the biggest reasons why I like augmenting worksheets, is the fact that you can access the web from the actual document. No need to create a website, blog entry, or post.


1. Why not use QR codes? A friend of mine still relies on passing out half sheets of paper for his Calculus class homework because he wants students to write out their work; however, recently he added one more component - a QR Code. Over 90% of his students have Smart Phones, so he decided that he would embed a QR code (and TinyURL for those who don't have access to Smart devices) on the worksheet to provide supports and extra help!


2. Why not add verbal instructions? I hear time and time again. Students don't read directions. Maybe this is so, but have you ever considered embedding a media clip with instructions? For example, in the past I have created my own Voki Avatar to communicate important class instructions to students. If they weren't listening, I wouldn't repeat. They would have to hit play instead. Maybe you want to spice things up and use Tellagami, a free App, where you can create a 30 second video of your very own avatar and voice.


3. Why not embed the power of screencasting? Most students do not complete homework because they get frustrated and don't know how. Why not provide them with screencast tutorials? You can easily use Screencastomatic, Educreations, and tons of other applications to record a mini lesson for students to use to understand content.


4. Why not eliminate vocabulary confusion? Robert Marzano once said that the "achievement gap is largely a vocabulary gap." Many students struggle with basic vocabulary, which prevents them from fully understanding content. Why not provide vocabulary supports in your worksheet? For example, if you are having students complete an outline, why not create a set of Quizlet flashcards with 10 terms you know students will struggle with? Review them prior to the assignment. Embed the link into the electronic worksheet, so that students can revisit them if they are confused. What about the terms that are not on flashcards? One of my favorite visual dictionaries is Blanchan Shahi, a visual dictionary that combines the power of Google, Flickr, and Yahoo images with text.

Conclusion:

I learned something very important from my copy machine debacle - what benefits one student could benefit all students. A minor adjustment like providing students with the option of a paper or electronic copy - made all of the difference. Many of my students told me that they could use this feature to focus on one paragraph at a time. They could adjust the background color, brightness, and contrast. This minor adjustment had a major impact on the way students completed reading assignments in my class. The adjustments and adaptations that I have suggested may also be worth the effort. So I have to disagree - an electronic worksheet is a worksheet which augments learning ("A" level of the SAMR model).

Thank you!

I wanted to give a big thank you for those of you who voted for my blog in this year's Edublog Awards. This was the first year my blog was nominated and I was surprised to make the top three! Although it may not be a big deal to you, it is validation to keep writing and helping others. I am truly blessed to have your support! 

Matt

Learn How to Use FlipQuiz in Less Than 5 Minutes #Eddies14


Using FlipQuiz is extremely helpful and and easy. I love using it as a whole class activity or something to share with my students as a study tool. I created the following video to help you. Enjoy!


Share the Love with a Vote! 


Voting takes place until 11:59 pm on Monday, December 15th.

My blog has been nominated in several categories for this year's Edublog Awards! If you enjoy reading this blog, please share the love and vote for Learn-Lead-Grow. I created this page to help you with voting because it can be a little tricky.


 IMPORTANT: PLEASE CLICK ON THE THUMBS UP LOGO BELOW. YOU WILL THEN BE PROMPTED TO SIGN IN USING A SOCIAL MEDIA ACCOUNT. You have to sign in using Facebook, Google, Linked In, or Twitter to cast a vote!

If you click on the number of votes, you will only see everyone who voted. Unfortunately this doesn't cast a vote.

Need help? Voting can be a little tricky!  Check out my how-to video!

 Please vote for ALL 3 categories on this page below (make sure you click on the thumb icon):

Best Individual Blog:

See full list on Listly

Best Ed Tech / Resource Sharing Blog:
See full list on Listly

Best Teacher Blog:

See full list on Listly

What Will You Do After the #HourofCode is Finished? Inspiring Student App Creation #Eddies14

I am a finalist for the 2014 Edublog Awards for Best Ed Tech / Sharing Blog, Best Teacher Blog, and Best Individual Blog. If you like what you see, it would mean so much if you cast a vote for me HERE. Voting takes place until 11:59 pm on Monday, December 15th.

Introduction:

For those of you not familiar with this week, it is the Hour of Code week. Millions of students and teachers across the nation are taking part. What can you do to keep inspiring your students after the Hour of Code is over? Why not have your students create their own App. It's pretty easy!

HHABM and App Creation: 

One of the best parts of being a teacher at the Milton Hershey School is the kids I get to work with. A few months ago, a group of my honors business students and I traveled to the Hershey Company to give presentations to employees and executives.

It was part of our Hershey's Honors Authentic Business Management program, a 34 week course where students learn about every aspect of the Hershey Company. From manufacturing to social media, a new Subject Matter Expert from the company helps me co-teach the class each week. At the end of the 34 weeks, my students create a presentation from one of the topics covered in class; however, there is a twist. They have to offer a new idea (related to their topic) to the company. Many of my students chose to present new product ideas, order management systems, and social media strategies.

One of my groups went above and beyond the standard PowerPoint Presentations that we normally give. They invented their own App to share with the company! The purpose of this App was to help the company sell chocolate in various ways. It provided Google Maps to brick and mortar store locations, product information, social media links, and links to products.

How did they do it? 

My students had an idea and wanted it to come to life, so they started researching free mobile App creators. They really liked Conduit Mobile (now called Como App Maker) because of how easy it was to create. They could easily create the App and preview what it looks like on multiple IOS and Android devices.

3 Ways to Start App Creation Today: 
  • Como (formerly Conduit Mobile) lets you have up to 50 free mobile visits and up to 5 App downloads a month. It's free and easy to use. 
  • Yapp is another free site with a focus on creating Apps for events. You can make your Apps public or private. It is also very easy to use. 
  • AppShed - is a great alternative too.  Although you have to pay for it, they have accounts for education. 

How did they share it? 

Knowing that Como lets you have up to 50 free mobile visits and up to 5 App downloads a month, they wanted a quick and efficient way to share their idea with the over 100 people in the room. They used Screencast-o-Matic to create a screencast of their App and embed it in their PowerPoint.

They still wanted to be able to have a limited number of participants interact with App, so they created a QR code containing the mobile address. They placed this QR code on the back of business cards that they placed on tables around the room. It gave the people who wanted to see the App up-close and personal a chance to do so.

Check out my student's explanation of the App:


Conclusion

Instead of creating a website, why not have students create their own App? Brain research has shown us that students need different ways of representing material to connect with it. Because every student learns differently, they also need different ways of demonstrating their understanding. This is a perfect option for analytical and struggling learners to stay engaged. 

We are seeing evidence that learning is becoming more mobile each day. From BYOD programs to the devices hidden in our students pockets, mobile devices are becoming an essential part of learning. Students are using mobile Apps to study, create projects, communicate, collaborate, and enhance the learning process. With so many mobile devices available, why aren't we give our students the chance to engage in a new way? 

I am a finalist for the 2014 Edublog Awards for Best Ed Tech / Sharing Blog, Best Teacher Blog, and Best Individual Blog. If you like what you see, it would mean so much if you cast a vote for me HERE. Voting takes place until 11:59 pm on Monday, December 15th.

RISE Up and Provide Meaningful Feedback

I am a finalist for the 2014 Edublog Awards for Best Ed Tech / Sharing Blog, Best Teacher Blog, and Best Individual Blog. If you like what you see, it would mean so much if you cast a vote for me HERE. Voting takes place until 11:59 pm on Monday, December 15th.

Feedback is an essential element to learning, but why do many of us struggle with providing valuable feedback to improve student performance? I've struggled with this too. I recently read an article by Troy Hicks of Edutopia titled Make It Count: Providing Feedback as Formative Assessment, which provided me with valuable strategies to use to provide meaningful feedback to my students. We often think an Edmodo badge, a Google comment saying "Good Job," or a foil sticker communicates feedback effectively. Although, they are wonderful forms of feedback, how do we help our students grow?

In Troy Hick's article, he mentioned the RISE Model for  meaningful feedback and self evaluation. This model was developed by Emily Wray and was developed with Bloom's Taxonomy in mind.  Check out the different levels of her model below:


What does RISE stand for?

R - Reflect 

When we reflect, we use lower level thinking skills to make connections, agreements, or disagreements with the student work. A simple "I like how you described _____ because...." or "I agree / disagree with ___ because..." would be an example of Reflection.

I - Inquire

As we inquire, we begin using our understanding and analyzing skills. Instead of recalling information about student's work, we are looking for meaningful dialog. We are "seeking information and providing ideas through questioning." For example, we may ask students to think about another strategy, perspective, or way of doing things. 

S - Suggest 

When we suggest, we are asking students to analyze and evaluate their work with deeper meaning to make improvements to the work. For example, suggestions provide students with strategies to develop a deeper understanding and higher quality product.

E - Elevate

When we elevate feedback, we are inspiring students to develop higher levels of creativity and problem-solving skills. When I think of the Elevate level, I think of Carol Dweck's work on the Growth Mindset, to develop continual growth and expansion of ideas. As businesses constantly refine products, why aren't we giving students an opportunity to refine their work? Just a thought!

Conclusion:

Providing timely and meaningful feedback to students is essential to learning in the 21st Century. If you aren't using the RISE model, why not? 

I am a finalist for the 2014 Edublog Awards for Best Ed Tech / Sharing Blog, Best Teacher Blog, and Best Individual Blog. If you like what you see, it would mean so much if you cast a vote for me HERE. Voting takes place until 11:59 pm on Monday, December 15th.

From S to R, Teaching #Vocabulary with #SAMR #Eddies14

I am a finalist for the 2014 Edublog Awards for Best Ed Tech / Sharing Blog, Best Teacher Blog, and Best Individual Blog. If you like what you see, it would mean so much if you cast a vote for me HERE. Voting takes place until 11:59 pm on Monday, December 15th.

What does effective technology integration look like? I believe it starts with how technology is implemented. In other words, successful technology integration is not about the tool, but how the tool is used.

What is SAMR?

SAMR Model
If you are not familiar with the SAMR model, Kathy Schrock has an excellent resource to understand it. This is a popular model was developed by Dr. Ruben Puentedura and stands for Substitution, Augmentation, Modification, and Redefinition. Think of SAMR as a lens to view the pairing of effective instruction and technology integration.


How would you integrate SAMR into teaching vocabulary? 

S - Substitution:

The lowest level of SAMR is known as Substitution, meaning technology is a direct substitute for paper and pencil. Here is an idea:

  • Students type their vocabulary terms in a Google Doc. At this stage, we are helping students remember information. 


A - Augmentation

Augmentation is still a lower level of technology use; however, the biggest difference between Substitution and Augmentation is the way technology offers functional improvements. At this level, you are helping students understand and apply their knowledge. Here are some ideas:
FlipQuiz.Me

  • Develop Quizlet  flashcards for students to review terms, listen to the term being read, play review games, and take quizzes.  
  • Create a FlipQuiz game board to have students review terms, which is an alternative to Jeopardy PowerPoints. 
  • Create an Edmodo vocabulary quiz and analyze results. Need help doing so? Check out my tutorial on how to make Edmodo Quizzes
  • Create an interactive Purpose Game, where students have to identify terms on an interactive graphic that you create. Check out my post on Purpose Games. 
The line between SA and MR is where using technology goes from enhancing to transforming the way students use technology to learn. 

M - Modification

Modification is where high levels of technology combine with applying, analyzing, and evaluating to create a significant task redesign. Without technology, you wouldn't be able to do the task. Here are some ideas:
MoveNote
  • Assign each student a vocabulary term, which they will use MoveNote to develop an interactive video that defines the term. Check out my post about MoveNote for ideas. 
  • Have students use the Educreations  iPad App to develop a screencast, which defines the term or concept. Want a PC screencasting alternative? Why not use Screencast-o-Matic
  • Have students explain the meaning of the term through Tellagami, a free App, where you can combine your voice with an avatar for a 30 second view. 
  • A good friend of mine uses iMovie to have her students create iMovie Trailers of each vocabulary term. 
R - Redefinition

Interactive Word Wall with QR Code
Redefinition is where higher level thinking (creativity and evaluation) and high levels of technology integration converge to create new tasks previous inconceivable. Here are some ideas:
  • Check out my blog post on 3 Ways to Make Word Walls more Accessible to Students.


Advice:

Carl Hooker's SAMR Pool
One of my favorite illustrations of the SAMR model comes from Carl Hooker, who has coined the SAMR pool model. Think of Substitution and
Augmentation as swimming in the shallow end of the instructional pool, while Modification and Redefinition represent the deep end of the pool. We can't spend all of our time on one end or the other. To help students learn, there are times when we have to swim to one side and then the other.

Like I had mentioned before, think of SAMR as a lens to view instruction and technology. When used effectively, the results are amazing!


Share the Love with a Vote! 

My blog has been nominated in several categories for this year's Edublog Awards! If you enjoy reading this blog, please share the love and vote for Learn-Lead-Grow. I created this page to help you with voting because it can be a little tricky.


 IMPORTANT: PLEASE CLICK ON THE THUMBS UP LOGO BELOW. YOU WILL THEN BE PROMPTED TO SIGN IN USING A SOCIAL MEDIA ACCOUNT. You have to sign in using Facebook, Google, Linked In, or Twitter to cast a vote!

If you click on the number of votes, you will only see everyone who voted. Unfortunately this doesn't cast a vote.

Need help? Voting can be a little tricky!  Check out my how-to video!

 Please vote for ALL 3 categories on this page below (make sure you click on the thumb icon):

Best Ed Tech / Resource Sharing Blog:
See full list on Listly

Best Teacher Blog:

See full list on Listly

Best Individual Blog:

See full list on Listly

Three #Google Tools to Take the Headache Out of Research Papers #Eddies14

I am a finalist for the 2014 Edublog Awards for Best Ed Tech / Sharing Blog, Best Teacher Blog, and Best Individual Blog. If you like what you see, it would mean so much if you cast a vote for me HERE.


Many teachers limit their students to writing research papers in Microsoft Word; however, here are three excellent tools that make it easy to write a research paper in Google Docs.


Tip #1: Create Your Own Table of Contents

If you are like most people, you often ignore using the text styles feature  for headings like heading 1, 2, 3, etc; however, there is a huge benefit to use headings as section titles in your document.

Google can use these headings to help create your own table of contents with hyperlinks, which anchor to particular sections of your document.

How do you do it? 

Before you are able to use this feature, you must use the section titles format (i.e. Heading 1) for section titles! Once you are ready:

1. Place your cursor where you want your table of contents.

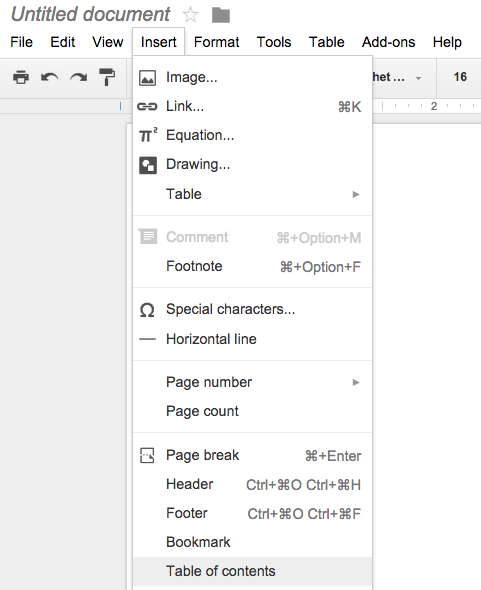
2. Select the "Insert" Menu and choose "Table of Contents"

Google will create your table of contents with hyperlinks to each section! Instead of scrolling through pages of text, you can now click a link. Here's a sample from a document that I recently created for a graduate course I am teaching:

Tip #2: Research From Within Your Paper

One of the biggest challenges of writing a research paper is the research part. Let's say that your students are writing a paper and need more information on Abraham Lincoln. Instead of exiting out of the document, you can use the Research feature in Google Docs. This let's you conduct a Google Search from within your actual document and let's you add pictures, information, even quotes directly into your document.


How do you do it? 

I like to do my research by highlighting (in my document)  the word or name I am looking up, but you do not have to do this prior to researching!

1. Choose the "Tools" Menu and select "Research"

2. If you haven't highlighted a word or name you want to research (from within your document), you will need to enter in your information in the embedded Google Search.

3. Search away and add information directly into your document with a click!


Tip # 3: Let Google Create Your Bibliography

Creating bibliographies can be difficult, especially when you have numerous types of sources. I highly recommend getting the EasyBib Add On, which helps you automatically site books, journal articles, and websites in the format you need!

How do you do it? 

1. Once you have downloaded the extension, you will need to access it by visiting the "Add-Ons" menu and selecting EasyBib Bibliography creator. 


2. A side menu will pop up and choose "Manage Bibliography" to open EasyBib. A side window will pop up on the right-side of your document, which will be used to add resources and eventually create your bibliography. 

3. Now you are ready to add resources! Instead of typing in the author's name, the title, publisher, etc., I can search by the title, ISBN or DOI number. EasyBib conducts a search and provides me with names of articles, books, etc. matching that title. I select the correct item to add it to my list of sources.

Adding the Bibliography to Your Document:

When I am completely finished and want to add my bibliography, I need to make sure that I have EasyBib open. 

1. Place your cursor where you want your bibliography

2. In the EasyBib window, choose "Add Bibliography to Doc." 


Share the Love with a Vote! 

My blog has been nominated in several categories for this year's Edublog Awards! If you enjoy reading this blog, please share the love and vote for Learn-Lead-Grow.

 IMPORTANT: PLEASE CLICK ON THE THUMBS UP LOGO BELOW. YOU WILL THEN BE PROMPTED TO SIGN IN USING A SOCIAL MEDIA ACCOUNT. You have to sign in using Facebook, Google, Linked In, or Twitter to cast a vote!

If you click on the number of votes, you will only see everyone who voted. Unfortunately this doesn't cast a vote.

Need help? Voting can be a little tricky!  Check out my how-to video!

 Please vote for ALL 3 categories on this page below (make sure you click on the thumb icon):

Best Ed Tech / Resource Sharing Blog:
See full list on Listly

Best Teacher Blog:

See full list on Listly

Best Individual Blog:

See full list on Listly

Goodbye Jeopardy, Hello FlipQuiz.Me! #Eddies14

I am a finalist for the 2014 Edublog Awards for Best Ed Tech / Sharing Blog, Best Teacher Blog, and Best Individual Blog. If you like what you see, it would mean so much if you cast a vote for me HERE.

Remember the days of using Jeopardy as a review game? Did you use a dusty old chalkboard or try to find some trendy PowerPoint template? Was it time consuming and difficult to form? Why not try an easy and free alternative?

What can I do instead? 

Perhaps you could add FlipQuiz to your review / flashcard repertoire to create interactive quiz boards that look and function much like flashcards with a game show twist!

How do I use it? 

Step 1: Create a free account at FlipQuiz

Step 2: Create your board. When you create your first board, you will be prompted to give it a name.


Step 3: Add category names. Just like Jeopardy has category names, you will need to create up to six category names for your questions. You can leave category names blank or use less than six if you would like!

Step 4: Add your questions. Next, you will want to add your questions and answers! Want a UDL way of reviewing material? This tool provides students with multiple ways of representing materials. You can incorporate text, pictures, videos, and hyperlinks (which could be used for audio) into your FlipQuiz!


Step 5: Play! After you are finished, you can begin playing your FlipQuiz.


What are the Advantages? 

FlipQuiz is entirely web-based, which means you can access it anywhere you have Internet access. The best part is that if you create a FlipQuiz, it can be used again and again! You can use multiple forms of media to stimulate learning. You can even embed this in a website, so that students can access it outside of the classroom!

What are the Disadvantages? 

Probably the biggest disadvantage is the fact that you do not have access to scoring features; however, they are available in the paid version. Unfortunately you are unable to upload pictures directly from your computer in the free version. You can find the URL of the picture and paste it into FlipQuiz. If you are interested in the paid version, it is $7 per month.

Conclusion:

Even if you use the free version, this is a great way to engage students differently without too much work on your part. One of the biggest limitations of old-school Jeopardy games is the fact that they address only one type of student - the student who excels reading text. Why not provide students with other ways to connect with material in the form of videos, pictures, and links?
Share the Love with a Vote! 

My blog has been nominated in several categories for this year's Edublog Awards! If you enjoy reading this blog, please share the love and vote for Learn-Lead-Grow.

 IMPORTANT: PLEASE CLICK ON THE THUMBS UP LOGO BELOW. YOU WILL THEN BE PROMPTED TO SIGN IN USING A SOCIAL MEDIA ACCOUNT. You have to sign in using Facebook, Google, Linked In, or Twitter to cast a vote!

If you click on the number of votes, you will only see everyone who voted. Unfortunately this doesn't cast a vote.

Need help? Voting can be a little tricky!  Check out my how-to video!

 Please vote for ALL 3 categories on this page below (make sure you click on the thumb icon):

Best Ed Tech / Resource Sharing Blog:
See full list on Listly

Best Teacher Blog:

See full list on Listly

Best Individual Blog:

See full list on Listly

Making Communication with Parents Easy: How Easy SchoolCircle is to Use (Part 2)

Saving time and making communication with parents more efficient has never been easier than with SchoolCircle,  a free website allows you to communicate quickly to entire groups or individual parents. My last post provided you with a brief introduction, but how does it work?

Step 1: Create Your Circle

After you sign up as a teacher, you will be prompted to create your own class, which is known as a circle. I named mine Mr. Bergman's Class.

Step 2: Invite Circle Members 

If you visit "Manage Members" on your dashboard and select "Invite," you will be able to invite parents as circle members. You will need to copy and paste your parent's email addresses in the space provided and click Send. School Circle automatically sends an email to parents! When parents receive the email, they will be prompted to create an account.

Step 3: Start Using SchoolCircle!

There are several things that you can do with SchoolCircle:

  • Create a Task - this is the perfect way to ask for volunteers and receive donations. Simply provide a description, share documents, add a due date, assign a number of volunteers needed, and even ask for specific food items!

  • Create an Event - perhaps you have an event that you are planning, like a class party or field trip. This allows you to do many of the same things that a task can do, but provides you several other features: create a starting and ending time, add a location, and even make it a reoccurring event. 

  • Create an Announcement - want to quickly share an announcement with parents without sending a hundred emails? Creating an announcement allows you to share information quickly and attach important documents to it!

  • Have Individual Conversations - this is exactly like it states, have individual conversations with parents in a private discussion forum setting. 
Conclusion:

After experimenting with SchoolCircle, I found it to be a perfect tool for the elementary and middle school classrooms. I also found that you are able to upload photos and files to SchoolCircle, which can be accessed by parents. This can be a helpful way to share information that may need to be accessed throughout the year.

Share the Love with a Vote! 

My blog has been nominated in several categories for this year's Edublog Awards! If you enjoy reading this blog, please share the love and vote for Learn-Lead-Grow.

Please take a moment to vote for my blog.

 IMPORTANT: PLEASE CLICK ON THE THUMBS UP LOGO BELOW. YOU WILL THEN BE PROMPTED TO SIGN IN USING A SOCIAL MEDIA ACCOUNT. 

Best Ed Tech / Resource Sharing Blog:
See full list on Listly

Best Teacher Blog:

See full list on Listly

Best Individual Blog:

See full list on Listly

Connecting Parents and Teachers with SchoolCircle (Part 1)

Busy. It seems like the best word to describe most parents, teachers, and students today. There is always some place to be or some event to attend. Being able to effectively communicate with parents (in all of their business) has to be one of the most frustrating parts of being a teacher today.  Some of us send emails that are never read or design websites that are never visited. What if there was a better way to reach our busy parents?

Over the next few posts, I am going to introduce you to SchoolCircle, a free one-stop-shop communication tool, which will change the way you communicate with parents. No more frustrating mailer daemon messages or disconnected phones. Communicate quickly to your entire group of parents or have individual conversations!

Communicate to the Entire Group:


Picture from School Circle (2014)
For example, let’s say that you wanted to post a message about your upcoming field trip and share an electronic copy of your permission slip. After your field trip, you wanted to share pictures with parents without sending out a billion email attachments.


With SchoolCircle, you can post messages, share documents, share pictures, assign tasks, create events, and even ask for parent volunteers. Imagine all of the trees we could save!

Communicate One-on-One:

Picture from School Circle (2014)
Have you ever wanted to quickly communicate with parents, but found yourself frustrated by the number of tasks necessary to find that information? SchoolCircle allows you to quickly find a parent’s name in your class roster and start a conversation, share a document or attach a picture.

Instead of spending time searching for information, you can spend more time concentrating on providing the best educational experience for all of the students in your class. 


There’s More!

There are a few more features I would like to cover in my next post. For example, what if you need class volunteers? How easy is it to use? Check out my next installment soon! 

Snorkl: My New Favorite Formative Assessment Tool

Snorkl is quickly becoming one of my favorite AI tools for students for several reasons. First, it allows students to demonstrate their und...