Develop Critical Thinking Through PBS Learning Media Daily News Stories


How do we help our students become critical thinkers and make educated decisions? It often begins with how they consume and curate information. Helping our students understand and navigate through the daily news is a very helpful strategy and can be used in any subject area.

PBS Learning Media's Daily News Story tool provides a daily story for students in grades 6 - 12 to analyze and practice their critical thinking skills.


PBS Learning Media: 

Not familiar with PBS Learning Media? 

  • PBS LearningMedia is a free tool containing over 100,000 videos, images, interactives, and lesson plans for every grade level and subject area.  Resources are aligned to national and Common Core academic standards.
  • PBS LearningMedia provides tools to increase your productivity, such as Lesson Builder, Storyboard and Quiz Maker. 
  • Teachers have access to a larger community of educators, who are committed to helping ALL children succeed. 
What is the Daily News Story? 
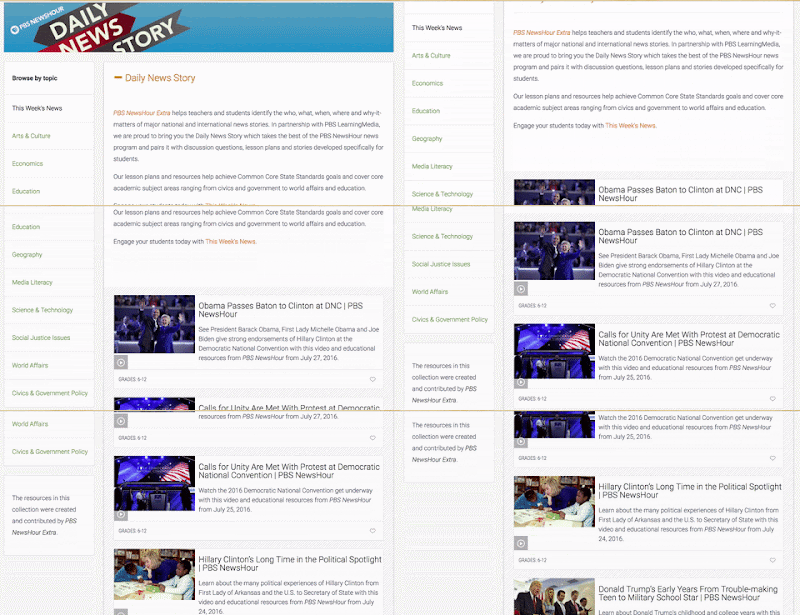
The Daily News Story is an extremely helpful tool for students in grades 6 - 12 to learn more about current events in politics, arts and culture, economics, world affairs, science, technology, and more.  Each current event is aligned to national and state standards, which makes it extremely easy to implement into the classroom. 

The Daily News Story also provides several important scaffolds and supports for students:
  • The information is provided in multiple mediums (video and text)
  • Students are provided with supplemental materials, such as critical thinking questions, handouts, and informational text
  • Students are provided with materials to further investigate the topic of interest
This tool is designed for students to think critically about current events and learn how to apply what they have learned. 

Conclusion

It is important for our students to understand how the world operates, how to interpret current events, and how to think critically about the world around them. PBS Learning Media provides excellent tools and resources to help ensure the success of our students as they advance into adulthood. 

Long Live Flashcards! How Tiny Cards is Changing the Way Students Learn Vocabulary

Vocabulary tends to be one of the biggest barriers all educators face in our classrooms, regardless of subject area. Even though our students come to our classrooms with diverse background experiences and learning needs, they still need options for how language, vocabulary and symbols are represented.

Tiny Cards iOS App:

Tiny Cards is a free iOS App designed for students to quickly learn new vocabulary terms in effective and efficient ways. Students can find user-created flashcards on a plethora of topics such as foreign languages, geography, history, and science.  You also have the option of creating and publishing your own flashcards with a free account.

Options for Learning:

I like the fact that Tiny Cards represents vocabulary terms in different ways for students through text, images, and spoken text. I also like the fact that Tiny Cards provides users with different ways of learning terms through interacting with flashcards, multiple choice questions, short answer questions, and self-assessments.

Conclusion:

The App is designed in a way that customizes instruction and provides students with the appropriate scaffolds, support, and rigor. After reading more about the App and its privacy agreement, I have found that this is an excellent tool for students ages 12 and older.

5 Ways to Make Your Pictures Speak a 1,000 Words

Students in our classrooms are highly variable in the way they learn and interact in learning environments. Many of our students love the power of images and video to learn. With this in mind, we will investigate the question: How do you make your pictures speak a thousand words?

Here are five ideas:

1. Google Drawings

I love Google Drawings, yet I believe it is the most underutilized Google App with the most potential. Students can use Google Drawings to label images, create graphic organizers, mind maps, etc.


David Garcia came up with a very cool idea. Why not create a Google Drawing and use it as an interactive worksheet? David designed a math activity, where students can make a copy of the drawing and use the image of a protractor to measure and draw angles.

2. Explain Everything with Explain Everything

A good friend of mine teaches a unit on genetics. He found that students can fill out a worksheet, but often struggle with explaining why they wrote what they wrote. He decided to have his students take a picture of his genetics worksheet and import it into the Explain Everything App on iPads.

 Students would record their voices and write on the image of the worksheet. When they were finished, they would send it to their teacher. Now he was to see and hear his student thought process.

3. Address Frequently Asked Questions with Screencasting

Every classroom contains students who need a little extra help, have frequently asked questions, or need the ability to rewind and listen to content again. Screencasting offers a great solution to address these questions or offer brief tutorials for students.

I enjoy using a free website called Screencastomatic to create brief videos for students. Not only does it offer the option to publish to YouTube or Screencastomatic, the recording places a yellow halo around your cursor to make it easier to track.  If you are a Chromebook school, there are other tools like Screencastify or Snagit.

4. The Problem with Homework


Kim Meldrum found that many of her students did not complete homework assignments because they did not understand the assignment and / or had no help. In fact, a recent survey by EdWeek found that 46.5% of parents struggle with understanding how to help their child complete their homework. Kim came up with a great solution, record a brief screencast to describe the assignment and uploaded it to her YouTube channel. She found other videos to add to the channel to help elaborate on concepts.

5. Where are you Posting? 

Whether you are flipping your classroom or creating brief tutorials, where you post your videos makes all of the difference! How can you make video presentations accessible to students who are deaf (without spending hours trying to come up with a transcript)? If you publish your video to YouTube, you can use the automatic Closed Captioning feature!

Conclusion:

Regardless of the device or tools you use, there are many other ways to make your pictures speak a thousand words. I just listed a few! In fact, I developed an entire framework to leverage the power of images and videos. Check this out below:


GUEST POST: The Visual Edge: Graphic Organizers for Standards Based Learning, Common Core 6-12


Today we have a guest post from Sargy Letuchy, author of the book discussed below. Enjoy! 


Common Core Standards pose many challenges, including quantity, rigor, and a lack of precise resources.  The Visual Edge: Graphic Organizers for Standards Based Learning, Common Core 6-12 is designed based on the principle that visual learning is an effective, efficient way to tackle these challenges.  It is an e-book of digital instructional tools carefully crafted for each English, History, and Science-grades 6-12 standard.  Using The Visual Edge, teachers are able to ensure that a lesson, project, or assessment is precisely tailored to the standard(s) in order to maximize classroom time.  

They can visually model and have students perform the skills outlined for their grade level with each tool provided, as the graphic organizers maintain classroom attention on the particular standard(s) being taught.  Each page has three sections:  the standard(s) in full text, an explanation section that clarifies the standard and details how to use the digital instructional tool at the bottom of the page, and the majority of each page features the corresponding visual instructional tool representing that standard(s) (e.g., a graphic organizer or example guide).  The Visual Edge is now available in e-book on google, in paperback on Amazon and Barnes N Noble, or by contacting the author at sargyletuchy@hotmail.com.    

5 Ways to Make Writing More Accessible in a Google Doc

Writing is an important component of all schools, yet it often creates barriers for students based on ability and disability. Google Docs is an awesome tool to increase student success in the writing process. Here are five ways to make writing more accessible in the classroom:

1. Google Voice Typing

Google Docs has a great feature called Voice Typing.  When you are in the Google Chrome Browser, open up a Google Doc, choose the Tools Menu, and select Voice Typing. Students can use this free speech-to-text tool to record their thoughts. 

2. Table of Contents Feature

How can you use Google to provide students with the scaffolds and supports they need? Why not turn to the table of contents feature in Google Docs to answer FAQ's or Frequently Asked Questions. Students will be able to click on a hyperlinked text, which will direct them to the resources they need to answer their questions. 

Want to see it done? Check it out!


3. Outline View

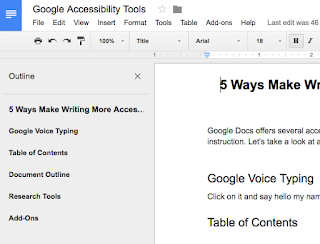
The outline view is a great feature to help anyone navigate your document. It provides you with a panel (in the left-margin of your screen) listing all of the headings appearing in your document. Click on any heading in this panel and you will automatically be hyperlinked to that section in your document. This is a great way to navigate long documents. Only text in the Heading format will appear in your room. How can you turn this feature on? Visit the Tools menu and select Document Outline.

4. Research Tools

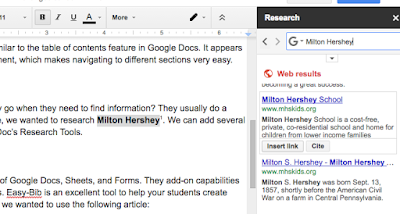
Where do most students go to do research? Google. Instead of leaving the document, you can visit the Tools Menu and select Research. Say for instance, you want to look up information about Milton Hershey. If you highlight the word in your document and use the Research tool, you will have a panel appear on the right-side of your screen with your research results. Find a picture, article, website, and even quotes. This feature allows you to hyperlink content directly into your document OR cite your resources as a footnote.  

5. Add-Ons

Google Docs, Sheets, and Forms come with default features. Add-ons provide enhanced capabilities within these three Google Apps. Some of my favorite Add-Ons for Docs are:

  • Easy Bib Add-On - this tool helps students cite resources and create a bibliography with the click of a mouse. Simply paste the URL of a website, article title, or book's ISBN number. Google will search through the database to find your correct article. With a click of a mouse, you can add this to your list of resources and create a bibliography in any format.
  • Orange Slice Rubric Add-On - I love Orange Slice as a way to generate rubrics for grading. I love that students have the ability to assess their performance through self-grading.  


Three Ways to Use Free Technology to Reduce Barriers in Your Classroom

How do you help ALL students learn and engage with the curriculum if they are experiencing problems and barriers? Here are some ideas to to help our students succeed in the classroom regardless of their ability or disability.

1. Voice Typing

How many of our students struggle with writing papers because of their ability to get their thoughts on a page or their typing abilities? Are we grading them on their knowledge or typing ability? Google Docs has a great feature called Voice Typing.  When you are in the Google Chrome Browser, open up a Google Doc, choose the Tools Menu, and select Voice Typing.


Students can use this free speech-to-text tool to record their thoughts. This can be a perfect tool for students with dyslexia, cerebral palsy, or a broken arm.


2. Provide Scaffolds and Supports through FAQ's 

I believe that there are three types of students in any classroom. Students who need your help, students who don't need your help (in fact, they wish you would stop talking and let them work), and frequently asked question students. Our focus should be on helping students who need help, but how do we help the FAQ kids when they have questions?

FAQ students often feel bad that they bothered you, but you can provide scaffolds and supports by creating a LiveBinder (with helpful resources) or create a Table of Contents in a Google Doc. Why not answer a few of their questions in this way?  Here are a few examples:

1. Reading Assignments the UDL Way (LiveBinders)

2. Creating a Table of Contents Using Google Docs 


3. Get Rid of One Size Fits All Discussion With Padlet

Why do we have students participate in one way? Padlet is a free tool that can be used on any device, which can provide with flexibility on sharing their reasoning. Padlet is basically a virtual post-it note platform, which gives students the ability to participate in ways that work best.
  • Type answer on the post-it note 
  • Attach a file (PowerPoint, Word, etc.) to explain reasoning, access grammar tools, and add visuals. 
  •  Attach a hyperlink to a an external source like Google Docs or create a MoveNote presentation, where they can verbally discuss their answer with their classmates.

Conclusion:

Removing academic barriers is an important part of the instructional process. By looking at the barriers that exist, we can provide students with ways to access the curriculum like never before. It is not so much the tool, but how the tool is used that makes all of the difference. What are your favorite strategies?


New Learn Lead Grow Home!

Hello readers! Happy New Year! It’s hard to believe that 15 years have passed since I launched my Learn Lead Grow blog. As we step into a n...