5 NEW Google Slides Features

Have you checked out Google Slides lately? Every time you look around, it keeps getting better and better! I want to share with you five new Google Slides features to make amazing presentations!

1. Add Diagrams

You can now add diagrams to Google Slides. Choose from a variety of templates to help you create a timeline, showcase a hierarchy, demonstrate relationships, and illustrate cycles.


2. Add-Ons Now Available in Slides!


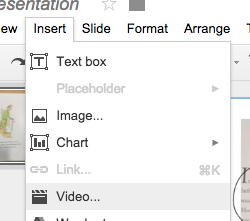
Add-Ons provide additional features that do not come standard in Apps like Docs, Forms, and Sheets. It is now available in Slides. Simply visit the Add-Ons Menu and choose Get Add-Ons.

You can choose from a variety of Add-Ons like Adobe Stock and Unsplash Photos, interactive presentations through PearDeck, and creative graphics through Balsamiq Wireframes. The inventory of Add-Ons will surely grow over the next few months!


3. Google Keep Integration

Google Keep is a great tool for keeping yourself organized, building task lists, and managing projects. You now have the ability to insert your Google Keep lists into your Google Slide presentations!


4. Use Voice Type Your Speaker Notes

The Voice Typing feature is a great productivity and / or accessibility tool. Use this text-to-speech feature to speak what you want to say in the notes section of your slides. Simply use the Chrome browser, open up Google Slides, choose the Tools Menu, then select Voice Type Speaker Notes.


5. See Q & A History

The Q & A feature is a great way for students to ask questions. If you are not familiar with this feature, you might want to check out my video below.


Google Slides now has a feature to see a history of your Q & A sessions.


Conclusion:

If you are not using Google Slides, you may want to consider using it. Not only does it give you the opportunity to build creative and collaborative presentations, it provides you with a resource to change the whole dynamic of giving a presentation.

DocHub: Your PDF Editor Solution

If you are like me, then you get a lot of PDF files. I just found a great Google App called DocHub to fill in forms, insert text, highlight, edit, draw, sign, stamp, or insert images into a PDF or Word documents.  You can even share and send your PDF's via the App.

How does it work? 

Visit the Chrome store to install the App. You can access your App by visiting chrome://apps/ or using the Show Apps icon.

Next, you open the App and upload a PDF or Word Document from your computer, One Drive, Google Drive, and Dropbox. I like that you have the option to make your document public or private.


Then, edit your document by inserting text, drawing, signing, stamping, highlighting, and even inserting a picture. Need to collaborate with someone else? You can share your document and collaborate.


Finally, download or send your document via Gmail, Drive, Classroom, One Drive, and Dropbox.


What I Like

I love the fact that this is a free and easy-to-use tool. Simply download the App to Chrome and link your Google account. 

I love the Page Manager, which displays thumbnails of each page in your document. Then you can rotate, delete, or reorder pages through drag and drop. You can merge PDFs or other materials with a simple click.

I love the collaboration features too. There are times when you might need to collaborate with a colleague. The collaboration tools make this very easy to do. 


Develop Executive Functioning Skills with Habitica

Many of our students struggling with executive functioning skills, such as planning, organizing, emotional control, and task management. There are a variety of techniques and tools to help students with this challenge. I was recently made aware of a free iOS and Android App called Habitica, which takes a gamified approach to task management.

Why use Habitica?

Habitica takes a gamified approach, where you build the health of an avatar through your performance. There are several different tasks, which can help you form positive habits. Your habits influence your experience points and health of your avatar.

The App provides a To-Do section, where you can set tasks and due dates. Every time that you complete a task, you are provide experience points, which impact the health of your avatar.

The Dailies section is for time-sensitive tasks, which need to be one on a regular schedule.

The Habits section provides you with tools to build positive habits or improve negative habits. Every time that you do a habit, you can tap a plus sign to award yourself with gold or a minus sign to take it away.


Items to Note

Habitica does require a login, which may pose challenges for students under the age of 13. You can link your Google or Facebook account to it. Habitica is free with limited features, but does offer a paid subscription with more features.

What are your favorite tools for executive functioning? Leave a comment below!

5 Ideas for Using Google Slides as a Portfolio

I work with many talented teachers, who use technology in creative and innovative ways. With the increased emphasis on Project-Based Learning (PBL) and standards mastery, it is important to help students find creative ways to showcase what they have learned. A portfolio may be a viable option for students to show progress and growth throughout the year. Many teachers turn to website programs (i.e., Google Sites, Weebly, Wix, etc.), Apps like SeeSaw, and web tools like LiveBinders.

Although they are good tools, it can be tricky to navigate privacy agreements and the skillsets of students under the age of 13. One of our teachers has created a portfolio using Google Slides! How might this work in your classroom? Here are some ideas:

1. Create a Google Slide Template for All of Your Students

Create a Google Slide Show template for students, including spaces for their name, goals, likes, dislikes, pieces of work, standards they have mastered, etc. Make it colorful and customizable, but also provide a basic structure too!


2. Show What They Know in Different Ways

The beauty of G Suite is that it provides students with different vehicles for showcasing knowledge. Here are just a few ideas:

  • Students can take a picture of an image, import it into Google Drawings, and add labels. 
  • Share a writing piece from Google Docs with a link
  • Showcase the different steps of an experiment by uploading images to your presentation
  • Record yourself reading text, upload it to Google Drive, and share the link. Add another recording several weeks or months later to show growth. 


3. Make a Copy of Your Template for Each Student

Placing your Google Slides template on Google Classroom is a good way to manage workflow and create a copy for each student.

Unfortunately, not everyone has the opportunity to use Classroom. If you would like to force students to make a copy of any Google Doc, Slide, Sheet, etc., just use this simple trick. 


4. Have Students Present Their Portfolios

Have students present their portfolios several times throughout the year, as a way to review content, showcase knowledge, and demonstrate growth. Whether it is sharing with a partner, small group, or in a teacher conference, students need opportunities to share what they have learned.


5. Use it as a Study Guide

The teacher that I had mentioned earlier uses this as a tool to get ready for state testing. It is a great way for students to reflect on what they have learned, see how things fit together and have the confidence that they have mastered a particular concept.


Conclusion:

Do you have any other creative ways of using Google Slides? I'd love to hear them. Please leave a comment below.

Create Your Own Teacher Games for Students with Smart Lab

If you are a Smart Notebook user, then you might have seen the Smart Labs feature. Smart Labs allows teachers to create your own customized interactive games for students to play on their SmartBoard or on a device. How does it work? Check out my video below:


Start with a Journey from Recap

Recap is an excellent tool for pre and post-assessments. If you want more information about Recap, please see my blog post.  The Start with a Journey is another great feature for students to use.

What is the Start With a Journey feature? 

The Start With a Journey feature is a pre-made storyline built around a topic of your choice. You can create your own journey or browse journeys made by other educators.

How Do I Use Start With a Journey?

Creating a journey is very easy!

  • First, you will want to login to Recap, create a Queue, and then click on "Start With a Journey." 

  • Next, you will want to choose "Create a Journey"

  • Then, create a guiding question and video introduction for your students. This guiding question can be used to help students understand the purpose for learning the content. 

  • Next, add your step by step instructions. You can add text and links for students to access content. Many teachers use links to share videos, have students take quizzes via Google Forms, or simply read an article. I like the fact that students can check off when they have completed a step. This is a great tool for increasing student accountability. 


Conclusion:

There are many reasons why I like this feature. First, if you are not familiar with Journeys, you can access another educator's. It is a great way to learn! Second, I like the fact that students can check off each step that they have completed. This is a great tool for accountability and organization. Finally, this is a great way to provide students with structured online activities. Whether you are in a 1:1 environment, hybrid learning environment, or have students participating in stations, it is a great tool for learning.

New Learn Lead Grow Home!

Hello readers! Happy New Year! It’s hard to believe that 15 years have passed since I launched my Learn Lead Grow blog. As we step into a n...