
Three #Google Tools to Take the Headache Out of Research Papers #Eddies14

I am a finalist for the 2014 Edublog Awards for Best Ed Tech / Sharing Blog, Best Teacher Blog, and Best Individual Blog. If you like what you see, it would mean so much if you cast a vote for me HERE.


Many teachers limit their students to writing research papers in Microsoft Word; however, here are three excellent tools that make it easy to write a research paper in Google Docs.


Tip #1: Create Your Own Table of Contents
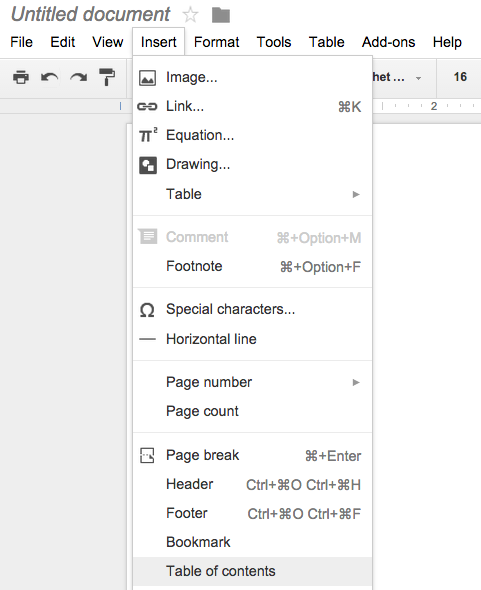
If you are like most people, you often ignore using the text styles feature  for headings like heading 1, 2, 3, etc; however, there is a huge benefit to use headings as section titles in your document.

Google can use these headings to help create your own table of contents with hyperlinks, which anchor to particular sections of your document.

How do you do it? 

Before you are able to use this feature, you must use the section titles format (i.e. Heading 1) for section titles! Once you are ready:

1. Place your cursor where you want your table of contents.

2. Select the "Insert" Menu and choose "Table of Contents"

Google will create your table of contents with hyperlinks to each section! Instead of scrolling through pages of text, you can now click a link. Here's a sample from a document that I recently created for a graduate course I am teaching:

Tip #2: Research From Within Your Paper

One of the biggest challenges of writing a research paper is the research part. Let's say that your students are writing a paper and need more information on Abraham Lincoln. Instead of exiting out of the document, you can use the Research feature in Google Docs. This let's you conduct a Google Search from within your actual document and let's you add pictures, information, even quotes directly into your document.


How do you do it? 

I like to do my research by highlighting (in my document)  the word or name I am looking up, but you do not have to do this prior to researching!

1. Choose the "Tools" Menu and select "Research"

2. If you haven't highlighted a word or name you want to research (from within your document), you will need to enter in your information in the embedded Google Search.

3. Search away and add information directly into your document with a click!


Tip # 3: Let Google Create Your Bibliography

Creating bibliographies can be difficult, especially when you have numerous types of sources. I highly recommend getting the EasyBib Add On, which helps you automatically site books, journal articles, and websites in the format you need!

How do you do it? 

1. Once you have downloaded the extension, you will need to access it by visiting the "Add-Ons" menu and selecting EasyBib Bibliography creator. 


2. A side menu will pop up and choose "Manage Bibliography" to open EasyBib. A side window will pop up on the right-side of your document, which will be used to add resources and eventually create your bibliography. 

3. Now you are ready to add resources! Instead of typing in the author's name, the title, publisher, etc., I can search by the title, ISBN or DOI number. EasyBib conducts a search and provides me with names of articles, books, etc. matching that title. I select the correct item to add it to my list of sources.

Adding the Bibliography to Your Document:

When I am completely finished and want to add my bibliography, I need to make sure that I have EasyBib open. 

1. Place your cursor where you want your bibliography

2. In the EasyBib window, choose "Add Bibliography to Doc." 


Share the Love with a Vote! 

My blog has been nominated in several categories for this year's Edublog Awards! If you enjoy reading this blog, please share the love and vote for Learn-Lead-Grow.

 IMPORTANT: PLEASE CLICK ON THE THUMBS UP LOGO BELOW. YOU WILL THEN BE PROMPTED TO SIGN IN USING A SOCIAL MEDIA ACCOUNT. You have to sign in using Facebook, Google, Linked In, or Twitter to cast a vote!

If you click on the number of votes, you will only see everyone who voted. Unfortunately this doesn't cast a vote.

Need help? Voting can be a little tricky!  Check out my how-to video!

 Please vote for ALL 3 categories on this page below (make sure you click on the thumb icon):

Best Ed Tech / Resource Sharing Blog:
See full list on Listly

Best Teacher Blog:

See full list on Listly

Best Individual Blog:

See full list on Listly

Goodbye Jeopardy, Hello FlipQuiz.Me! #Eddies14

I am a finalist for the 2014 Edublog Awards for Best Ed Tech / Sharing Blog, Best Teacher Blog, and Best Individual Blog. If you like what you see, it would mean so much if you cast a vote for me HERE.

Remember the days of using Jeopardy as a review game? Did you use a dusty old chalkboard or try to find some trendy PowerPoint template? Was it time consuming and difficult to form? Why not try an easy and free alternative?

What can I do instead? 

Perhaps you could add FlipQuiz to your review / flashcard repertoire to create interactive quiz boards that look and function much like flashcards with a game show twist!

How do I use it? 

Step 1: Create a free account at FlipQuiz

Step 2: Create your board. When you create your first board, you will be prompted to give it a name.


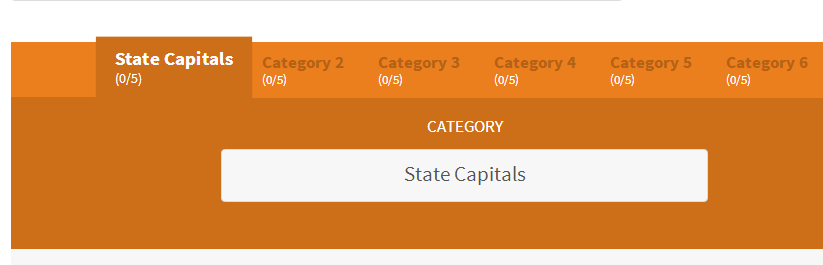
Step 3: Add category names. Just like Jeopardy has category names, you will need to create up to six category names for your questions. You can leave category names blank or use less than six if you would like!

Step 4: Add your questions. Next, you will want to add your questions and answers! Want a UDL way of reviewing material? This tool provides students with multiple ways of representing materials. You can incorporate text, pictures, videos, and hyperlinks (which could be used for audio) into your FlipQuiz!


Step 5: Play! After you are finished, you can begin playing your FlipQuiz.


What are the Advantages? 

FlipQuiz is entirely web-based, which means you can access it anywhere you have Internet access. The best part is that if you create a FlipQuiz, it can be used again and again! You can use multiple forms of media to stimulate learning. You can even embed this in a website, so that students can access it outside of the classroom!

What are the Disadvantages? 

Probably the biggest disadvantage is the fact that you do not have access to scoring features; however, they are available in the paid version. Unfortunately you are unable to upload pictures directly from your computer in the free version. You can find the URL of the picture and paste it into FlipQuiz. If you are interested in the paid version, it is $7 per month.

Conclusion:

Even if you use the free version, this is a great way to engage students differently without too much work on your part. One of the biggest limitations of old-school Jeopardy games is the fact that they address only one type of student - the student who excels reading text. Why not provide students with other ways to connect with material in the form of videos, pictures, and links?
Share the Love with a Vote! 

My blog has been nominated in several categories for this year's Edublog Awards! If you enjoy reading this blog, please share the love and vote for Learn-Lead-Grow.

 IMPORTANT: PLEASE CLICK ON THE THUMBS UP LOGO BELOW. YOU WILL THEN BE PROMPTED TO SIGN IN USING A SOCIAL MEDIA ACCOUNT. You have to sign in using Facebook, Google, Linked In, or Twitter to cast a vote!

If you click on the number of votes, you will only see everyone who voted. Unfortunately this doesn't cast a vote.

Need help? Voting can be a little tricky!  Check out my how-to video!

 Please vote for ALL 3 categories on this page below (make sure you click on the thumb icon):

Best Ed Tech / Resource Sharing Blog:
See full list on Listly

Best Teacher Blog:

See full list on Listly

Best Individual Blog:

See full list on Listly

Making Communication with Parents Easy: How Easy SchoolCircle is to Use (Part 2)

Saving time and making communication with parents more efficient has never been easier than with SchoolCircle,  a free website allows you to communicate quickly to entire groups or individual parents. My last post provided you with a brief introduction, but how does it work?

Step 1: Create Your Circle

After you sign up as a teacher, you will be prompted to create your own class, which is known as a circle. I named mine Mr. Bergman's Class.

Step 2: Invite Circle Members 

If you visit "Manage Members" on your dashboard and select "Invite," you will be able to invite parents as circle members. You will need to copy and paste your parent's email addresses in the space provided and click Send. School Circle automatically sends an email to parents! When parents receive the email, they will be prompted to create an account.

Step 3: Start Using SchoolCircle!

There are several things that you can do with SchoolCircle:

  • Create a Task - this is the perfect way to ask for volunteers and receive donations. Simply provide a description, share documents, add a due date, assign a number of volunteers needed, and even ask for specific food items!

  • Create an Event - perhaps you have an event that you are planning, like a class party or field trip. This allows you to do many of the same things that a task can do, but provides you several other features: create a starting and ending time, add a location, and even make it a reoccurring event. 

  • Create an Announcement - want to quickly share an announcement with parents without sending a hundred emails? Creating an announcement allows you to share information quickly and attach important documents to it!

  • Have Individual Conversations - this is exactly like it states, have individual conversations with parents in a private discussion forum setting. 
Conclusion:

After experimenting with SchoolCircle, I found it to be a perfect tool for the elementary and middle school classrooms. I also found that you are able to upload photos and files to SchoolCircle, which can be accessed by parents. This can be a helpful way to share information that may need to be accessed throughout the year.

Share the Love with a Vote! 

My blog has been nominated in several categories for this year's Edublog Awards! If you enjoy reading this blog, please share the love and vote for Learn-Lead-Grow.

Please take a moment to vote for my blog.

 IMPORTANT: PLEASE CLICK ON THE THUMBS UP LOGO BELOW. YOU WILL THEN BE PROMPTED TO SIGN IN USING A SOCIAL MEDIA ACCOUNT. 

Best Ed Tech / Resource Sharing Blog:
See full list on Listly

Best Teacher Blog:

See full list on Listly

Best Individual Blog:

See full list on Listly
Connecting Parents and Teachers with SchoolCircle (Part 1)

Busy. It seems like the best word to describe most parents, teachers, and students today. There is always some place to be or some event to attend. Being able to effectively communicate with parents (in all of their business) has to be one of the most frustrating parts of being a teacher today.  Some of us send emails that are never read or design websites that are never visited. What if there was a better way to reach our busy parents?

Over the next few posts, I am going to introduce you to SchoolCircle, a free one-stop-shop communication tool, which will change the way you communicate with parents. No more frustrating mailer daemon messages or disconnected phones. Communicate quickly to your entire group of parents or have individual conversations!

Communicate to the Entire Group:


Picture from School Circle (2014)
For example, let’s say that you wanted to post a message about your upcoming field trip and share an electronic copy of your permission slip. After your field trip, you wanted to share pictures with parents without sending out a billion email attachments.


With SchoolCircle, you can post messages, share documents, share pictures, assign tasks, create events, and even ask for parent volunteers. Imagine all of the trees we could save!

Communicate One-on-One:

Picture from School Circle (2014)
Have you ever wanted to quickly communicate with parents, but found yourself frustrated by the number of tasks necessary to find that information? SchoolCircle allows you to quickly find a parent’s name in your class roster and start a conversation, share a document or attach a picture.

Instead of spending time searching for information, you can spend more time concentrating on providing the best educational experience for all of the students in your class. 


There’s More!

There are a few more features I would like to cover in my next post. For example, what if you need class volunteers? How easy is it to use? Check out my next installment soon! 

From Your Camera Roll to Your Facebook Post: Cooliris One Place to See Your World

Photo source iTunes Store
I just came a very unique app called Cooliris and had to share it with you all! If you are a visual learner, you will especially love it. This could be a great visual brainstorming tool for students, who want to see pictures they have stored on their camera roll.

Cooliris is a free iOS and Android App that combines all of your pictures from various sources and places them in one place. All of your pictures from your camera roll, Instagram, Facebook, Twitter, Flickr, Dropbox, Google Drive, Picassa, and Google+ into a stunning 3D board!

It has a very simplistic interface, which makes it easy to share photos with your favorite person or social network.

Check it out and let me know what you think!


November is Clicks for a Cause Month!
Last November, I started a new tradition called "Clicks for a Cause." The concept was easy. You visit my blog, I donate!

I would like to continue again this year! For each visit to my blog during November, I would donate a penny to help baby Adam Maldonado and his family. Adam has been through more surgeries and procedures in his short life time, than most of us have been through our entire life. See his story here. 

At the end of November, I will be making a contribution to the family's GoFundMe page, to help with the enormous medical bills his heart procedures have cost. 

How can you get involved?
  • Visit and share my blog with others. I have others who are matching my contribution. The more clicks, the more money we raise! 
  • Like Adam's Facebook page and keep updated on his condition.
  • Pray for Adam and his family!
  • Make a contribution to the family's  GoFundMe page. 
  • Please contact me if you have any questions or if you have a  HEART to help a child in need!

Easy as 1, 2, 3: Math iPad Apps

My five year-old son Trey is in Kindergarten and loves math. He is constantly counting, writing down his numbers, and adding up his animal crackers. He is my inspiration for today's post about iPad Apps to help with Math.


1. Number Pieces

Learning place value is one of foundations of learning in the mathematics classroom. Many teachers utilize base ten blocks in their classroom; however, how can you help students learn this valuable concept through the power of technology?

Number Pieces is a free app to help students understand this very important concept. Students can this app to perform basic functions like counting or perform more complex functions like adding, subtracting, multiplying and dividing.  I also like the fact that there are annotation features to quickly let students to write down their answers.


2. Long Division Touch 

My daughter will be starting division very soon. What tools can I provide her to practice the important, yet challenging, concept of long division? Long Division Touch is another free IOS App available to teach her the important mechanics of long division; although there is also a paid version too!

This app provides students lessons on long division basics, zero up top, remainders, decimals, repeating decimals, and decimals in the divisor. This App includes in App purchases to use the random problem generator feature.


3. Math Fact Monster (.99 cents)

My daughter and son are always bringing home ziploc bags full of math flash cards; however, they are not always the easiest thing to carry around when we are waiting for a doctor's appointment or going out to dinner.

I usually try to stay clear from paid Apps, but Math Fact Monster is a good one! This App provides you with flash cards to customize what your child or students learn. Choose from all four operations or which numbers you would like to drill. It is well worth the .99 cents because it is much cheaper than a set of flashcards!


Check out some of my favorite math Apps. What would you add to the list?


November is Clicks for a Cause Month!
Last November, I started a new tradition called "Clicks for a Cause." The concept was easy. You visit my blog, I donate!

I would like to continue again this year! For each visit to my blog during November, I would donate a penny to help baby Adam Maldonado and his family. Adam has been through more surgeries and procedures in his short life time, than most of us have been through our entire life. See his story here. 

At the end of November, I will be making a contribution to the family's GoFundMe page, to help with the enormous medical bills his heart procedures have cost. 

How can you get involved?
  • Visit and share my blog with others. I have others who are matching my contribution. The more clicks, the more money we raise! 
  • Like Adam's Facebook page and keep updated on his condition.
  • Pray for Adam and his family!
  • Make a contribution to the family's  GoFundMe page. 
  • Please contact me if you have any questions or if you have a  HEART to help a child in need!

Using Class Dojo with Common Sense: Why it is NOT an Invasion of Privacy

I recently read an article in the New York Times by Natasha Singer that criticized Class Dojo and called it an invasion of privacy. In the article, the teacher posts the dashboard on his SmartBoard in the front of the room, where he deducts and adds participation points.  Every student is able to see their classmate's performance on the board.

While I agree that we don't post academic grades on walls anymore, there are ways of solving this dilemma that do not involve writing a degrading article in the New York Times. A simple look at the features of Class Dojo would reveal the solution. 

Article Concern # 1: Showing student performance in front of the class

At bare minimum, if teachers are concerned about other students seeing the performance of other classmates, they can use the Android or IOS Apps. Secondly, the article did not state that teachers can customize the display of the dashboard in their settings.

Simply open the class that you are working with and choose display settings (top left-hand corner). If this teacher did not want to display the number of points each student has accumulated, they could have selected "Don't Show Points."

Article Concern #2: Seeing and hearing notifications for positive and negative behavior

Once again, if you go to the display settings you can choose display settings. If this teacher did not want a message to pop up on their screen or a sound to play, they could have unchecked the "positive" and "needs work" boxes in the Show Awards Notifications box. They could have unchecked the "positive" and "needs work" boxes in the Play Awards sounds box.

Article Concern # 3: Tracking Student Performance

This article mentioned the evils of a company "tracking" your child's performance and "using" this data without parental permission. First of all, teachers have been tracking students performance  since schools began. It's called a report card. I would hate to get to the point when I have to ask a parent if it is ok for me to give a test or give a student a detention because they just punched a classmate. Teachers have been tracking the same data that appears on Class Dojo for ages.

Secondly, schools today are required to accumulate so much student data that parents (and New York Time reporters) would be surprised. According to the IEP's of most students with special needs, there is an element of "progress monitoring." This is a great tool used to track behaviors that could prevent a student from accessing the curriculum.

Conclusion:

In reaction to and other concerns in the article, Class Dojo has promised a revise to its current privacy policies by the end of the year. Secondly, Class Dojo has posted the following message on its blog.

It is the jobs of educators across the country to gather data on student performance and share that data with parents. Parents use grading portals like PowerSchool and Infinite Campus to communicate and share data with parents. Class Dojo makes that job easier in a confidential and professional way. This website is not the next Eric Snowden, threatening to leak out whether Tommy had a bad day or Janey had a good day. The bottom line is that Class Dojo is a great tool used by teachers, parents, and students across the country.


November is Clicks for a Cause Month!
Last November, I started a new tradition called "Clicks for a Cause." The concept was easy. You visit my blog, I donate!

I would like to continue again this year! For each visit to my blog during November, I would donate a penny to help baby Adam Maldonado and his family. Adam has been through more surgeries and procedures in his short life time, than most of us have been through our entire life. See his story here. 

At the end of November, I will be making a contribution to the family's GoFundMe page, to help with the enormous medical bills his heart procedures have cost. 

How can you get involved?
  • Visit and share my blog with others. I have others who are matching my contribution. The more clicks, the more money we raise! 
  • Like Adam's Facebook page and keep updated on his condition.
  • Pray for Adam and his family!
  • Make a contribution to the family's  GoFundMe page. 
  • Please contact me if you have any questions or if you have a  HEART to help a child in need!

New Learn Lead Grow Home!

Hello readers! Happy New Year! It’s hard to believe that 15 years have passed since I launched my Learn Lead Grow blog. As we step into a n...