Find Your Students' Breadcrumbs in Google Drive

Have you ever have a student just lose something on Google Drive and you have no idea where it went, what happened, or what they did? My colleague Lisa gave me a great tip, which can be used to check up on what your lovely little cherubs were up to.

Show Details Button:

You can use the Show Details button on Google Drive (I button) to provide you with a breadcrumb trail of actions that the student has taken. It will show you when and where they moved files. Need to know if a student was using their time correctly? Check out what they created, edited, or deleted. How does this work?

This is a great "together" activity for students who might not be on task.

1. Make sure that you and the student are logged into their Google Drive. 

2. Make sure that you do not have a folder or file selected.

3. Choose the Show Details icon (i button)

4. Select the Activity tab


See Specific Folder Activity!

You can also see specific activity occurring in that folder. Simply choose your folder, select the Show Details icon, and browse the folder activity. 

This feature will also provide you with information about your folders within Drive. Add a description of your folder, see who the folder is shared with, and when the last edit was made. Make sure that your folder is selected and choose Details to see this information!


Keeping it Straight: Google Drive, Docs, and Classroom

I don't know about you, but it can be difficult to keep Google Drive, Docs, and Classroom straight. As an Instructional Technology Specialist and former classroom teacher, I find that many of my colleagues feel the same way. To help everyone keep it "straight," I created a brief video analogy.

What do you think? Will this work with my staff?

Snap Type: The Write Way to Help Students Write Legibly

Have you ever thought about the challenges that handwriting poses? For many of our students, just the simple act of writing things down, while keeping up with the pace of instruction, can become an extremely challenging activity. Snap Type was designed to reduce barriers caused by poor handwriting and help all students access learning.

How does it work? Students use their iPad or iPhone to import or take a picture of a worksheet, then use their keyboard to add text. When students are finished, they can share, print, or email their document.

Snap Type comes in both a free and paid version. Some of its amazing features are:

  • Upload multi-page PDF's (up to 3 pages)
  • Save to Google Drive or iCloud
  • The pro version contains a filter tool, which helps students who have difficulty writing legibly with black text and a white background
Conclusion:

We may think that this tool is only designed for one student in mind; however, this could be the perfect tool for anyone who wants to stay organized and compose legible notes. 

Do you have other accessibility tools? I'd love to hear about them!

8 Ways NearPod Can "Draw" Your Students to Engagement

NearPod has changed the way that information is presented and how students are engaged. Teachers can provide students with interactive polls, short answer questions, the chance to draw their answer, and learn at their own pace (Homework).

My last post focused on how you can use the new Virtual Field Trips feature in NearPod to engage students. Today I would like to share with different ways you can have students use the Drawing feature in NearPod to engage students and help them demonstrate their understanding. 

1. Go Beyond the Dots

Multiple choice questions often benefit great test takers, but discriminate against students who need to show what they know in different ways. Why not use the drawing feature to help all students show what they know? Ask a question and give students a choice in how they respond. The Drawing feature provides students with the flexibility to show what they know through drawing, writing, or typing their answers.

2. Grammar Practice

Take a screenshot of a sentence and use the drawing feature to have students diagram sentence structure. For example, have students use red to underline verbs, green to underline nouns, etc. Take a screenshot of a paragraph and have students practice their editing skills.

3. Solve Math Problems

Use the drawing feature to have students solve math problems. The CCSS emphasizes word problems. Why not use NearPod to see what strategies your students are using to solve problems? For example, you might want to take a screenshot of a word problem and have students analyze and solve the problem. I used to hate when my teachers sent me to the board to solve a problem and I got it wrong; however, NearPod lets students take risk. Their answers can be shared anonymously with the class. This is a great way to show what worked and what did not work when solving the problem.

4. Diagramming Tool

Upload a picture of the human body, an insect, or computer. Have students use the drawing feature to label and diagram each part. 

5. Adjective or Noun Practice Anyone?

Upload a picture and have students identify all of the nouns in the picture. Practicing adjectives? See if students can identify the adjectives in your photo.

6. Activate Background Knowledge

Are you starting a new topic? In the past, I have often had my students do a graffiti activity, writing down everything they know about a particular topic. This is a great way to see what they already know, make connections, and even identify misconceptions. 

7. Graphic Organizers

Are you trying to have students understand how everything ties together and relates? Why not have students use the drawing feature to create their own graphic organizer? You may even want to take a screenshot of the graphic and post it to your website. 

8. Prediction Tool

Are you going through a story, history lesson, or science experiment? A certain element of surprise almost always engages students. Why not use NearPod as a way for students to predict what will happen next? Have students draw, write, or come up with solutions to problems as a way to enhance your lesson.

Conclusion:

These are only a few ways that you can use this tool to engage students. Do you have other ways you like to have students use the Drawing feature? I'd love to hear the creative ways that you use it in your classroom. 

No Google CardBoard? Try NearPod Virtual Field Trips

NearPod has changed the way that information is presented and how students are engaged. Teachers can provide students with interactive polls, short answer questions, the chance to draw their answer, and learn at their own pace (Homework).

Recently I learned about a new feature called Virtual Field Trips. In a partnership with 360 Cities, NearPod now gives teachers and students the opportunity to view pristine locations like the Taj Mahal, the Golden Gate Bridge, and The Great Wall of China. You can view famous architecture, famous artifacts, and even different planets! Virtual Field Trips are a great addition to any classroom.

This feature works very much like Google Cardboard; however, instead of using a view finder, students can move and position their iPad to get a 360 degree view of famous locations (all from  your iPad!).

How Can I Add a Virtual Field Trip?

To add a Virtual Field Trip slide to your NearPod:

1. Add a New Slide
2. Add Content
3. Select Field Trip

Conclusion:

Choose your location and add it to your NearPod! This amazing feature will transform the way students learn. It can provide them with new and engaging experiences to solidify learning. The best part is that each student can explore the location at their own pace and from their own perspective.

Instant Research Results with InstaGrok

Finding the right tool to address the needs of your students is often one of the biggest challenges of research. How can we provide students with the scaffolds and supports that they need?

Steph, who is one of my graduate students, suggested that I take a look at InstaGrok. This amazing interactive concept map can help students represent any topic of their choice. For example, if I type in the term "water," InstaGrok suggests key facts, websites, videos, images, and other concepts to help me with my research.

Students can also customize the difficulty level of their search results. Increase the difficulty and you will see more advanced terms, concepts, and facts. This is a great tool to differentiate the type of research that my students conduct.

InstaGrok has a journal feature, where students can record notes, create a bibliography, and write a research report. It also has a Quiz feature where students can assess their knowledge of the topic.

There is also a sharing tool, which allows you to share your search via social media, email, and even embed it on a website.

Have you ever used this tool? If so, how have student's responded? How are you using this in your classroom? I'd love to hear more!

Want to see it in action? Learn how to use InstaGrok in less than 2 minutes!


Help ALL Students Enjoy Writing with Google's Voice Typing

Think for a moment about the barriers that writing assignments pose to students. One student may find it difficult to get their thoughts to paper. A student with cerebral palsy may find it difficult to type text, while a student with a broken arm may have the same challenges. How do you meet your learning goal of composing a paper, while addressing the needs of your students?

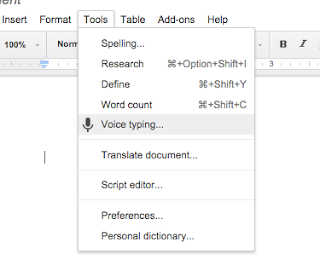
Google recently made an important addition to Google Docs called Voice Typing. This is no longer an add-on, but a standard feature. How does it work? Visit the Tools menu and choose Voice Typing.


This free tool simply takes voice to text technology to help your students compose a writing assignment. After playing with it for awhile, I found it to be very easy to use and accurate. Although not 100% accurate (when you think about it, what is?), it is still a valuable resource built into Google Docs. Students and teachers of all abilities will find this tool valuable.

Google has used this technology before. For example, when you open up Chrome, you have the ability to use speech to text to conduct a Google search. In the past, this has been perfect for my students who are dyslexic or have difficulties spelling.


Remember it's all about working smarter and eliminating barriers, sot hat students can spend more time learning and less time struggling.

The Sharing Dilemma: Setting a Passcode for Google iPad Apps

Many schools across the country are forced to use iPads in shared environments due to limited funding and resources. Although not ideal, there are ways around the constraints of multiple users and one device.

Schools often turn to Google Apps for Education (GAFE) Apps like Drive, Docs, Slides, and Sheets to help students create, save, and manage documents; however, logging out seems to pose a problem for users.

It may seem like your students have three basic options:
  1. Stay logged in and toggle to their account when they need to access their documents. 
  2. Remove their account from the device every time it is used
  3. Create a general account for all of your classes to use and share.
None of these options are safe or secure; however, Google offers another option. Thanks to my colleague Sharon, I found another way to make Google and iPads work in shared environments!

What is the Solution? 

Have your students set a passcode for their account on the iPad. How does it work? This tip currently works in Drive, Docs, Slides, and Sheets. The current version of Google Classroom does not have this feature. 

Step 1: Open Drive, Docs, Sheets, or Slides.
Step 2: Tap on the three horizontal line icon in the top-left corner of your screen.

Step 3: Choose Settings

Step 4: Choose Passcode Lock and turn Passcode Lock on for your device.

Step 5: Enter your four-digit passcode

Want to watch it in action? Check out my video:


Conclusion

Now you are set! Your student iPads are now safe and secure. Have more cool Google tips and tricks? I'd love to hear them.


New Learn Lead Grow Home!

Hello readers! Happy New Year! It’s hard to believe that 15 years have passed since I launched my Learn Lead Grow blog. As we step into a n...