Clips Makes Video Creation Easy for Anyone!

Clips is quickly becoming one of my favorite iOS Apps. If you are not familiar with this tool, it provides you with a quick and easy way to turn images and videos into movies. I like to think of it as a simpler version of iMovie, which makes it extremely easy to use in an elementary classroom.

I love the easy to use interface, which makes it extremely easy to add content. Users can add images or video from their camera or Camera Roll (library). There is also a feature called Posters, which allows you to add title slides to your movies. Just keep in mind that you have to use the red record button (red oval button at bottom of your screen) to "record" your clips. If you do not use this button, you cannot add your clips.

There are also additional helpful features too, like adding stickers, emojis, and music (from built-in soundtracks).


Want to learn how to use Clips? Check out my tutorial below:


Wheel Decide: A Useful Decision Making Tool

Having trouble with decision making? Want to give students options for completing an assignment? Sometimes random choice gives students a voice in completing assignments!

Wheel Decide is an actual website that can help you make random decisions. To create your own customized decision wheel, choose the "Modify" button in the bottom right corner of your screen.


Add up to 100 different choices for students from the list provided.


Then, share your wheel with a link, social media, or through embedding it on a website or blog!


Unsplash Photos: A Great Option for Royalty-Free Images

Images are an important part of learning; however, copyright laws tend to be confusing and murky. Therefore, it is important to find tools that will help you find royalty-free images.

If you use Google Slides, then you might want to check out the Unsplash Photos Add-On. You can easily search and add high-resolution royalty-free photos to your Slides presentation.


Yes, Google Slides does have a feature to insert royalty-free photos into your presentations. However, it's library is often limited. I like Unsplash Photos because it has a variety of high-quality images, which have been curated by people from around the globe.

3 Tools to Make Electronic Reading Easier


There is an art to reading electronically, which can make it a difficult task for our students and even colleagues. There are a number of tools available to help students read in an electronic format, whether they struggle with dyslexia, ADHD, or just need an extra support. 

Here are a few that I recently came across. 


I like Visor for reading while browsing in Chrome. This is the perfect tool for reading news articles, working in Google Docs, etc. The free Chrome Extension utilizes a screen dimmer to dim your screen, making it easier to focus on content on your Chrome Browser. Your cursor controls the point of focus feature, which highlights text line by line. It is also important to note that you can still utilize your cursor while Visor is on. 


Focus Reader View is a very simplistic, but effective tool. If you use Safari, then you might be familiar with the Safari Reader View. Focus Reader View is essentially the same thing for Chrome users. How does it work? Simply find an article that you like, turn on the Chrome Extension, and it gets rid of any distracting text, advertisements, and graphics from your screen. 


Do you remember using an index card, bookmark, or piece of paper to focus on one line at a time? The Reading Focus App for the MacBook is very similar to the strategy that many of us used or still use today. It provides you with a digital index card, which you can use to focus on one line at a time. It provides you with a variety of tools to customize the look and feel of your index card. If you are working in multiple applications like iBooks, Word, etc., this might be a good tool to use. 

Image result for reading focus card app

ExploreLearning Gizmos: A Great Simulation Tool

How often do you use technology to provide your students with hands-on learning experiences? It can be a difficult task; however, providing students with hands-on learning opportunities is extremely important. ExploreLearning's Gizmos is a Math and Science library of simulations. 

I recently came across a Hurricane Motion Gizmo during a recent search on Twitter. I was amazed at the quality of the simulation and the type of data that you can analyze. Simply drag the hurricane to analyze its path. Choose the weather station data to get wind speed data, cloud cover, and pressure information. 


ExploreLearning has an extensive library of Gizmos that explore a variety of math and science-related topics. Here are a few samples!


A Tour of the New Google Classroom

If you have used Google Classroom lately, then you might have noticed several new changes. First, you will notice that the Stream tab has turned into a place where notifications are communicated. Users can see the most recent activity by viewing the Stream. 


Next, you will notice that there is a new tab called Classroom. This particular tab is where you will spend the majority of your time posting content and collecting assignments.

The Classroom Tab also introduces us to the evolution of the Topics feature. What used to be a way of filtering content, has evolved into a way of organizing content by headings. Once you have established topics, you can organize your posts with a click.


The Classroom Tab also introduces us to a new type of post called Materials. This may be the way to go if you want to share a view only document, link to a website, or an attachment.

Finally, the Students / Classmates tab has been replaced with the People Tab. This tab allows you to invite students, teachers, and display the class join code.


Want a tour of the new Google Classroom? Check out my video below for more information!


Seesaw Activities Feature

There are times when you want your students to have a template for an activity to complete. If you are a Seesaw user, then you might be aware of the new Activities feature, which allows you to use templates created by other educators for your students.

Looking for a third grade math lesson or a beginning of the year activity? You will find it in Seesaw. 

Check out my video for more information:


If you are a paid user, then you have the ability to create your very own activities, which can be used across your district. If you are a free user, then you can use activities created by other educators. Give it a try today!

Are You Blockbuster or Netflix? Understanding Blended Learning Through Movies and Water

Do you take a Blockbuster or Netflix approach to education? It's a very important question to ask because it reveals your "why." When you understand your "why," you can begin to understand the need for personalized instruction in your classroom. Blended learning may be a great tool to inspire and adapt to the changing needs of our students.

Check out my video below for more:


Flip Learning with Flipgrid

Flipgrid is an amazing free tool to provide students with a voice in your classroom! Even the quietest student has a voice in this application.

Basic Terminology

The App is made up of grids and topics. Grids can be defined as a community where all of your topics are housed. For example, you might want to create a Period 1 grid, where all of your topics (discussion topics) are housed. Topics are discussion topics that you want your students to discuss via Flipgrid.

How Does It Work? 

Step 1: Create a Flipgrid Account

First, you will want to visit Flipgrid and sign up for a free account!


Step 2: Create a Grid

Next, you will want to visit Grids to create your first grid or community. For example, you might want to create a grid for each of your different classes, homerooms, etc. When you create a grid, you will also want to decide how you want students to enroll in your grid.

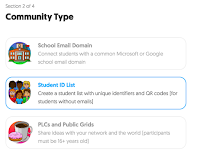
  • School Email Domain - if you students have Microsoft or G Suite accounts, they can use their email address to get in. Only students with the same domain (usually after the @ in an email address) can login to your class. 
  • Student ID List - you can manually enter in the names of students. You will need to include their first and last name. You will also need to include an identifier, which acts like a username / password to log students into your grid. It also provides you with a unique QR code to login via the mobile application. This is a helpful tool for elementary students. 

  • PLC's and Public Grids - are great ways to collaborator with colleagues and lead professional development. 

Step 3: Create a Topic

Then, you will want to post a Topic or discussion topic for students to respond to. To customize the topic to the needs of your students, there are several different sections to help customize your assignment. When you are ready to post your topic, choose create.

The Topic Details section is where you can provide important details about your assignment, adjust the video response time from 15 seconds to five minutes, and decide when your topic should post.


The Topic Privacy section is useful if you want to moderate student responses before student videos are posted. 


Use the Topic Resource and Attachment sections to add helpful resources like links, documents, videos, and emojis to your topics. 


The Video Features and Feedback sections help create another layer of customization in how videos are presented and how students respond. 

Step 4: Have Students Join

You can share your grid a variety of different ways, such as giving students a URL, code, or scan a QR Code.

If you chose a grid that requires users to be a part of your school domain, your students will be required to login with their Microsoft or Google accounts.

If you chose a grid that requires a Student ID list, students can login using a QR Code or entering in their unique identifier.


If you choose the PLC and Public Grid option, you can share your URL with others. In order to participate in the grid, you will need to have a Microsoft or Google account.


How Does It Meet Needs? 

Learners need flexible options for participating in learning because not every student learns the same way. Some of our students could excel through verbal discussion, while others may not. Some of our students are shy by nature and this platform can provide students with a "voice" without the social pressure associated with participating in class.


Easily Share Open Tabs with OneTab

I'm all about simplicity. Sometimes my keep it simple attitude is tested when I find myself multitasking or sharing multiple resources. I was contacted by someone the other day who wanted me to share several URL's to resources.

I have to admit that I was dragging my feet a little because of the effort that it required. Then I remembered a great Chrome Extension called OneTab, which takes all of my open tabs and makes them into an easy to share webpage.


How Does It Work? 

First, install the OneTab Chrome Extension.

Next, open up all of the tabs that you would like to share. Click on the One Tab Chrome Extension icon to save all of your tabs.


One Tab takes all of your open URL's and saves them. You have a variety of ways to use One Tab.


  • Restore all will open up all of your URL's on your screen. 
  • Delete all will delete your URL's
  • Share as a Webpage will allow you to share all of your links via a webpage or QR Code. This is what I did in the example that I described earlier.  


Seesaw: Addressing Student Variability One Post at a Time

With fall approaching quickly, many of us are finding ourselves looking for tools to increase student engagement and learning. It can be overwhelming to see the sheer variety of ed tech tools available to teachers and students. One of my favorite learning tools is called Seesaw, which serves as a learning journal and portfolio. It is especially a great tool for the elementary classroom.

What Makes Seesaw Great? 

First, Brain research is crystal clear that learner variability is the rule and not the exception. Students are very different in how they learn and interact with the world around them.

Seesaw provides students with options for engagement and expressing knowledge. Students can type our a response in a note, share a picture or video, add a drawing or annotate a picture, and add a link to another resource.


Next, teachers have all of the control with how content is posted in Seesaw. Teachers need to approve a student comment or piece of content before it is made visible in Seesaw. Safety is a key feature that makes this tool extremely helpful! This is extremely helpful when working with students under the age of 13.

Families can easily connect with your classroom in Seesaw, only seeing their child's content. If their child posts something, they can get a notification in realtime.

Finally, Seesaw can be accessed on a variety of devices. Whether you have iPads, Chromebooks, or laptops, you can access Seesaw with your students!

Not only can it be accessed on a variety of devices, but it also has additional features that can help safely address variability in the classroom! You might want to check out the Activities and Blogging features too!


Ramp Up for 2018-19 with Class Dojo's Toolkit

I have to admit that it's been awhile since I have checked out Class Dojo. I recently checked it out again and noticed some teacher-friendly tools that could be very useful for teachers this upcoming school year.

Check out Class Dojo's Toolkit, which contains all sorts of helpful features such as:

  • Timer
  • Group Maker
  • Noise Meter

For instance, have you ever had students that had no idea how loud they were? Class Dojo has a feature called Noise Meter that can help you control the volume level in your classroom. Whether you are using the App or the website, you can use your device's microphone to help monitor your students.


How often do you want students to work on a task for five minutes, which suddenly becomes fifteen minutes? The timer feature is another helpful tool to keep your students and yourself on task.


Want a tool to create random groups? Class Dojo's Group Maker tool makes it easy to create random groups. Simply say how many students you want per group and Class Dojo does the rest!


Guided Access: An iOS Tool That Never Gets Old!

If you are an iPad user, you may or may not know about an important Accessibility feature called Guided Access. This feature is helpful when you want to lock your students (or own children) into using only 1 application. This may be helpful when you have a student who is distracted and needs to focus or if you have a toddler who shouldn't be exploring other Apps.

How does it work? 

Check out my video below:


Special Guest Post: Voice and Choice Is Important—but Sometimes It’s Not Enough

Voice and Choice Is Important—but Sometimes It’s Not Enough
During my first year of teaching in 2002, I walked into my government class on the first day of school to a group of comedic, socially confident seniors. A flashback from the 80’s movie “Summer School” with Mark Harmon ensued. Most of the students acknowledged my entrance by reluctantly quieting down and taking their seats, but one boy, Jack, remained standing, even as I started to introduce myself. I asked him to take his seat, “Where should I take it?” he asked, with a mischievous grin. The class roared with laughter and I knew it would be a long semester.

Over the first few weeks, Jack turned in below grade level work while tirelessly promoting himself socially. The assignments he cared to turn in demonstrated his clear lack of interest in the class subject matter as well as a real gap in his writing ability. For a clever wordsmith, Jack had a really hard time expressing his ideas in written form.

I wanted to get him interested in my class and to support him in applying the strength of his verbal voice to his writing. Through my efforts with Jack, I realized that while giving students opportunities to pursue their interests can improve engagement, it’s not always enough. Without a structural element as a backbone, students won’t always keep up with grade level skills and standards. In the case of writing, students can love their topic but have no idea how to structure a thoughtful essay around it.

This realization has guided my work over the past 16 years, and in my most recent role as a high school ESL teacher, I continue to balance the need for building flexibility in voice and choice with developing structural supports to help my students meet the reading and writing standards for their age level. In some ways, my current approach still owes a lot to that challenging semester with Jack.

From Unfocused Rant to Coherent Essay
When I was working with Jack, all of my coursework and raw instincts at the time told me that I must get to know him and creatively base assignments on what I learned about his learning style and interests. Through class discussions, individual conversations with him and close dissection of the work he submitted, I gained insight into his personal background, academic strengths and areas for growth. Jack reminded me of Matthew Broderick’s character from “Ferris Bueller’s Day Off”—he had always gotten by on popularity and was barely an average student, yet he possessed above average intelligence and worldliness.

One day, after sulking in the hallway, Jack shared with me that his parents were trying to enforce what he thought was an early weekend curfew, which was getting in the way of his burgeoning social life. With the unit essay on the Declaration of Independence coming up, I seized an opportunity to make this assignment more personal for Jack. The assignment was to closely read the document, identify one purpose or theme and explore it through writing a personal, persuasive essay rooted in text evidence. I suggested that Jack write a persuasive essay to his parents explaining why he wanted to be more independent, so that he could fuel his writing with the passion he had for his personal issue. He got into it, and what he turned in was very emotional and compelling. The problem was that it was a completely unstructured, unfocused rant.

It was clear that Jack lacked the persuasive writing literacy skills to make his essay a coherent argument and that I had to do something to bridge this gap. Furthermore, as I began reviewing other students’ essays, I realized many of them were having the same issue—disorganized, unclear writing.

I tried giving my students a rubric to encourage an improvement, but that didn’t help. Being inexperienced, I was not immediately sure why the rubric wasn’t working and what to do to remedy the problem. After reflecting on this for some time, I finally got to the heart of the issue: the rubric told them where I wanted them to be, but not how to get there. I made some assumptions about the skills my students had and as a result, I hadn’t equipped them to be successful with the level of planning and organizing this assignment required. Although my students were engaged because they found topics that mattered to them, the essays I received from a mostly college-bound, senior class were unacceptable.

I wanted to develop a tool to help my students logically connect their personally chosen themes and purposes to text evidence from the Declaration of Independence, and wanted to modify it for Jack to help him plan and express his argument to his parents through a basic structure of claim, reasons and evidence.

My solution was to create a graphic organizer to help students structure their thoughts more clearly. Essentially I developed a chart aligned to the particular practice we were trying to develop and worked with students to rewrite their essays. Jack’s was focused on the skill set that would eventually become the first College and Career Readiness Anchor Standard for Writing: “Write arguments to support claims in an analysis of substantive topics or texts using valid reasoning and relevant and sufficient evidence.” His graphic organizer looked like this:

Claim


Support
Support
Support
Reason 1-


Evidence 1-   


Reason 2-


Evidence 2-   


Reason 3-


Evidence 3-   


Using this graphic organizer, Jack could connect the dots on his thoughts before writing his essay. He was able to focus his essay on the claim he wanted to make to his parents about his curfew, come up with logical reasons for that claim and drive home his points with related evidence.

When I looked at Jack’s first and second essays next to each other, there were stark differences. In addition to the meatier body, which was now fleshed out with stronger reasons and substantial evidence, the essay had a much more coherent flow. Having his reasons and evidence already in the organizer when he started drafting helped him leverage the skills he already had like building in transitional sentences and painting a picture through descriptive details. Not to mention, his essay had expanded by about 300 words.

It wasn't just Jack, I saw improvements in my other students’ essays too. Most of the essays in the first round included reasons that didn’t support the claim or lacked evidence. Most essays in the second round had a stronger connection between claim, reasons and evidence because students were pausing to consider these links before drafting.

Flash Forward
My experience with Jack and his peers taught me that it is critical to build effective standards-aligned tools to scaffold instruction and guide students toward a particular outcome. The strategy that has worked best for me is to develop flexible graphic organizers that I can modify for each student depending on the central skill or standard they’re working on.

As my role has changed to working with English language learners and state-mandated literacy standards have become more prevalent, I have continued to use this strategy, developing a graphic organizer for each skill I teach and encouraging my students to modify it as they wish to make it work better for them.

I’m grateful for my experience with Jack and the senior government class because it helped me figure out early in my career that simultaneously increasing voice and choice and using standards-based graphic organizers can be powerful for learners. The former gets students engaged, and the latter develops and strengthens literacy skills.

Over the years, I’ve taught a number of students that share some of Jack’s characteristics, and countless others with a diverse range of needs and strengths. I’ve learned that designing instruction that meets the idiosyncrasies of learners and building flexibility in voice and choice is important, but alone, those strategies are insufficient.

______________________________________________________________________________
This piece originally appeared on EdSurge on 6/5/18. (https://www.edsurge.com/news/2018-06-05-voice-and-choice-is-important-but-sometimes-it-s-not-enough)

Sargy Letuchy is a Bilingual-ESL teacher near Chicago, Illinois. Over the past 16 years, Letuchy has taught ESL, Social Science and has coached tennis in suburban Chicago. He has experience presenting, consulting and writing about standards-based curriculum design and is the author of The Visual Edge: Graphic Organizers for Standards Based Learning. The book is available on Amazon, Barnes n Noble, or by contacting Sargy at sargyletuchy@hotmail.com. Also, connect with Sargy on Linkedin.

WebCam Record Chrome Extension

Are you looking for a quick way for students to reflect or summarize content? You might want to check out Alice Keeler's Webcam Record Extension.

This tool allows students to record up to a 30 second video on their laptop, MacBook, or Chromebook. After you select "Finish," your video will be saved in a Folder to your Google Drive. Each video can be shared via a link from Google Drive.

This tool is an excellent tool to have students practice the art of short and succinct elevator speeches. Use the tool to summarize or reflect on learning!


A Brief Tutorial and Demo of Apple Classroom

Do your students use iPads? Then you have to check out Apple Classroom! It might even be a good tool to manage your own children's iPads!

Here is a brief tutorial and demo on using the Classroom App:


Encourage Audience Participation Through Mentimeter

I love creating interactive presentations because it increases engagement. I love using a variety of different tools, like Google Forms, Kahoot, NearPod, and Socrative. A colleague of mine shared another great tool called Mentimeter.


What is It? 

Mentimeter is an interactive presentation tool, which allows teachers to create interactive presentations through a variety of voting question types:

  • Multiple choice
  • Word clouds
  • Image choice
  • Quiz
  • Scales
  • Open-Ended Questions
  • Q and A
The free version of Mentimeter allows you to create 2 voting question types per presentation, plus a variety of other features. Learn more about the different voting question types here

How Do Students Connect? 

Students can access your presentation through Menti.com or through a QR Code. 

Once students have voted, they can see your results!

Conclusion:

This could be a great tool to use in the secondary classroom to create more interaction and engagement in the classroom. 


Make a Self-Paced Quiz in Google Slides

Google Slides is more than just a tool to present information. Have you ever thought about creating a self-paced lesson or quiz using Slides? Google Slides could be a great tool to help students learn at their own pace.

How Do I Do It?

Step 1: Create Your Google Slides presentation.

I usually bundle each question I ask into 3 slides. 1 slide is dedicated to ask the question and 2 slides for feedback (correct and incorrect answers).


Step 2: Link your answers to the correct or incorrect answer slides. 

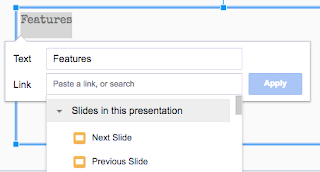
I begin by highlighting one of my answers and visiting the Insert Menu and choosing Link. You can also choose the Link icon.

One very helpful resource is to link to specific slides in your presentation! So if students answer correctly, I want them to visit the correct answer slide. If students visit the incorrect answer, they go to the incorrect answer slide.


Step 3: Move to the Next Slide or Go Back.

So what do you do if students get an answer wrong? You can have participants go back and try to answer the question again or add a slide with the correct information. For my sample presentation, I drew a shape and hyperlinked it to the question slide.

If students get the answer correct, I have them visit the next question.


Step 4: Publish Your Presentation

I like publishing self-paced quizzes on Slides, so that students cannot see answers. You can do this by visiting the File Menu and choosing Publish to the Web. Once your presentation is published, participants will NOT see the slide view or presenter notes.

Here is what my presentation looks like in a Published format.


Additional Considerations

Here are some additional things you may want to consider.
  • Teach a mini-lesson by inserting a video from Google Drive or YouTube.
  • Make your Slides function like a self-paced module or textbook by inserting text to explain content and concepts. 
  • Insert hyperlinks to additional resources 
  • Insert links to other tools to foster participation. For example, link to a Google Doc to reflect on content or a Google Drawing for an interactive worksheet. 

More Ways to Customize Google Forms!

I work with teachers all over the country on using G Suite in the classroom. One of the biggest knocks on the new version of Forms is how limited it is to customize its appearance or theme.

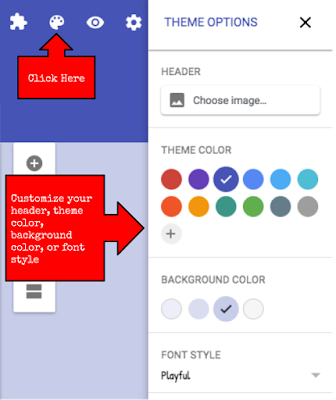
Forms recently launched a more options to customize its appearance, giving you the ability to change the header photo, theme color, background color, and font style.

How Does it Work?

Simply click on the Customize Theme (color pallet icon) to launch Theme Options.

Mix and match the background color, them color, and font style. Forms automatically makes the adjustments that you want.

Click on the X to close out.


Draftback: Sit Back, Relax, and Watch Your Google Doc in Action

Writing is an important element of learning; however, many of our students struggle to understand the abstract process of writing. Have you ever had a student quickly write a draft of an essay and turn it in? Have you ever questioned how much time was spent writing an assignment?

Draftback is a Chrome Extension that generates a video of every revision made in a Google Doc. It also provides very helpful statistical information about a document, such as time spent and when revisions were made.

Want to see it in action? Check out my video below:

Trace My Shadow - Helpful Digital Citizenship Tool

I recently came across a great digital footprint tool called Trace My Shadow.  It is an excellent resource for helping students and teachers understand the types of information that you are leaving behind and the risks associated with it. 


How Does It Work? 

Visit the Trace My Shadow website and choose which devices you use on a regular basis. The site will then provide you with ways that your device and identity are traced by using that device.


You can check out information in the Traces You Accumulate section to see which devices are associated with certain traces and the type of information that you would collect. It will provide you with a total tally of traces and tips for staying safe! 

Conclusion
 
Talking about digital citizenship is an important part of teaching today; however, why do many of our students' eyes glaze over when we discuss it? Perhaps our students struggle with digital citizenship because we fill them with dated and irrelevant information. Perhaps they are tired of the scare tactics that are used to prevent them from taking inappropriate pictures or giving away personally identifiable information. 

Trace My Shadow is a great tool to make things relevant for students and adults. Not only does it provide you with valuable information, but it also provides you with tips for keeping yourself safe! 


Have You Tried Kahoot's Jumble Feature?

Have you played Kahoot lately?

If you have, then you might have seen a new type of Kahoot game called Jumble. Jumble allows you to design questions that occur in a certain order. For example, if you were going to have students place the events from a story in chronological order, then Jumble would be a good tool for you to use. This option promotes higher-level thinking, which is an extremely important component of learning.

How Does it Work? 

First, you will want to sign into your teacher account and create a New Kahoot.


Next, you will choose Jumble.


Then, you will want to name your Kahoot and provide a description. Add a Jumble question. Make sure that you put your events in the order that they occur! 


Finally, you will want to invite your students to play! Students will see the question appear on the teacher's screen. Students will have to drag and drop their answers (circle, square, etc.) into the correct order on their device's screen (grey dotted area in the picture below).


Search More Effectively with Google Search Education

We live in an age where information is just a tap or mouse click away. I have learned that locating information is a fine art. Are your students well-versed in how to search for the most appropriate, relevant, and timely information?

Google has developed a Google Search Education website to address this very challenge. The site is composed of Lessons & Activities, Power Searching, A Google a Day Challenge, and Live Trainings.

Each item provides students and teachers with the strategies and tools that they need to find information quickly and effectively.


New Learn Lead Grow Home!

Hello readers! Happy New Year! It’s hard to believe that 15 years have passed since I launched my Learn Lead Grow blog. As we step into a n...