I developed the following video (2 minutes) for you in case you want to remind students how everything is done on a Google Doc can be seen. The video shows how to use Version History to see everything that was ever done on a document. This can be a helpful tool to have in your toolbelt of classroom management strategies.
Google Docs Version History as a Classroom Management Strategy
Although it is nothing new to learning, you probably know that many of our students use Google Docs as a way to chat with one another during the day. Collaboration can be a good thing, but it can also be a distraction too. It’s probably a good idea to periodically monitor and talk to students about your expectations of their use of Google Docs.
I developed the following video (2 minutes) for you in case you want to remind students how everything is done on a Google Doc can be seen. The video shows how to use Version History to see everything that was ever done on a document. This can be a helpful tool to have in your toolbelt of classroom management strategies.
NOTE: Version History can only be accessed on a computer or Chromebook. If you are interested in seeing a student’s Version History, just share the document to Google account and access it via a computer.
I developed the following video (2 minutes) for you in case you want to remind students how everything is done on a Google Doc can be seen. The video shows how to use Version History to see everything that was ever done on a document. This can be a helpful tool to have in your toolbelt of classroom management strategies.
Use Google Keep to Create Collaborative Checklists and Reminders Based on Location
Have you ever considered using Google Keep as a tool for students to set goals, monitor progress, create to-do lists, or set up reminders? Here are some creative ways to help students stay organized using Google Keep:
1. Create Checklists
Do you incorporate Project-Based Learning in your classroom? Creating checklists is an extremely helpful scaffolding tool for setting goals or creating checklists. Simply create a new list, click on the three vertical dots, and show checkboxes!
Checklists are extremely helpful for dividing up tasks, creating grocery lists, or creating goals for the week.
2. Collaborate with Others
Did you know that your notes in Google Keep can be shared with others? Simply, click on the collaborator icon and choose who you want to share your note with. This is the perfect tool for sharing ideas, tasks, links, and notes for completing group projects.
Setting goals and measuring progress is an important way for our students to develop important executive functioning skills. Google Keep could be a great tool for students to aid in collaboration, setting goals, and developing checklists.
1. Create Checklists
Do you incorporate Project-Based Learning in your classroom? Creating checklists is an extremely helpful scaffolding tool for setting goals or creating checklists. Simply create a new list, click on the three vertical dots, and show checkboxes!
Checklists are extremely helpful for dividing up tasks, creating grocery lists, or creating goals for the week.
2. Collaborate with Others
Did you know that your notes in Google Keep can be shared with others? Simply, click on the collaborator icon and choose who you want to share your note with. This is the perfect tool for sharing ideas, tasks, links, and notes for completing group projects.
3. Set-Up Reminders Based on Location or Time
Did you know that you can set up reminders for Google Keep based on a date or a particular location? This could be helpful for completing assignments. Perhaps students who struggle with completing homework need a reminder when they get home. Perhaps you need to remind students to complete the final phase of their project next week. Reminders are a great way to do it!
Conclusion
Setting goals and measuring progress is an important way for our students to develop important executive functioning skills. Google Keep could be a great tool for students to aid in collaboration, setting goals, and developing checklists.
3 Visual Learning Google Keep Tools
How often do you use Google Keep? I have to admit, I don't have as much time or experience using Google Keep as I would like to. Therefore, I have decided to dedicate my next few posts on how you can use Google Keep inside and outside of the classroom.
What is Google Keep?
First of all, what is Google Keep? If you are not familiar with this tool, it is a digital notepad, where you organized and add digital notes, checklists, drawings, and images. You can access Google Keep via the web or a smart device, like a phone or iPad.
Here are three helpful features for using Google Keep to represent content visually.
1. Labels
Do you use hashtags on social media? Labels are very similar, in the sense that they help categorize your notes by subject or keyword. The best part is that you can filter your notes by the labels that you use. Organize your research by keywords, so that you can filter out unnecessary notes.
2. Note with Drawings
If you are a visual learner, who needs to draw out a concept or illustrate an idea, this feature is for you. Add single or multiple drawings to your note. Plus you can add additional text and/or links describing your content.
3. Note with a Picture
 Do you have a picture of an idea? Google Keep lets you attach a single image to your note. You can add additional text and/or links describing your content.
Bonus Tool! Grab Text from Image
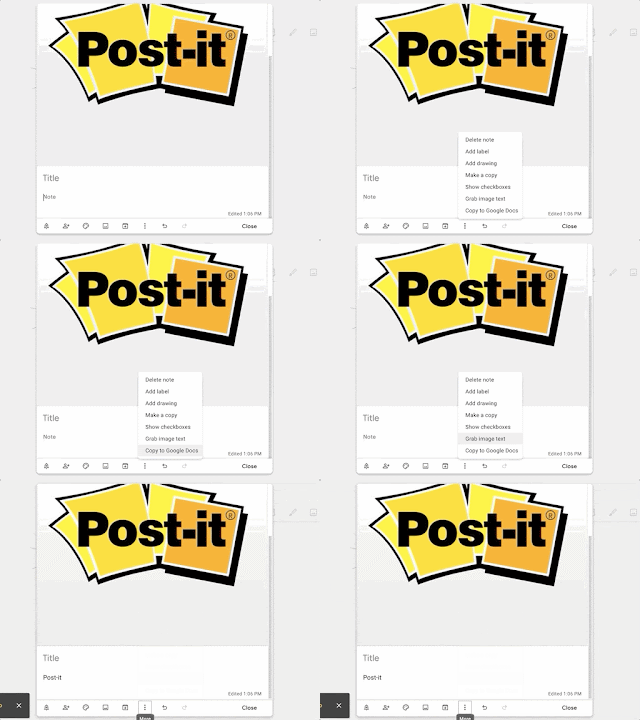
The Grabe Text from Image feature is a really neat way of using technology to "read" and search for text within your drawing or image. Here's how it works. Google uses Artificial Intelligence to look for content within your pictures. Once it finds it, it places content in the notes section of your note.
What is Google Keep?
First of all, what is Google Keep? If you are not familiar with this tool, it is a digital notepad, where you organized and add digital notes, checklists, drawings, and images. You can access Google Keep via the web or a smart device, like a phone or iPad.
Here are three helpful features for using Google Keep to represent content visually.
1. Labels
Do you use hashtags on social media? Labels are very similar, in the sense that they help categorize your notes by subject or keyword. The best part is that you can filter your notes by the labels that you use. Organize your research by keywords, so that you can filter out unnecessary notes.
2. Note with Drawings
If you are a visual learner, who needs to draw out a concept or illustrate an idea, this feature is for you. Add single or multiple drawings to your note. Plus you can add additional text and/or links describing your content.
3. Note with a Picture
 Do you have a picture of an idea? Google Keep lets you attach a single image to your note. You can add additional text and/or links describing your content.
Bonus Tool! Grab Text from Image
The Grabe Text from Image feature is a really neat way of using technology to "read" and search for text within your drawing or image. Here's how it works. Google uses Artificial Intelligence to look for content within your pictures. Once it finds it, it places content in the notes section of your note.
Sorting Activities with Post-It Plus
 Throughout my career in the classroom, I have found it highly effective to provide students with opportunities to predict content and information. Sorting activities provide students with a certain amount of rigor and relevance to create engaging learning environments.
Want to provide students with an easy, yet highly engaging activity? Why not write down characteristics on post-it notes and have students use the Post-It Plus iOS App to scan, sort, and edit content.
This is a great way for students to recognize patterns, make connections with content, analyze background knowledge, and build upon new knowledge.
Want to see this in action? Check out my video below on how this might work with characterizing mammals and reptiles:
Creating and Sharing a TIP Vocabulary Chart in Google Sheets
Vocabulary is an essential component of learning; however, many of our students struggle with understanding vocabulary terms. A lack of background experience often creates barriers to learning new vocabulary terms. How can we provide our students with effective ways to access and understand new vocabulary terms?
What is the TIP Chart?
In her book, Learning the Fast Lane, author Suzie Pepper Rollins describes a vocabulary method called a TIP Chart, which stands for:
What is the TIP Chart?
In her book, Learning the Fast Lane, author Suzie Pepper Rollins describes a vocabulary method called a TIP Chart, which stands for:
- Term
- Information
- Picture
Using a TIP Chart provides students with multiple means of representing vocabulary terms so that students have the foundational knowledge and experiences to understand terms. Here's an example of the term bridge:
Make Your TIP Chart Interactive!
I like the idea of using a TIP Chart to help students learn important terms. Here are some suggestions to make it even better!
1. Make an electronic version of a TIP Chart in Google Docs, Slides, or Sheets. This will allow students to have access to it inside and outside of the classroom. If we want students to use vocabulary outside of the classroom, then we need to provide ways for them to access terms. Using technology is a great way to make it portable.
2. Share Your TIP Chart with a QR Code, shortened URL, or post it to your Google Classroom. The idea is to provide students with access.
3. Add links to additional videos and websites to provide different exposures to the term. Sites like YouTube, YouTube 360, Flocabulary and Quizlet provide students with great visuals and videos to better understand terms.
Creating and Sharing a TIP Chart in Google Sheets
Want to see how I created mine in Google Sheets? Check out my video below:
Google Docs Quick Create Chrome Extension
It's often the little things that get overlooked! That's why I would love to share a quick and easy Chrome Extension called Google Docs Quick Create.
Use this extension to quickly create a new Google Doc, Sheet, Slides presentation, Drawing, or Form. It is a great way to save time and effort for students and teachers alike.
How Does It Work?
It's that easy!
Benefits
There are so many benefits. First, it is extremely easy to use and install. Secondly, it could be a great way to provide an extra layer of support for teachers, who may struggle with navigating through G Suite. Finally, it helps save time. Students and teachers can quickly create new documents with the click of a button.
Use this extension to quickly create a new Google Doc, Sheet, Slides presentation, Drawing, or Form. It is a great way to save time and effort for students and teachers alike.
How Does It Work?
- Then, click on the Chrome Extension icon and choose which type of Google App that you want to use. Once you click on the application that you would like to use, a brand new Doc, Sheet, Slide, Drawing, or Form appears.
It's that easy!
Benefits
There are so many benefits. First, it is extremely easy to use and install. Secondly, it could be a great way to provide an extra layer of support for teachers, who may struggle with navigating through G Suite. Finally, it helps save time. Students and teachers can quickly create new documents with the click of a button.
Are You Accidentally Oversharing When You Take a Picture?
Are you sharing too much information when you take a picture? You might want to consider taking off the geotagging feature on your iPhone or iPad. Geotagging allows someone to see the location of where you took your picture, the date, and time. This could be a dangerous scenario for your students, family, and yourself.
Learn how to turn this feature off in less than 2 minutes:
Learn how to turn this feature off in less than 2 minutes:
Use QuickTime to Green-Screen!
Over the past week, I have shared different ways to use green-screening with iMovie on your Mac or iPad. Have you ever thought of using QuickTime as another green-screening tool? Check out how you can use it in the video below:
Giving Students the Power to Green Screen with an iPad and iMovie
Did you know that you can record a green screen video with just an iPad and iMovie?
This is a great feature that many teachers do not realize exists! Many devices already have iMovie preloaded, which makes it extremely easy to access and a powerful way to create a video. The following video shows you how easy it is for students to create their own green screen videos!
This is a great feature that many teachers do not realize exists! Many devices already have iMovie preloaded, which makes it extremely easy to access and a powerful way to create a video. The following video shows you how easy it is for students to create their own green screen videos!
Don't have an iPad or iPhone? Check out the following tutorial on how to use your MacBook instead!
Green Screen with iMovie on Your MacBook
Green screening is a simple, yet amazing way, to take video production to the next level.
The technique involves recording video with a solid green or blue background. Then replacing that green or blue background with an image or video.
If you have a MacBook, then you can easily use its free iMovie software to record and produce a green screen video within minutes. Want to learn how? Check out this quick tutorial:
Subscribe to:
Comments (Atom)
New Learn Lead Grow Home!
Hello readers! Happy New Year! It’s hard to believe that 15 years have passed since I launched my Learn Lead Grow blog. As we step into a n...

-
I am a big fan of Eduprotocols. If you are not familiar with this innovative and engaging way of infusing technology and pedagogy together, ...
-
Whether you are planning a face-to-face lesson or remote learning experience, it is important to design learning experiences with accessibil...
-
The Frayer model is one of my favorite tools for building student vocabulary. Whether you are face-to-face or in an online environment, bui...


