Need a refresher on how to create an exit ticket or self-grading quiz? Check this out:

Showing posts with label GoogleForms. Show all posts
Showing posts with label GoogleForms. Show all posts
Don't Forget About Forms! Create Exit Tickets and Self-Grading Quizzes for Virtual Instruction with Google Forms
Don't forget about Google Forms as a way to assess students for virtual instruction!
Need a refresher on how to create an exit ticket or self-grading quiz? Check this out:
Need a refresher on how to create an exit ticket or self-grading quiz? Check this out:

New Grading Feature in Google Forms!
Google Forms is quickly becoming one of my favorite formative assessment tools. In the past, you used to have to limit self-grading questions on Google forms to multiple choice, checklists, and dropdown menus.
Google recently made an update to Forms, which allows users to create self-grading quizzes with short answers. How does it work?
Step 1: Choose the Settings Button (Gear Icon)
Choose the Settings button, select the Quizzes tab, and turn on the Make this a Quiz feature. Make sure that you save your progress!
 Step 2: Create Your Question
Create your question on Google Forms. Type in your question and make sure that "Short Answer" is selected.

Step 3: Add Your Correct Answers
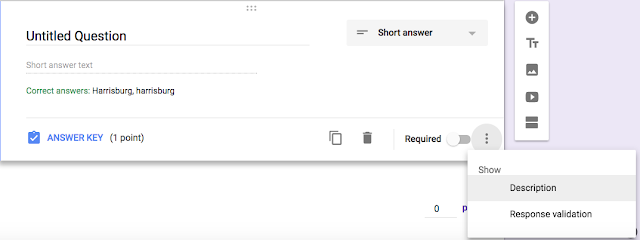
While you are still editing your question, select "Answer Key" and enter in all of your possible short answers. You will also want to select the box containing "Mark All Other Answers as Incorrect" and add a point value for your question.

NOTE: If you want students to type text or numbers a certain way, you can use the description and response validation features of Google Forms. Make sure that you are back in the editing feature of your question in order to access this.
Google recently made an update to Forms, which allows users to create self-grading quizzes with short answers. How does it work?
Step 1: Choose the Settings Button (Gear Icon)
Choose the Settings button, select the Quizzes tab, and turn on the Make this a Quiz feature. Make sure that you save your progress!

Create your question on Google Forms. Type in your question and make sure that "Short Answer" is selected.

Step 3: Add Your Correct Answers
While you are still editing your question, select "Answer Key" and enter in all of your possible short answers. You will also want to select the box containing "Mark All Other Answers as Incorrect" and add a point value for your question.

NOTE: If you want students to type text or numbers a certain way, you can use the description and response validation features of Google Forms. Make sure that you are back in the editing feature of your question in order to access this.
- The description section is useful for writing a helpful hint, such as "Capitalize the first letter!"
- The response validation feature is useful for restricting responses to a certain type of answer. For example, you may want to limit responses to numbers and whole numbers.

Upload Files and Images to Google Forms!
November is Clicks for a Cause Month! Check out how you can help a child in need below.

If you are a Google Apps for Education (GAFE) user, then you might want to check out the latest update to Forms called File Upload.
NOTE: This feature currently does not work on personal Google accounts.
How Does It Work?
Creating a Google Form File Upload Question
Create a new question in your Google Form and select the new File Upload feature. As you normally would for any question, provide instructions for users.

Uploading Files
Send out your Google Form like you normally would. When users come to the File Upload question, they will be prompted to upload any file from their computer or Google Drive (from 1 MB to 10 GB).

Where Do The Files Go?
When someone uploads a file or image to your Google Form, a folder is automatically created in Google Drive. The folder has the same name as your Google Form. Inside of the folder, you will see another folder for each File Upload question that you created. All of your files and images are in the folder!

Conclusion:
Although Google Classroom is a great workflow solution, Google Forms File Uploads has a lot of potential. This is a great way of quickly collecting files and images from users without needing to create a Google Classroom.
NOVEMBER IS CLICKS FOR A CAUSE MONTH!
Addison Jacobs was born on 1/13/15, one month prematurely with unknown underlying medical issues. At nine months old, she was diagnosed with Shwachman-Diamond syndrome (SDS), a rare autosomal recessive disorder characterized by exocrine pancreatic insufficiency, bone marrow dysfunction, leukemia predisposition, and skeletal abnormalities. Addison requires a lot of care with all of her complex medical issues. All of her medical necessities trips to Philly for her care and time off work creates an enormous financial strain on her family.
During the month of November, I need your help to make a difference for Addison and her family! Here is how!
Visit and share blog posts - I will be personally donating 1 cent to her family’s medical fund for every blog visit for the entire month of November.
- Make a donation - for the price of coffee or lunch, make a donation to Addison’s fund via credit card, debit card, check, or cash.
- Contribute to Addison’s GoFundMe page
- Show your support with a Like - “Like” Addison’s Facebook page and share words of encouragement!
QR Codes + Google Forms = Documentation Tool for the Classroom
Documentation has become increasingly important in our schools today. Especially, when it comes to tracking discipline and progress monitoring. A Google Form paired with a QR code provides you with an instantaneous way to log in information as it occurs.
Here is a quick tutorial on how you can make this work for you! Check out the my video or read below:
Step 1: Create a Google Form
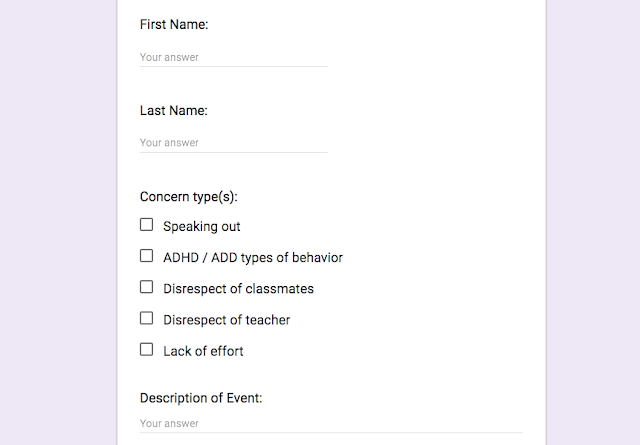
Create a Google Form containing the type of information that you would like to collect. Here is a link to a sample Form that I developed. I suggest that you create a checklist (not multiple choice type of question) to quickly check off behaviors that you observed, as well as who you notified. It may also be helpful to contain a paragraph text box to further describe the incident.
 Helpful Settings
Once a Form is published, it can be accessed by someone with a link; however, there are a few precautions that I would suggest that you take if you are a Google Apps for Education user.
Step 2: Develop a QR Code
When a Form is published, it can be accessed via a link. This can be helpful when sharing with others, but it may not be helpful if you need to quickly access via a mobile device. I suggest that you copy the link to your Form and use it to create a QR Code. I love using QR Stuff or QR Code Generator to create a QR Code.
Print out your QR Code and place it on your desk or a place in your room, where you can quickly access your Form. Use your mobile device to scan the QR Code and enter in your information.
Step 3: Analyze Your Data
It is important to remember that ALL data from a Google Form is compiled into a Google Spreadsheet. To analyze your data in your Spreadsheet, go to the Editing View of your Google Form and select the Google Sheets icon. This will open up your private Google Sheet filled with results. NOTE: Students CANNOT access this information unless you personally share it with them.

Use the filtering tools to filter by student, date, behavior, etc. You can even download this spreadsheet into an Excel or PDF file format to share with others. I would highly recommend that you send any information via PDF.
Conclusion:
A Google Form paired with a QR code could be a viable solution to analyze behavior trends and provide valuable feedback to administrators, parents, and other staff.
Here is a quick tutorial on how you can make this work for you! Check out the my video or read below:
Step 1: Create a Google Form
Create a Google Form containing the type of information that you would like to collect. Here is a link to a sample Form that I developed. I suggest that you create a checklist (not multiple choice type of question) to quickly check off behaviors that you observed, as well as who you notified. It may also be helpful to contain a paragraph text box to further describe the incident.
 Helpful Settings
Once a Form is published, it can be accessed by someone with a link; however, there are a few precautions that I would suggest that you take if you are a Google Apps for Education user.
- Go to the Settings Gear icon and choose "Restrict to (domain name) Users," so that you have to be signed into your district's GAFE account to access. When you select this option, you will have the ability to check a box that states "Collect email addresses." This will automatically let you know if a student entered in data. This will allow you to have a friendly conversation with that student.

- If you know that you are going to be away for a day or two, turn off your Form. In the Editing view of your Google Form, choose the Responses Tab and click on the button "Accepting Responses." This will prevent anyone from adding to your Form.
- NOTE: ALL OF YOUR DATA IN YOUR GOOGLE SHEET IS SAFE! Any data that is entered into your Google Form is safely protected in the Google Sheet attached to the Form. Students cannot access this information unless you personally share the Google Sheet with them.
Step 2: Develop a QR Code
When a Form is published, it can be accessed via a link. This can be helpful when sharing with others, but it may not be helpful if you need to quickly access via a mobile device. I suggest that you copy the link to your Form and use it to create a QR Code. I love using QR Stuff or QR Code Generator to create a QR Code.
Print out your QR Code and place it on your desk or a place in your room, where you can quickly access your Form. Use your mobile device to scan the QR Code and enter in your information.
Step 3: Analyze Your Data
It is important to remember that ALL data from a Google Form is compiled into a Google Spreadsheet. To analyze your data in your Spreadsheet, go to the Editing View of your Google Form and select the Google Sheets icon. This will open up your private Google Sheet filled with results. NOTE: Students CANNOT access this information unless you personally share it with them.

Use the filtering tools to filter by student, date, behavior, etc. You can even download this spreadsheet into an Excel or PDF file format to share with others. I would highly recommend that you send any information via PDF.
Conclusion:
A Google Form paired with a QR code could be a viable solution to analyze behavior trends and provide valuable feedback to administrators, parents, and other staff.
New Quizzes Feature in Google Forms
Did you have a chance to look at Google Forms lately? If not, you may want to check out the new Quizzes feature in Forms! This is a feature many educators have been waiting for and here are some of its key benefits:

Tutorial:

- It is easy-to-use and no Add-ons are required!
- The Quizzes feature grades work for you automatically! Set the correct answer and point value for each question.
- Students can see which questions they missed and receive feedback on the correct answers.
- Students can receive instantaneous feedback after they have completed the quiz or control when results are released. This is an awesome feature in the fight against cheating!
Tutorial:
Want a quick tutorial? Check out my 3 minute tutorial:
Conclusion:
Educators understand the importance of providing students with timely feedback because it is an essential component of the learning process. In an instantaneous society, our students expect quick responses. The new Google Forms Quiz feature saves you time and helps make the learning process more effective.
How to Create Form Limits with Form Ranger

How do you create a Google Form with limits? I have created 2 resources to help you.
Here is a brief video tutorial:
Here is a how-to guide:
Grade Individual Sections of Google Forms
I recently had a reader contact me about how they could link multiple Google Form Quizzes and have each quiz or part graded individually with Flubaroo. As far as I am aware, Flubaroo treats an entire form as a Quiz; therefore, grading each section individually will not work with Flubaroo.
I came up with a few work arounds that you might want to try. Each option requires that you make a separate quiz for each section. For example, if you wanted three sections for your quiz, you would need to create three different quizzes.
I came up with a few work arounds that you might want to try. Each option requires that you make a separate quiz for each section. For example, if you wanted three sections for your quiz, you would need to create three different quizzes.
- Idea # 1 - Create individual quizzes in Google Forms, but link everything in a Google Doc.
- Idea # 2 - After each "quiz" or section is finished, created a custom message with a hyperlink to take your next "quiz" or section.
Cheat Sheet for Creating Self-Grading Google Form Quizzes
If you are a Google Classroom user, you may find it difficult to give your students quizzes; however, you can quickly assess your students by using Google Forms. This is NOT a new idea, but many of my colleagues have asked me about it lately. Here is how you do it:
1. Create and Publish Your Quiz Using Google Forms
 Google Forms provides you with a platform to ask multiple choice and text questions. You can even embed videos and pictures! Just remember to have a section for students to enter their name. More on this later!
2. Create an Answer Key
Fill out your Google Form with the correct answers. It may be helpful to use the name "Answer Key" so that you can keep track of the correct answers.
 3. Have Your Students Take the Quiz
Publish your quiz and have students take it!
4. View Results and Use Flubaroo
View the results of your "quiz" in Google Forms by accessing a Google Sheets with your results. You will also want to install the add-on Flubaroo (in Google Sheets) to automatically grade your results.
Here is a cheat sheet for the entire process:
Click here for the actual link to the presentation.
1. Create and Publish Your Quiz Using Google Forms
 Google Forms provides you with a platform to ask multiple choice and text questions. You can even embed videos and pictures! Just remember to have a section for students to enter their name. More on this later!
2. Create an Answer Key
Fill out your Google Form with the correct answers. It may be helpful to use the name "Answer Key" so that you can keep track of the correct answers.

Publish your quiz and have students take it!
4. View Results and Use Flubaroo
View the results of your "quiz" in Google Forms by accessing a Google Sheets with your results. You will also want to install the add-on Flubaroo (in Google Sheets) to automatically grade your results.
Here is a cheat sheet for the entire process:
Click here for the actual link to the presentation.
5 Engaging Ways to Use Google Forms
Google Forms is one of my favorite tools because of the infinite possibilities it provides any classroom. Here are 5 ways that you can incorporate Google Forms into your classroom today:
1. Pre-Assessment Tool
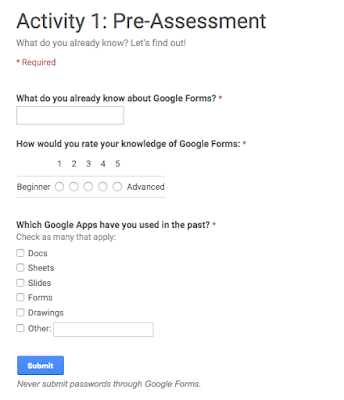
What do your students already know? What misconceptions do they have? Creating a Google Form offers excellent tools like multiple choice, rating scales, and text questions to gauge your participant's knowledge. This is extremely helpful trying to get a temperature of your class, as well as making your lesson more effective and more efficient.
2. The Power of a Poll
Polls are a great way to measure likes, dislikes, feelings, and perceptions; however, they are also a great authentic teaching tool. You can use your own polls to teach students about statistics, bias, misconception, etc. Polls are not just limited to the math classroom because they can be effective in any classroom.
Want to teach your students about democracy? Why not have your own class election? Have students in your science classroom keep valuable data on experiments, types of species, etc. in a real-life environment.
3. Start your Lesson with a Bang!
 The start of many lessons usually begins with a "hook" or way to engage students. Use a Google Form to embed a video (or picture) and a writing prompt. This is the perfect tool for any subject area because writing translates across the curriculum. Have students state their opinion, share a memory, summarize a concept, make a prediction, or share a current event.
4. Choose Your Own Adventure
Do you remember reading choose your own adventure books in school? Why not make your own "adventure" using a Google Form? Students become highly engaged when they have options or choices for what they learned.
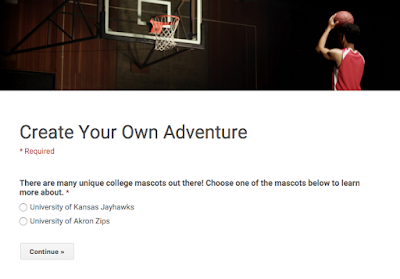 I was recently giving a workshop to demonstrate how this particular idea might work. We had participants choose which college mascot they would like to learn about. Their choice directed them to a new page, where they would learn more about the mascot. I provided text and pictures, but you could also include videos and links.
When participants finished, they were directed to a page containing a brief quiz to assess their understanding. Want to see it in action? Check it out!
5. Tweeter Board
Want to get your student's tweeting without Twitter? Use the Tweeter Board template developed by Tammy Worcester Tang. This amazing resource is a Google Form that collects data into a Google Spreadsheet. It is a great resource to use the power and engagement of social media without needing to use social media! Click here to learn more.

Conclusion:
There are literally hundreds of other possibilities for Google Forms. What ideas do you have? I'd love to hear them!
1. Pre-Assessment Tool

What do your students already know? What misconceptions do they have? Creating a Google Form offers excellent tools like multiple choice, rating scales, and text questions to gauge your participant's knowledge. This is extremely helpful trying to get a temperature of your class, as well as making your lesson more effective and more efficient.
2. The Power of a Poll
Polls are a great way to measure likes, dislikes, feelings, and perceptions; however, they are also a great authentic teaching tool. You can use your own polls to teach students about statistics, bias, misconception, etc. Polls are not just limited to the math classroom because they can be effective in any classroom.
Want to teach your students about democracy? Why not have your own class election? Have students in your science classroom keep valuable data on experiments, types of species, etc. in a real-life environment.
3. Start your Lesson with a Bang!

4. Choose Your Own Adventure
Do you remember reading choose your own adventure books in school? Why not make your own "adventure" using a Google Form? Students become highly engaged when they have options or choices for what they learned.
 I was recently giving a workshop to demonstrate how this particular idea might work. We had participants choose which college mascot they would like to learn about. Their choice directed them to a new page, where they would learn more about the mascot. I provided text and pictures, but you could also include videos and links.
When participants finished, they were directed to a page containing a brief quiz to assess their understanding. Want to see it in action? Check it out!
5. Tweeter Board
Want to get your student's tweeting without Twitter? Use the Tweeter Board template developed by Tammy Worcester Tang. This amazing resource is a Google Form that collects data into a Google Spreadsheet. It is a great resource to use the power and engagement of social media without needing to use social media! Click here to learn more.

Conclusion:
There are literally hundreds of other possibilities for Google Forms. What ideas do you have? I'd love to hear them!
Tweeter Board Google Form
Want to get your student's tweeting without Twitter? Use this amazing Google Form resource is called Tweeter Board, which was developed by Tammy Worcester Tang. This amazing resource is a Google Form that collects data into a Google Spreadsheet. It is a great resource to use the power and engagement of social media without needing to use social media!
How does it work?
You will want to visit: http://tammyworcester.com/class-tweeter-template/ to make a copy of the Google Form Template. Once you have made a copy, you will want to begin setting up your form by following the step-by-step instructions found in the Spreadsheet.
Need help? Check out my helpful video:
Once you have the sheet up and running, you will want to share the Google Form with your students. Tammy's Spreadsheet actually generates a shortened URL and QR code to make sharing easy.
The form can be set up so that you can approve and moderate comments or have comments appear on the Tweeter Board tab (tab number 4) at the bottom of your screen.

How can I use it?
Use this as a tool to collect valuable information from your students. Have students summarize today's lesson (in 140 characters or less of course!). Have students give back feedback, make predictions, share what they have learned.
How does it work?
You will want to visit: http://tammyworcester.com/class-tweeter-template/ to make a copy of the Google Form Template. Once you have made a copy, you will want to begin setting up your form by following the step-by-step instructions found in the Spreadsheet.
Need help? Check out my helpful video:
Once you have the sheet up and running, you will want to share the Google Form with your students. Tammy's Spreadsheet actually generates a shortened URL and QR code to make sharing easy.
The form can be set up so that you can approve and moderate comments or have comments appear on the Tweeter Board tab (tab number 4) at the bottom of your screen.

How can I use it?
Use this as a tool to collect valuable information from your students. Have students summarize today's lesson (in 140 characters or less of course!). Have students give back feedback, make predictions, share what they have learned.
Subscribe to:
Posts (Atom)
New Learn Lead Grow Home!
Hello readers! Happy New Year! It’s hard to believe that 15 years have passed since I launched my Learn Lead Grow blog. As we step into a n...

-
 Hello readers! Happy New Year! It’s hard to believe that 15 years have passed since I launched my Learn Lead Grow blog. As we step into a n...
 -
 If you are like me, you spend a lot of time browsing through different articles on the Internet and want a solution for revisiting them when...
 -
As our world continues to advance in its application of AI, it is important to educate our students and teachers on the potential of generat...
