Google Drawings Cheat Sheet and Ideas

Google Drawings is an amazing tool that teachers can use to create interactive worksheets, graphic organizers, virtual manipulatives, and more! If you are not familiar with how to use this tool, I have created the following cheat sheet to help you learn how to use this amazing tool.

Click here to access a PDF copy of the Cheat Sheet.


Ideas for Using Google Drawings in the Classroom

If you have never used Google Drawings, it might be helpful to see examples of how others use them in the classrooms. See below for a presentation that I developed:


4 Ways Tech Will Excite Students on Read Across America Day


As we approach Read Across America Day (March 2, 2017), I want to share with you four activities to increase your student' passion for reading!


1. Retell Your Story with Shadow Puppets EDU

We remember 90% of what we teach others. Why not use technology to have your students retell or summarize a story? A teacher that I work with uses Shadow Puppets EDU to have her students retell the major points of the story using first, next, then, and finally.


2. Sequencing Practice with Post-It Plus 


Sequencing can be a major challenge for students. Why not write down the major details of a story on post-it notes? Place the post-it notes on a table. Have students use the Post-It Plus App to scan, re-organize, and write/draw/type additional information on the virtual post-it notes.


3. Create Book Trailers!

Why should students only be excited for 1 week? Why not have students create book trailers of their  favorite books using iMovie. Each trailer can contain exciting information, powerful quotations, and reasons for reading the book.

One librarian that I know, posts the videos online (YouTube or Google Drive are great options) and creates QR Codes for students to access trailers online! You can put your QR code on posters, walls, and even the books!


4. Skype or Do a Google Hangout

It is becoming increasingly more difficult to have guests come into schools. Why not open your classroom up via Google Hangouts or Skype? One teacher that I know is having an adult read to her first grade class through Skype.


Conclusion:

What are you doing for Read Across America Day? I would love to hear your creative and innovative ideas!

Stoplight Technique for Technology

Classroom management is extremely important when using technology; however, many teachers are looking for new ways to communicate, reduce behavioral issues, and share expectations. I recently came across an excellent idea from @edtechwunder on the stoplight technique.

How it Works:

Create a stoplight sign, where each light communicates a different message to students about how tech will be used that day.

For instance, green means that students should have devices open to start the beginning of class. Yellow means that students will be using technology later in the class period, but devices should be closed to start class. Red means that students will not be using technology that day in class.

Conclusion:

Place your sign outside of your classroom or another visible area inside of your classroom. Then use a binder clip to signify how technology will or will not be used in your classroom. This is a great tool to help students stay on task, understand the day's expectations, and reduce the number of questions students have.

Do you have any other cool classroom management ideas? Reply below and tell me about them!

How Do You Recap? A Great Way to Use Formative Assessment in the Classroom

Formative assessments are a great way of helping gauge student understanding and there are a variety of tools available to help teachers. I was recently made aware of a really great tool while in a Twitter chat with Karen (@Teach4SpclNeeds). She told me about Recap, a video formative assessment tool that can be used on a multitude of devices.

Getting Started 

To begin, teachers have to sign up for a Recap account and create a class. When you create a class, you will have to enter in the names of students much like SeeSaw.

Once you have your roster set up, students can access your class by going to the following link. You can choose how you want your students to sign into the App, whether using a PIN or email account (for older students). When students login to the course, they will need to choose their name from the list of students.

Creating Your First Assignment

Assignments are known as Recaps. You can create your first Recap by signing into your account and accessing your class. Once you are in your class, you can develop a Recap with a question (or questions) and / or a video explanation.

There are also ways to customize the way your students respond. For instance, you can choose the maximum recording time (15 seconds to 2 minutes), due date, and adding an assess yourself poll question.

Student Responses

Students can access the assignment by using the following link to log into their accounts and entering the PIN (or email address) associated with the class.


Students choose their name from the class roster and open up the Recap assignment in their dashboard. Once they access the question, they can record their video response.


Increasing Engagement

Once a video has been posted to Recap, teachers can use a variety of tools and features to check understanding, showcase learning to parents, or automatically combine all Recaps into a class video called the Daily Review Reel.  Videos can easily be shared with parents or other educators through a link or Twitter.


Conclusion

When I think of formative assessment, I am sometimes reminded of an episode of The Office. The main character, Michael and his sidekick Dwight, drives into a lake while using a GPS. Why? They did not have an understanding of where they were going.  I am a firm believe that when we don't understand where our students are going, we can end up with a sinking lesson or unit.

Our students can end up in a similar predicament if we are unsure where instruction is headed. Are students understanding material? What misconceptions do they have? What are they struggling with? This is why formative assessment is a great tool for gauging student understanding.

Recap is an excellent tool to help students develop a deeper understanding of content, so that can articulate where they are going and where they have been.

NEW Quizziz App for iOS

If you are a fan of Kahoot, then you should check out Quizziz because it offers another way to assess your students.

Now is the time to check it out because Quizziz just announced a new student iOS app and several great features!

  • These app functions like the web version, but much smoother on the iPad.

  • The new Read Aloud feature reads questions aloud for each quiz. This is an excellent resource for students of all abilities and backgrounds.

  • You still have access to all of the memes, avatars and leader boards that make the web version engaging to students of all grade levels.

This is a great tool to have in your teacher toolbox, especially if you are looking for quick ways to engage students and quickly assess understanding. Not only is it easy to use, but it is device agnostic - meaning you can use it on any device.

What are some of your favorite formative assessment tools? Leave a comment! I'd love to hear your ideas.

Don't You Forget About Me....SafeShareTV

Video is an important aspect of many blended classrooms; however, have you thought about where you have your students access videos? Questionable suggested videos have prevented many educators from using YouTube, but have you considered using SafeShare TV?

This has been a tool that has been around for quite some time, but I have found that many teachers have forgotten about it!  This is a great tool for removing the distractions that could appear when using YouTube or Vimeo without needing to download and convert videos. Simply copy and paste your video's URL and SafeShare TV does the rest. 

What does SafeShare do?

  • Removes advertisements from videos
  • Customize the start and end times of videos
  • No more advertisements for related or suggested videos! 
  • Share your video safely

Don't forget about SafeShare TV! It is such an important tool.


Video Tutorial on Using Numbers to Create Interactive Worksheets and Timelines

Thanks for the great feedback that I received about one of my latest posts titled More Than a Speadsheet: 3 Ways to Use Numbers in the Classroom. You spoke and I listened!

Here is a video clip describing how to create an interactive worksheet and interactive timeline. Enjoy!


Customize and Add Videos from Drive to Slides


Google Slides is an amazing collaborative tool for students and teachers. In addition to adding YouTube videos, you can now add videos from Google Drive! How does it work?

STEP 1: Insert a Video

Insert your video by going to the Insert menu and choose Video. You can also use the video icon on your toolbar.

STEP 2: Choose Google Drive

Instead of inserting a YouTube video, you can now select Google Drive.

STEP 3: Choose Your Video

Choose your video from Google Drive. Once your video is embedded, you can right-click on your video and choose Video Options.


Video options will allow you to choose when to start and end your video, whether it should autoplay when presenting, loop your video, or  whether it should be muted or play with audio.


Conclusion

Not only is this a great tool for teachers, it can be helpful for students too. This is a great way to have students (especially under the age of 13), create and embed videos into your Google Slides presentation without needing to publish to YouTube. 


More Than a Spreadsheet: 3 Ways to Use Numbers in the Classroom

I recently sat down to learn about how to use Numbers in student learning. If you are not familiar with Numbers, this is Apple's spreadsheet software, similar to Excel and Google Sheets, which comes with your Macbook or iPad.

Here are three ideas to use Numbers in your classroom.

1. Manipulatives 

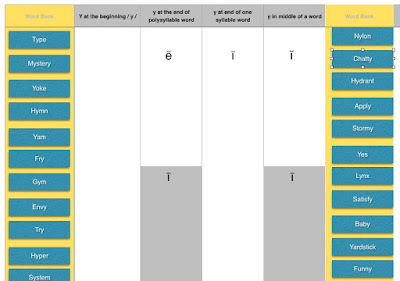
Vocabulary is an important component of any class regardless of your content area. Numbers can be used to create a variety of interactive vocabulary exercises to allow hands-on learners to interact with content.

The activity on the right is something that I developed for a teacher in my school to allow students to drag and drop vocabulary (blue boxes) words into the right positions.


***BONUS IDEA!

Because you can add video clips into your spreadsheet, why not record yourself giving instructions, doing a sample problem, or sharing resources? This helpful strategy provides students with the scaffolds and supports that may be necessary to complete the task successfully. 


2. Create a Timeline

Timelines are useful tools to visualize the order of historical events, understand the parts of a story, or understand a process.

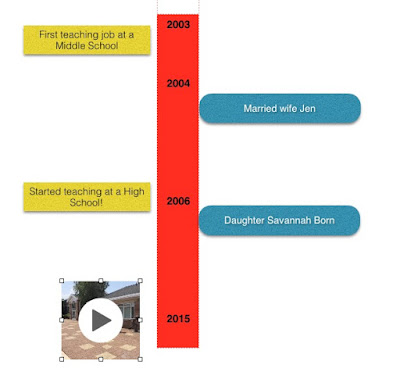
Numbers is a great tool to create an interactive timeline with text boxes, hyperlinks, images, and video files.

As an example, I created a sample timeline of important events in my life.


3.  The Perfect PBL, STEM, or Design Thinking Tool 

PBL, STEM and Design Thinking have become an important part of today's classrooms. Instead of using separate programs to compose your project, Numbers gives you the ability to create, store, and showcase various types of media in one place.

During my time exploring Numbers, I saw an example of how students used an iPad to complete a Circuit Training lesson.  To complete the activity, students were asked to do the following:
  • STEP 1:  Access a Numbers spreadsheet, containing a map and detailed instructions of the circuit tasks they needed to complete. 
  • STEP 2:  Students were asked to use an iPad to record themselves doing each circuit exercise. As they completed each exercise, they were asked to embed the video from their iPad into the spreadsheet. I love the fact that you can watch the video in Numbers! 
  • STEP 3: Students were asked to use an App called Cardiio to analyze their pulse after each activity. Students input the data into Numbers to see the impact of each activity on their body. 
  • STEP 4: Students used Numbers to create a chart to analyze and visualize their data.
  • STEP 5: Students used the "selfie cam" on their iPads to record a video analysis explaining the results. 
Conclusion:

Do you use Numbers? If you are a Mac or iOS user, you may want to seriously consider learning how to use this valuable and under utilized program. Why? This amazing spreadsheet tool can offer so many possibilities and modalities for students to learn more effectively. 


Cheat Sheet for NEW Google Sites

Have you tried to use the NEW Google Sites?  If you haven't had the opportunity, I would highly recommend that you check it out. The drag and drop interface makes it easy for anyone to design a webpage, regardless of past experiences or abilities. If you have ever used Weebly or Wix, the interface and design is very similar. It is easier than ever to add your favorite Google Tools, YouTube videos, and calendars to your site.

If you are new to using Google Sites, I have created the following cheat sheet to get started. Click here if would like to download your own copy of my infographic.


Book Talks with SeeSaw

If you are an elementary teacher, you have most likely heard about or have used the online portfolio App called SeeSaw. I love this App because there are so many different ways for students to express their understanding.

3 Sent Book Talk Format

Recently, I met Chrissy in a Twitter Chat. She mentioned to me about how she has students use SeeSaw to create "selfie videos" to practice fluency, summarize text, or respond to a prompt. I was intrigued by her 3 Sent Book Talk format that she learned from Hacking Literacy.

Students use the SeeSaw App to record themselves answering the following questions in 1 sentence each:

  1.  What's the gist of your book's plot? 
  2. Why did you like it or dislike it? 
  3. Who else should read the book? 


 Other Ways to Do the Same Thing

Although I had mentioned that this activity could be done on SeeSaw, it may be helpful to think about other ways this task could be done - especially for older students who may prefer using another application.

  • You could have students use their device's camera, record a video, and upload to a website, blog, or LMS.
  • Students could import their video into iMovie to make a more professional looking product. 
  • After developing a PowerPoint or Google Slide show presentation, students could use a screencasting program like Screencast-o-matic, Screencastify, or Quick Time to record their presentation. 
Whichever way you have students respond, the whole idea is that they are responding and thinking critically. What other activities do you like to do? What other programs do you use? 


4 Tools to Learn More About Google Suite for Education

I often get the question from other teachers, how do I learn more about Google Tools? Here are some great resources that you can use to incorporate Google Tools in your classroom!

1. G Suite Learning Center

Learn ANY Google tool with the G Suite Learning Center! I love this resource because it provides you with a variety of tools based on your ability level. There are a variety of tools, such as videos, cheat sheets, and tips for advanced users.


Simply type in blog.google and you will be directed to Google's central location for product updates, news, topics, and new ideas.  I just recently heard about this resource and immediately fell in love with it!  If you browse through the homepage, you are exposed to so many innovative ideas that it is hard not to get inspired! 


3. Google for Education Training Center

One of the best ways to learn about Google Suite for Education is to go through the certification process. The Google for Education Training Center provides you with resources to learn more about using Google Tools, as well as becoming a Level 1 or Level 2 Certified Educator.  The Level 1 track concentrates more on the fundamentals, while the Level 2 track concentrates on advanced training. 


Google recently bought Synergyse, which provides amazing training resources without leaving the App you are in. The lessons are very effective because they are simple and interactive. If you are new to G Suite, you should check this out! 


Conclusion:

From YouTube videos to blog posts like my own, there are so many different ways to learn how to use Google Suite for Education. The tools in this article are some of the best. What are your favorites? 


New Learn Lead Grow Home!

Hello readers! Happy New Year! It’s hard to believe that 15 years have passed since I launched my Learn Lead Grow blog. As we step into a n...