#ISTE2015: DAQRI Human Body Augmented Reality App

As curriculum becomes more student-driven, we need to look for ways for students to interact with content in new ways. More and more teachers are using Augmented Reality (AR) tools to make an impact on student learning. I just came across a new AR tool called DAQRI, which will allow students to peer into the human body in 4-D!

This App is available on the iTunes and Android stores. It may be very well worth checking into! According to its website:

"Anatomy 4D puts every detail of the most complex human bodily systems into a free app that is easy to use, accessible, and truly engaging. Learners explore bodily systems in depth through DAQRI’s 4D experience, which provides the opportunity to understand their interrelationships spatially – a learning experience previously only accessible in a gross anatomy lab."

Using the App is very simple. Simply open up the DAQRI App and point it towards a printout called a "target" (see picture on right). You can print this "target" out from the website or App itself. Then use the App to explore the human body. How cool is that? It sure beats a textbook!

As we learn more about how students learn, we understand that students need different ways to interact and understand concepts. This tool provides students with a hands-on approach to learning anatomy, which has been very difficult to do in the past.


#ISTE: Formmule Rocks!

I have been finding myself using Google Forms very often for sign-ups; however, what if there were a way to send confirmation emails to workshop attendees? I recently found a way that I can create a Google Form with several different workshop dates and use a Google Sheets Add-On called Formmule to send an automated and customized message to participants. How did I do it?

Step 1: Create Your Google Form

Make sure that you request an email address from anyone filling out your form. If you are using Google Apps for Education, you can automatically collect this information by restricting who can access the form.

Step 2: View Responses

After you have created your form, you will need to access Form Results (where all of your results are compiled into a spreadsheet).

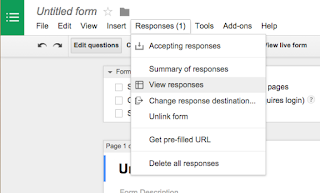
1. While you are still editing your Google Form, go to the Reponses Menu

2. Choose Form Responses

Step 3: Get the Formmule Add-On

Remember that all of the responses from your Form is compiled into a Google Sheet.

1. In this sheet, choose the Add-Ons menu and select Get Add-ons

2. Search for "formmule"


Step 4: Use Formmule

Check out my brief tutorial video to learn how to do this entire process in less than 5 minutes! Steps 1 - 3 are also mentioned in the clip!


#ISTE2015: The Barrier of Equality

Last night kicked off ISTE 2015 in Philadelphia, PA. Thousands of audience members had the privilege of listening to an eclectic mix of speakers; however, speaker Soledad O'Brien's presentation on leveling the playing field and addressing poverty in technology was impressive. Ironically, I will be presenting on the same topic on Wednesday, July 1 from 11:45 - 12:45 pm. I will be sharing my experiences on  Using Technology to Address The Needs of Students Living in Poverty in PCC 120B.

Here are some thoughts from Soledad's presentation:

"It's not about the technology, but how the technology is being used"

Anytime that you talk about technology, there is always the temptation to use technology to use it. I agree. Many of my teacher friends are tempted to have students use 50 Apps, but they don't use them well. Technology should be used to promote higher-level thinking, creativity, and overcome barriers. We can accomplish this if we use 5 Apps very well.

According to brain research from CAST and my personal philosophy, technology should be used to help overcome high-probability barriers and provide students with alternative ways to represent material, demonstrate knowledge, and engage students. See more on UDL framework.

Technology inequality is the next civil rights issue

Poverty is an issue that impacts us all and unfortunately the rich are getting richer and the poor are getting poorer. If technology is the great equalizer, we need to find creative ways of getting it into the hands of our students living in poverty. I have heard many creative ways it can be accessed in the classroom.

Old cell phones can be used to gain access to WiFi, grants are available from large organizations and credit unions, and many of our students have devices in their hands, despite not being able to pay for food.


eLearning Revolution Conference

Hello everyone!

I am presenting at the eLearning Revolution conference at IU 13 in Lancaster, PA today. Here are materials from my presentation.

9 Ways GAFE Can Address Diversity in the Classroom
9:40 - 10:40 am in Room 104

The way that we learn is as different as our DNA, which makes educating a classroom of thirty students very difficult. If you are a GAFE school, then you know the power of Apps, Add-ons, and Extensions; however, are you using these tools to strategically address the needs of all students? Join Matt Bergman as he shares with you strategies to address the needs of all learners as he explores GAFE through a UDL lens. Participants will learn how to use a variety of Google Apps, Add-ons, and Extensions to meet the needs of all students in their classroom.


What are You Doing with the Last 5? 
11 am - 12 pm in Room 104

The last five minutes of a class period are one of the most notoriously wasted parts of class. Students often use this time to pack up materials, socialize, and get into trouble. What if there were strategies and tools to maximize this wasted time period? Join Matt Bergman as he shares with you practical and effective strategies to use technology to maximize learning and reclaim the last five minutes of class. Participants will learn how to incorporate effective technology tools and strategies to maximize learning in a timely manner (5 minutes).


The Power of Annotation: 3 Ways to Use Skitch

Pictures speak a thousand words and Skitch may be able to speak volumes in your classroom.  If you are not familiar with Skitch, it is an annotation App brought to you by Evernote. Here are three ways you can use it in your classroom:

#1 - Begin a Unit with BINGO

Why not create a BINGO card to pre-assess students to see what they know? Populate the card with trivia, tasks, etc.

Have students find someone in the room who can answer an item on the card.  Annotate it with Skitch! Create a BINGO card, project it on your screen, and have your students take a picture with their iPad.

# 2 - Labels Galore 

Remember the days of labeling diagrams? Skitch adds another dimension to labeling! If you were discussing the skeletal system, students can take a picture of the skeleton and label it with Skitch. Are you talking about adjectives? Students can take a picture and label all of the adjectives in the picture. Are you discussing the parts of a plant? Take a picture of the plant and label the parts.

#3 - Solve Math Problems

Math teachers always want to see how you solved a problem. Have students take a picture or screenshot of a math problem and annotate it with Skitch. This is a great way to see all of the work.

Conclusion: 

Are you using Skitch? How are you using Skitch to annotate student work?

IU #6 STEM Leadership Conference at Clarion University

I'm so excited to attend the Riverview I.U. #6  STEM Leadership Conference at Clarion University! Here are resources from my presentations today:

Using LiveBinders to Help ALL Students Learn (11:00 - 11:45 am in Stevens Hall 125)

LiveBinders is a popular online tool that can help teachers organize links to websites, documents, presentations, videos, and more – all in the form of an electronic binder! Learn tips and tricks on how to use LiveBinders to help address all learning styles. Participants will learn how to use LiveBinders as a support tool/scaffold to address student learning needs. They will also learn how to use the site to organize materials and information in an understandable and manageable way.

Today's presentation on Slide Share

What are You Doing with the Last 5? (1:15 - 2:00 pm in Stevens Hall 125)

The last five minutes of a class period are one of the most notoriously wasted parts of class. Students often use this time to pack up materials, socialize, and get into trouble. What if there were strategies and tools to maximize this wasted time period? Join Matt Bergman as he shares with you practical and effective strategies to use technology to maximize learning and reclaim the last five minutes of class. Participants will learn how to incorporate effective technology tools and strategies to maximize learning in a timely manner (5 minutes).


9 Ways GAFE Can Address Diversity (Variability) in the Classroom (3:15 - 4:00 pm in Stevens Hall 125)

The way that we learn is as different as our DNA, which makes educating a classroom of thirty students very difficult. If you are a GAFE school, then you know the power of Apps, Add-ons, and Extensions; however, are you using these tools to strategically address the needs of all students? Join Matt Bergman as he shares with you strategies to address the needs of all learners as he explores GAFE through a UDL lens. Participants will learn how to use a variety of Google Apps, Add-ons, and Extensions to meet the needs of all students in their classroom.


3 Ways to Better Use the Last Five Minutes of Class

What are you doing with the last five? What I mean is - what are you doing with the last five minutes of class? Have you ever thought about the consequences of wasting five minutes a day? You lose 25 minutes of instruction per week, two class periods a month, and eighteen class periods a year.

This is the perfect time to utilize formative assessment tools to gauge student understanding and help make decisions about tomorrow’s instruction. Here are three ways you can better utilize the last five minutes of class:

#1: Correcting: Where am I?

In other words, this is the perfect time to gather feedback, correct mistakes and address misconceptions. Knowing what students understand and do not understand is extremely important in preparing the next day’s lesson. Here are some ideas on how you can use assessment tools to see where students are in their understanding:

Socrative is an excellent formative assessment tool to gather student feedback to correct mistakes and address misconceptions. Students can participate on any device, which makes it extremely flexible for 1:1 environments. Not only are you able to create pre-made quizzes, but Socrative has an Exit Ticket feature that requires very little effort on your part. The best part is that all data from Socrative is saved and accessible in web, Excel, or PDF formats.

What if students do not have access to devices? If you are like many teachers, you probably have access to a Smartphone. Why not use Plickers? Plickers stands for “paper clickers.” Teachers simply download the App to their Smart device and print out QR code cards for students to use to answer multiple choice questions. Students position their cards according to their answer, while the teacher scans the room with their mobile device.

#2: Summarizing: Where Have I Been?

Students need to be able to share the main ideas and key points of what they learned; however, we often forget to have our students take a few moments to summarize what they have learned. According to Reif (1993), students remember 70% of what they say and 90% of what they do. The last five minutes of class is a perfect time to get students saying and talking about what they learned.

Think about the power of technology and how it allows students to demonstrate their understanding in various ways. Several months ago, I was inspired by Fox’s new television station called Fox Sports 1, which is very similar to ESPN. At the bottom of the station’s screen are your typical news briefs in the sports world; however, I was drawn to one of the briefs titled “3 Things You Should Know.” I thought this was the perfect idea to use in class.

I had my students use Movenote to create presentations on “3 Things You Should Know From Class Today.” If you are not familiar with this tool, it is an interactive presentation tool. You can upload pictures as visuals, while you explain it through video from your webcam. It can be easily shared and provides students with a way to share what they understand. Students can create and share their Movenotes, which could be posted and shared with other classmates via a class website, blog, or LMS.

#3: Reflecting: Where am I Going?

Reflection is an essential element of learning; however, we often forget about having our students reflect on their learning because there is never enough time. Investing just five minutes at the end of class is an important chance for students to connect the dots and see where their learning is headed.


We must keep in mind that the way students learn and reflect is as different as their fingerprint; therefore, providing students with options to reflect is important. Here are some of my favorite reflection tools:

  • Penzu is a web-based journal, where students can write their reflections and thoughts. It can be password protected and easily shared.
  • AudioBoom is a free podcasting platform, where users can create free mini-podcasts called “boo’s.” This is perfect for the student who may struggle with getting their thoughts to paper.
  • See Saw is an excellent digital portfolio tool for students to share their thoughts through writing, recording, and images. This tool provides students with the flexibility to be creative, while still reflecting on their learning.

Conclusion:

In order to better utilize the last five minutes of class, it is essential that we connect today’s learning with tomorrow’s lesson through formative assessments. We can help students understand where they are at, where they have been, and where they are going. Formative assessments provide students with the roadmap to successful learning. Not only are students better prepared for learning, but teachers gain more class time and cover more content. The best part is that it takes only five minutes a day.


Like NearPod? Then Love Nearpodize This!

I have been using NearPod and Google Slides for a long time; however, I recently came across a Chrome Extension that puts both of my favorite tools together. What is it called? Nearpodize This!

In short, this Chrome Extension will take your existing Google Slides presentation and convert it into a NearPod presentation immediately. In NearPod, you will be able to add activities like multiple choice questions, drawing activities, and short responses.
From Nearpod.com 

What is NearPod? 
If you are not familiar with NearPod, it is a web-based presentation platform and assessment tool, which allows you to create interactive multimedia presentations. Once you have created content, it can be viewed and shared on any device, such as laptops, Smart Phones, and tablets. NearPod allows you to quickly gather student responses, share the responses, and access response data on PDF reports. 

Nearpodize This and UDL

Nearpodize This! provides an engaging and interactive way of representing content. Students are able to stay on task because the teacher controls the pace OR students can go at their own pace through the Homework feature. Nearpodize This! also give students the opportunity to demonstrate their understanding or show what they know in different ways. 


Have you used Nearpodize This! in the classroom? I'd love to hear your feedback!


Self-Regulate with Time Warp

Self-regulation is a difficult skill for adults, let alone students to master. It involves helping providing students with tools to help master their emotions and motivations. Time Warp is an excellent Chrome Extension tool that can help students master the art of staying on task and avoid distracting websites.

Once installed, the user creates a "wormhole" by entering in the address of distracting websites and choosing one of three different actions (if the site is visited):

1. Redirect - if you visit your distracting website, you will be directed to a predetermined website. For example, let's say that you want to cut down on using Facebook and visit Google's homepage instead.


2. Quote - if you visit your distracting website, you can place a predetermined quote on your screen to redirect your activity.


3. Timer Only - if you visit your distracting website, you will see a timer appearing on your screen. This will tell you how much time you have spent on the website.


Conclusion:

It is never too early or too late to teach the art of self-regulation. Tools like Time Warp can be very helpful inside and outside of the classroom. In 1:1 environments, this can be a perfect tool if students are distracted with social media, gaming sites, or watching videos.

Reclaiming the #Last5Minutes of Class: 3 Exit Ticket Tools

What if there were a way that you could gain 25 extra instructional minutes a week, 2 extra class periods a month, and 18 extra class periods a year? Effectively using the last five minutes of class is the answer. In this series, I would like to help you reclaim the #last5minutes of class.

My last post focused on how you could use a camera to solve problems. Today I would like to focus on creative ways to use exit tickets to gather information.

Exit Tickets:

Whether you call it a parking lot, exit ticket, or ticket out the door, exit tickets are an important formative assessment tool. Here are 3 tools that you can use for creating your own exit tickets:

Idea # 1: Socrative Exit Tickets

What I like about Socrative is that it has a built in Exit Ticket feature available, so there is no need to prep. This pre-made template includes three basic questions:

  1. A multiple choice question asking "How well did you understand today's material?"
  2. A short answer question asking "What did you learn in class today?" 
  3. A short answer question asking "Please answer the teacher's question." You could verbally ask students your own question or write it on the board.
I like that there is very little prep time and students can use mobile devices or computers to answer questions; however, it limits how students can answer questions and demonstrate their understanding. 

Idea # 2: Padlet

If you are not familiar with Padlet, it allows you to create your own virtual post-it note board. Students do not have to have a username to access. Instead they need the hyperlink to your Padlet. 

This tool provides students with multiple means of showing what they know. Students can respond by:
  • Entering text
  • Recording a message via their webcam
  • Adding a hyperlink 
  • Uploading files and documents
If you are looking to provide students with flexibility in how they respond, this is a great tool to do so. 


Idea # 3: Video Exit Tickets with MoveNote

Have you ever considered using audio or video to create an exit ticket? Think about the difficulties many of our students with or without learning disabilities have.  They know the content; however, they may have trouble getting it on paper. 

Why not have students create a video exit ticket with MoveNote? It has a variety of platforms to choose from, including an App and Chrome extension. 

If you are not familiar with this tool, it is an interactive presentation tool. You can upload pictures as visuals, while you explain it through video from your web cam. It can be easily shared and provides students with a way to share what they understand. 

Conclusion

No matter the tool, it is important to use the last five minutes of class as a way to gather information to adjust instruction. I'd love to hear more exit ticket ideas. What other tools would you use? 


Reclaiming the #Last5Minutes of Class: A Camera for Solving Problems?

What if there were a way that you could gain 25 extra instructional minutes a week, 2 extra class periods a month, and 18 extra class periods a year? Effectively using the last five minutes of class is the answer. Think about how much time is wasted for packing up materials, completing homework, and socializing. In this series, I would like to help you reclaim the #last5minutes of class.

Camera +  Annotation = High Tech Problem Solving

Mobile devices seem to populate many classrooms today and students can use this technology to quickly complete problems and provide feedback. Whether it is a cell phone, iPod touch, or tablet, students have the ability to take pictures and annotate those pictures. 

What if you were to have students do the following? At the end of the class, you have a problem on the board. Perhaps you ask students to complete a math problem, analyze the parts of a sentence, or write a short response. 

Step 1: Camera

Have students take a picture of the problem on the whiteboard. They can use the editing features to brighten the picture, crop, and transfer to another Application. For students who don't have a smart device, why not take a picture for them and share it via Google Classroom, Edmodo, Schoology, etc.

Step 2: Annotate

Have students open the picture in an annotation or photo editing App like SkitchNotability or Google Drawings. Students can use annotation tools to label or write their answers by hand, text, or highlighting. 

Other Ideas!

Don't just limit your ideas to problems on a board. I recently saw a post by Matt Gomez, who suggested the idea of taking a picture and labeling the parts of a picture. For example, if you had a picture of a plant, label the stem, flower, leaves, etc. You could also take a picture of an object and write down all of the adjectives to describe it. 


Google Forms and Formmule to Send Confirmation Emails

I have been finding myself using Google Forms very often for sign-ups; however, what if there were a way to send confirmation emails to workshop attendees? I recently found a way that I can create a Google Form with several different workshop dates and use a Google Sheets Add-On called Formmule to send an automated and customized message to participants. How did I do it?

Step 1: Create Your Google Form

Make sure that you request an email address from anyone filling out your form. If you are using Google Apps for Education, you can automatically collect this information by restricting who can access the form.

Step 2: View Responses

After you have created your form, you will need to access Form Results (where all of your results are compiled into a spreadsheet).

1. While you are still editing your Google Form, go to the Reponses Menu

2. Choose Form Responses

Step 3: Get the Formmule Add-On

Remember that all of the responses from your Form is compiled into a Google Sheet.

1. In this sheet, choose the Add-Ons menu and select Get Add-ons

2. Search for "formmule"


Step 4: Use Formmule

Check out my brief tutorial video to learn how to do this entire process in less than 5 minutes! Steps 1 - 3 are also mentioned in the clip!


Have you tried the Zebra Pen? 

If you are an avid reader of my blog, you know that I focus on educational technology and Universal Design for Learning solutions. Recently I was contacted by Zebra Pens to try out a new product called the F-402 Ball Point Retractable pen.

I have to admit that I was unsure; however, this is an amazing pen because this stainless steel pen has provided one of the most comfortable and smooth writing experiences I have ever had. I take it everywhere with me and won't use anything else.

Check out some of the solid features:
  • Stainless Steel Barrel
  • 0.7m Point Size
  • Black/Blue Ink Color
  • Easy Glide Ink Performance
  • Designer Metal Clip for Confident Clasp
  • Designer metal clip provides an elegant yet confident clasp 
  • Refillable with F-301 Refill

I would highly recommend that you check the Zebra Pen out. You'll never want to use another pen!

10 Tips for Building Better Learning Goals

Goals are not just the foundation; they are the roadmap for effectively planning a UDL lesson. They often serve as a roadmap, providing stud...