Get Your Very Own Frayer Model Template on Jamboard

 The Frayer model is one of my favorite tools for building student vocabulary. Whether you are face-to-face or in an online environment, building student vocabulary is an important aspect of learning. The Frayer model provides students with four quadrants to fill in with definitions, characteristics, and examples of a term. 


Why I Love the Frayer Model

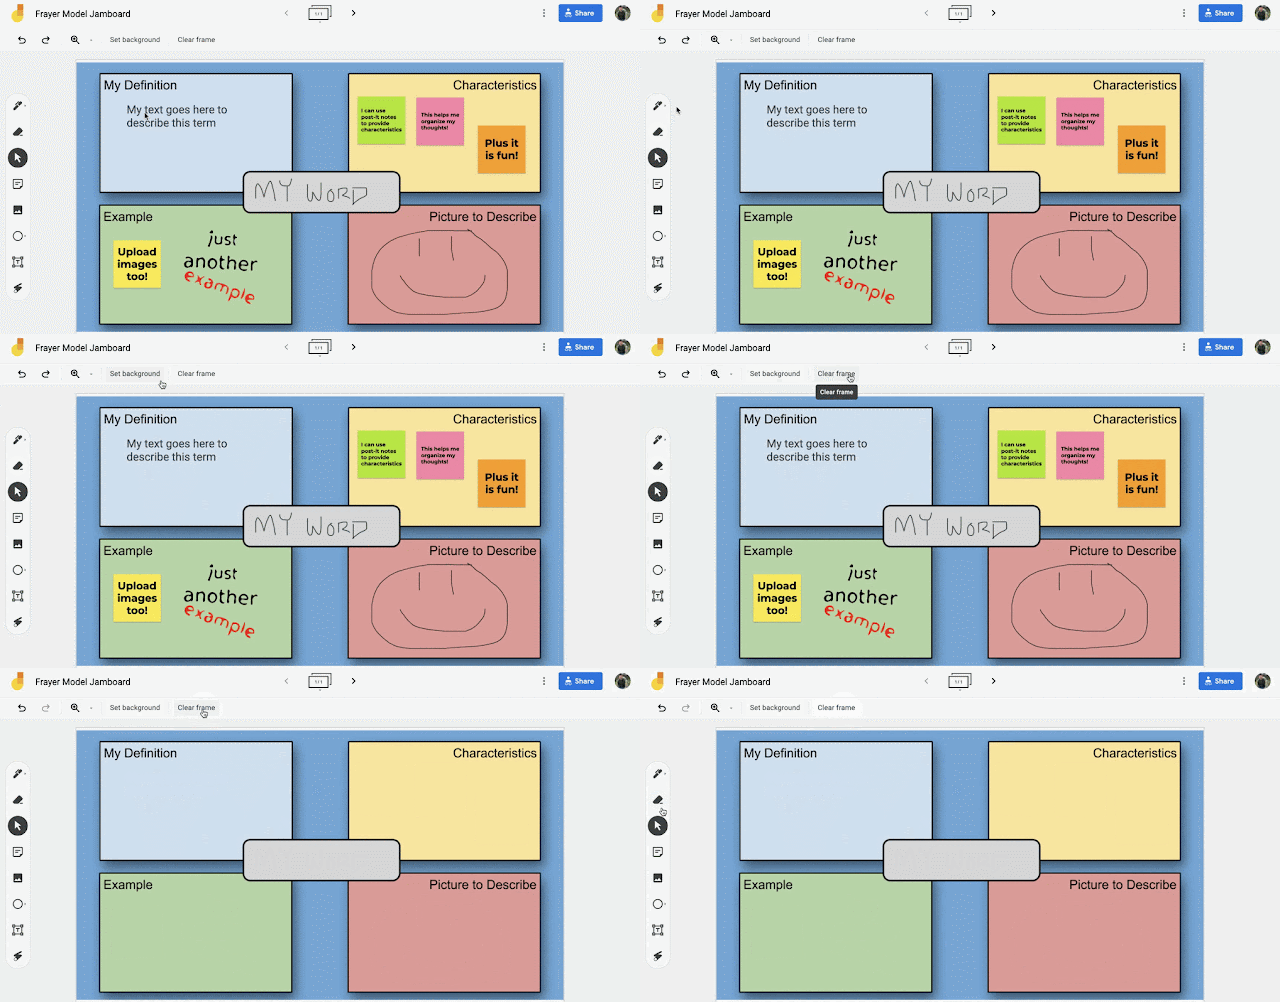
I like this tool because it provides students with multiple ways to represent a term. There are many different variations of the Frayer model; however, I created the following variation to provide students with an opportunity to write, draw, and supply background knowledge. Plus, students can draw their own Frayer model on paper or use an electronic version.


Get a Copy of My Jamboard Template

If you are working virtually, I wanted to share with you the following Jamboard template, which students can use in remote, hybrid, or face-to-face learning situations! Jamboard provides the perfect platform for students to 
  • Use the textbox to enter in their definition
  • Sticky-Notes to gather and organize their ideas
  • Upload images to provide helpful examples and illustrations
  • Drawing tools for students to illustrate content and ideas

Custom Background Feature

Jamboard just recently released a new feature, which allows you to create a custom background. This helps with keeping your template in place if students need to clear the frame! In the past, if you cleared the frame, you would lose everything! 

Having the custom background also prevents students from tampering or inadvertently deleting your template. 


Use Jamboard to Create Sketch Notes

 Did you know that you could use Jamboard to create sketch notes? If you are not familiar with the term sketch notes, it refers to a visual way to take notes by including text, images, concept maps, etc. 

Sketch notes are a powerful strategy in helping students understand content, make connections, demonstrate understanding, and reflect on the learning.  In a virtual learning environment, Jamboard provides an excellent way for students to use a device to create notes because it contains a variety of flexible tools to express their knowledge. However, you can use a variety of other tools to do the same thing! The idea is to get students to share what they have learned! 


Jamboard also provides students with a way to collaborate with other classmates on a Sketch Note, share a view-only copy of their notes, or download a PDF or PNG copy of their notes. 

How do you get started? Students can create their own notes by visiting Jamboard or you could create and share a template of a Jamboard with students on Google Classroom! Check out my video for how to do this in the classroom! 


Phonics Practice with Jamboard

 Jamboard recently developed a new option for adding custom backgrounds to your frames. A colleague and I decided to put this to the test by developing an interactive phonics practice activity using Jamboard, Google Drawings, and Google Classroom. 

Even if you are not a Language Arts or elementary school teacher, you might find this activity helpful.

How Did We Do It? 

First, we created a brand new Jamboard


Next, we created a few custom backgrounds using Google Drawings. After we were finished designing our backgrounds, we saved them as a JPG (File > Download > JPG) and then uploaded them to Jamboard. You can upload your custom background to Jamboard by visiting Set Background. 


After we set our custom background, we designed a few interactive "chip" pieces that would be placed on this frame. We created the "chips" using Google Drawings and downloaded them as a JPG; however, we chose the add image button in Jamboard to upload our "chips." We also used the duplicate image feature by clicking on the 3 dots in the top-right corner of our image. 


Then, we put together additional frames. The image below is an example of using the Sticky note feature of Jamboard. This provided students with a way to move predetermined words and classify them into prefixes and suffixes. 


Finally, we placed everything on Google Classroom and made a copy for each student! This was helpful for individual practice, but it also allowed the teacher to monitor student progress by checking the assignments directly in Google Classroom. 


Want to see a video of how to do this? Check out my video below


5 Ways You Can Use Flipgrid's New Mic Only Feature

 Flipgrid just launched a new feature to record with the Mic Only feature! This is a great tool for students who may be camera shy, need to practice their reading, or might be distracted by the camera. 

How might you use this feature? 

  • Have students use this feature to respond to discussion questions. They could very easily put their ideas into a Google Doc or on the Sticky Note tool!
  • Students could create their own podcasts. For example, perhaps students develop a podcast to discuss the causes of the Revolutionary War with on-the-scene "interviews" of historical figures. 
  • The Mic Only feature could be a great way for students to practice their reading fluency in the elementary or middle school reading classroom! Simply have students pull out a book or piece of text and record their voice. Have students practice reading this text multiple times throughout the year to show progress monitoring.
  •  Did you know that students can still use all of the tools in Flipgrid? Use the whiteboard feature and have students show their work and discuss how they are solving math problems!
  • Use the Mic feature in Flipgrid as an editing tool! After students have completed a writing assignment, have them read it aloud on Flipgrid, not only as "proof" that they did read their writing aloud but also as a way to listen for potential revisions that need to occur. 

How does it work? Check out my video below. 


Make Mind-Mapping Easy with Gitmind

Visualization tools like mindmaps are extremely helpful for students to visualize concepts, see connections, and express their understanding in tangible ways. Gitmind is a free web-based tool that makes creating mindmaps and flowcharts easy to do. 

Check out my video on how to use this great tool! 


Getting the Most Out of Zoom During Virtual Learning

 With many schools turning to virtual learning, it can be difficult to keep up! Although Zoom is an amazing platform that many teachers are using to conduct virtual learning, many teachers are becoming stressed and overwhelmed. Why? Classroom management changes when you are conducting online learning. 

I developed the following video to help provide teachers with tips and tricks for teaching with Zoom. The following video will provide you with an overview of:

  • Screen sharing
  • Managing student participation
  • How to use the whiteboard feature
  • Creating Breakout Rooms
  • Tips and tricks for managing disruptions
  • Helpful security features
  • Tips for using Zoom with an iPad


Make Learning Fun Again with Baamboozle!

 I am always looking for fun and engaging ways to help students learn! I recently came across Baamboozle, which is a free tool for students to study, self-assess, or play a Jeopardy-like group game! Whether you want students to study, provide direct instruction, or play a group review game, Baamboozle has a feature for you. 


Some of my favorite features of this tool are:

  • No two games are the same! Questions are never in the same order and are pulled from a bank of questions created by the creator of the game. 
  • You can customize your game to your student's needs! Need a timer? Want to give students a chance to pass on a question they don't know? Do you want to change your team names? 
  • There is no need to prepare! There are thousands of games created by other educators available to play at your fingertips.
  • Limited on student devices? No worries. You can easily project this game on your Smartboard
  • Students do not need accounts or codes to play!
  • I can easily create my own games within minutes!


If you want to check out how to play and create your own games on Baamboozle, check out my video below!


Make a Booksnap in 3 Easy Steps

Booksnaps take a literacy twist to the idea of Snapchat! The idea is for students to use a digital tool to identify a portion of the text and share connections in a creative and meaningful way! 


“A BookSnap is simply a digital, visual representation used to annotate and share reflections of an excerpt of a book or text.” (Martin, T, 2017)


Why Booksnaps?

  • Students can make meaningful and personal connections to the text.

  • Provides students with flexible options for expressing understanding and thoughts.

  • Helps students identify critically important parts of the text, illustrations, themes, etc.  


How Do I Create a Booksnap? 


The most effective tools for creating a Booksnap allow students to insert images, utilize annotation tools, and add audio/video. You can use a variety of tech tools, such as Flipgrid, Seesaw, and Book Creator. 


Check out my helpful video below:


No tech? No problem! Students can do many of the same things on a paper handout. 


Step 1 - Take a Picture!


Have students use their camera to take a picture of a passage from their book, OR the teacher can pre-determine the passage of text. 


Step 2 - Annotate and Make Connections


Booksnaps should have the following four components:


  • Identify - Underline, circle, or highlight the portion of the text that you are connecting with. 


  • Reflect - Add a sentence or phrase with a brief comment on what stood out to you from your highlighted sentence. Consider using text boxes, speech bubbles, etc.  


  • Visual - Add a visual representation that shares your thinking. Think about using an image, drawing, emoji that represents something about your passage. 


  • Give Credit! - Don’t forget to include the name of the text and the author OR include a picture of the book. 

Step 3 - Present 


Record a brief 15 to 30-second video of yourself presenting your Booksnap. Using tools like Flipgrid or Seesaw provides students with an opportunity to view each other’s work and comment and discuss the text in meaningful and interactive ways! 


Additional Resources


Crash Course on Creating Your Own Fliphunt with Flipgrid

 Fliphunts are digital scavenger hunts powered by Flipgrid and another tool like Google Docs. 

Fliphunts are an amazing way to help students demonstrate their understanding of content in a highly engaging way! Whether students are at home, at school, or in a hybrid situation, they can showcase their understanding anytime and anywhere! 

How Do You Create a Fliphunt? Check out my video below:


What are the common elements of effective Fliphunts? 

  • Fliphunts begin with a learning goal. Ultimately, you are providing students with an opportunity to demonstrate their understanding of a concept or content. 
  • Tasks are often listed in a Google Doc, Word Document, Google Slides, etc. 
  • Each task should be designed to meet your goal, which is often designed with varying degrees of difficulty. 
  • Some Fliphunts can take the form of a list of tasks to be completed in order 
  • Students record themselves performing tasks, answering questions, or finding clues 


  • Many Fliphunts take a gamified approach and provide students with an opportunity to choose which tasks they will complete. Tasks are often assigned point values and students need to meet a certain number of points. 
  • Consider using many of Flipgrid's amazing tools to illustrate understanding, such as the drawing tools, adding images, and adding emojis!
  • Fliphunts should be fun and hands-on! 


Conclusion

Students learn more when they teach others! Fliphunts provide students with the opportunity to "teach" others what they have learned by demonstrating their understanding. Fliphunts powered by Flipgrid offer a great way to do this. Not able to use Flipgrid in your school? Consider using alternative tools like Seesaw, Canvas, or the camera on a tablet. 


3 Strategies for Creative, Meaningful, and Engaging Discussion Online

 If you are a Google Classroom or other LMS user, then you know that increasing student engagement and participation in asynchronous discussions can be difficult for several reasons. What if we looked for ways to facilitate online discussion in creative, meaningful, and engaging ways? 

Idea # 1 - Flexible Discussion Board

When I was younger, I would struggle with writing my thoughts on paper. It was much easier to "speak" them than right them. If your goal is for students to reflect on a writing prompt, why not consider offering a few ways to respond? Here is an example of a Google Classroom discussion prompt, which provides students with two different response options: 

  • Written response on Google Classroom
  • Video response on Flipgrid


If you cannot offer flexibility in the tool being used, it might be helpful to consider using a speech-to-text tool like Voice Typing in Google Docs or using a tool like Grammarly to help edit your student's writing. 

Idea # 2 - Provide Students with Roles

Role-playing is an effective instructional technique to provide students with an opportunity to view content and make meaning from different perspectives. When designing asynchronous discussion boards, why not give the students different ways of participating in the discussion? Here is a sample template that you could use as students participate in an online debate. Click here for your own copy! 


How can you assign roles? There are a variety of ways that you could give roles, such as: 


Idea # 3 - Differentiate Discussion Questions

Did you know that you can differentiate assignments in Google Classroom? Did you know that you can differentiate discussion questions in Google Classroom as well? Differentiating questions will provide you with an opportunity to shrink the group size and have students work in smaller discussion groups. This might be particularly effective in role-playing situations.


When you differentiate assignments in Google Classroom, students cannot see assignments not assigned to them. This will be particularly effective if you want students to avoid reading others' posts and participating in discussions with original thoughts. 

Conclusion

 If you are a Google Classroom or other LMS user, then you know that increasing student engagement and participation in asynchronous discussions can be difficult for several reasons. First, students sometimes lose interest because they respond to the same question and the same way as the rest of their classmates. Secondly, students may not have the same type of access to a discussion forum as their classmates. For instance, what if a student has a permanent or temporary loss of their hands for typing. Should students fail because they cannot type or struggle with getting words from their mind to their fingertips? Finally, students may lose interest because they feel like they do not have autonomy or choice. 

By planning with variability and accessibility in mind, we can develop meaningful and engaging learning opportunities for all students - regardless of ability or disability. 

Step-By-Step Guide to Creating a HyperDoc

HyperDocs are an excellent way to connect learning with students in hybrid, face-to-face, or virtual learning environments. Want to learn how to create your own HyperDoc? 

First, I would recommend visiting the HyperDocs.co website to get an idea of some of the templates and samples that are available for all teachers to use. Here is a sample HyperDoc on HyperDocs that I have created. 


Want to see a step-by-step video on creating a HyperDoc


 Next, I would make a copy of a template and begin putting together your HyperDoc. Here are a few things to think about:

  • Workflow - how will you collect and distribute materials? How will students submit work to you? Google Classroom is a great tool for this. 
  • Accessibility - how will you help students access learning and materials?  A good way to do this is to force a copy of the document and add helpful video tutorials. Screencastify is a great tool for creating helpful videos. 
  • Design - how will you create a document that is easy to navigate and simple to use? A good way to do this is making Hyperlinks appear highlighted and in a larger font. Joypixels is a great tool to add emojis to your doc!
  • Engagement - how will you hook students into learning? Add trivia, a fun quiz, and opportunities to collaborate and create! Google Forms and Quizziz are excellent tools to use for this. 
  • Reflection - offer your students regular opportunities to reflect on their learning. It might be helpful to view reflection as checkpoints or exits along the learning journey. Flipgrid is a great tool to reflect! 
Finally, share your document with your students and watch learning happen! 

New to HyperDocs?

 Are you new to HyperDocs? Check out my infographic for tips, tricks, and resources:


3 Ways You Can Share a Jamboard on Google Classroom

 Jamboard is quickly becoming a favorite tool for many educators across the globe. It is simple to use and easy to integrate; however, the one question that I often hear is "how can I share it with students?"

Want a tutorial on how to use Jamboard? Check this out! 

Google Classroom may be one of the easiest ways to share a Jamboard with your students. Simply attach your Jamboard to your assignment from your Google Drive. Then you will have the option to choose one of the following options:


  • View Only - students can only see your Jamboard and can't change anything. Perfect if you want to demonstrate something to students. 
  • Students Can Edit - this allows your entire class to work on one Jamboard at the same time.
  • Make a Copy for Each Student - this creates an individual copy of your Jamboard for each student in the class. This will save on your student's Google Drive. NOTE: You will not be able to see all of your students completing their Jamboards at once; however, you can have students turn it into Google Classroom to see what they have completed. 

Want to see this in action? Check out my video below

Create an Interactive Google Sheets Checklist: Tally Checkboxes, Use Conditional Formatting, and More

Have you ever been frustrated when students forget to read instructions or include certain elements in an assignment? I have found writing assignments to be particularly challenging for some students.

In order to save my sanity and help students practice important self-management skills, I developed an interactive Google Sheet called "My Perfect 10 Checklist." The following Sheet has checkbox reminders, a tally feature to count all checked boxes, and conditional formatting, which will turn green when the student is ready to turn in their assignment. 


How Does It Work? 

First, you will want to create a Google Sheet with the important tasks you want students to complete. It might be helpful to keep it simple and list a handful or no more than 10. 

Then, you will want to add checkboxes, so that students can keep track of their completion. 


Next, I find it helpful to add a box to tally up how many boxes have been checked. You can use a CountIf equation to keep track of how many boxes are checked. Here is the sample equation from my example. 


Finally, I like to add conditional formatting to tell students whether or not it is ok to turn in their assignment. For example, if students score anything less than 10, the box containing their total will appear red. If they score a 10, then the box will appear green. You will use Conditional Formatting (in the Format menu) for this to appear. I show you exactly how this works in my video below. 


Want More? 

Want to see this in action? Check out my video below. 

Want your own copy? Click here for a copy of my template. 

Flipgrid + Google Slides = Virtual Word Wall

 Word Walls are great strategies for helping students interact with vocabulary terms in meaningful and productive ways. Word Walls typically are constructed of paper stapled on a bulletin board or wall; however, what do you do once your students leave your classroom? Why not create a virtual word wall using Google Slides and Flipgrid? 

How does this work? 

Click here or check out my video below:

Conclusion

Creating a virtual word wall will bring vocabulary to your students in virtual, hybrid, and even face-to-face situations. Plus, adding the collaborative nature of Flipgrid will increase engagement and provide meaningful opportunities for students to practice using vocabulary terms in class. 

Google Jamboard Integrates with Meet!

 Did you know that you can create a Jamboard directly from Google Meet? It is now possible by clicking on the 3 dots in the bottom-right corner of your Google Meet screen.


Once you select Jamboard, you can use a new or existing Jamboard, which saves on Google Drive! Want to create an existing Jamboard before your Google Meet? No problem! Check out my tutorial.

Why Should I Use Jamboard? 

Jamboard is an interactive whiteboard tool that can be used as a tool for group or individual instruction. Here are some ideas for using this tool: 

  • Use it as a whiteboard for group instruction.
  • Keep notes of your meeting and save as a PDF. 
  • Use the post-it note feature as a way to collaborate and groupthink.
Did you know that if you create an existing Jamboard and share it in Google Classroom, you can make individual copies for each student? This might be an excellent way to customize instruction for each of your students!


Wordwall: A Highly Engaging Tool to Create Interactive Games and Printables

 I am so glad that I came across Wordwall the other day while I was browsing Twitter! If you are not familiar with this free tool, you can create interactive quizzes, games, and even printables with a few clicks. 

I decided to see how easy it was to create a quiz, so I decided to create an account and develop the following quiz on Starbucks.


 To my surprise, it was incredibly easy to create and extremely flexible to use. Although I used the "Quiz" template, I found that I could convert it into another activity to make it more engaging and fun for students. Plus, I could create a PDF printable for students who may not have the technology or needed a paper version of the activity.  If you are in a remote learning situation, I would highly recommend checking this out! 


Want a quick tutorial on how this tool works? Check out my video below: 


99 Math: A Gamified Approach to Math Fluency

Games and math fluency practice are nothing new. In fact, when I was younger, I loved the game Number Munchers, which helped me learn my math times tables through individual practice. 

As devices have changed, so have the games; however, 99 Math is quickly becoming one of my favorite math fluency games because it can be used on any device as long as it is connected to the Internet.  


Why? It combines the gamified approach of Kahoot and Quizziz with math fluency practice! It's easy to use, device friendly, and free! How does it work? 

Check out my video below: 


Split Your Browser Screen into Two with Dualless

 Remote learning has caused educators to rethink the way that we provide instruction to our students. For example, many of our students (and even educators) struggle with needing to juggle multiple screens and windows. Dualless is a Chrome extension, which provides users with the ability to split their browser screen into two either horizontally or vertically! 

This is perfect for students who may need additional supports, need to see additional resources, or who want to increase their efficiency.


The ratio can be adjusted based upon need, which makes this a perfect companion tool for students and teachers who are working with multiple browser windows at the same time. 

Here are some helpful features:


  • Split your current browser window into a pair and resize according to a ratio (3:7,4:6,5:5,6:4,7:3)
  • Need to merge your split browser windows into a single window? No problem!


Did you need a video tutorial on how to do this? No problem! Check out my video below:


Create a Question Bank and Import Questions in Google Forms

 Did you know that you can import questions from a previously used Google Form? It's possible and can make your life so much easier. Simply click on the import questions button in Google Forms, search for the Form you want, and import your questions.


Why not take things a step further and build a question bank using Google Forms? First, create a new Google Form and add questions it. You will not actually use or share this with others, because the whole idea is to important questions from this resource. Next, create your Google Forms quiz and choose the import questions button. Finally, choose the questions that you would like to import. Want to see it in action? Check out my video below:

Annotation Feature in Google Classroom iPad App

 The annotation feature in the Google Classroom mobile app is a great way to have students complete worksheets, annotate text, highlight key ideas, and show their work for math problems! It is also a great tool for teachers to create PDF annotations for students, while you are waiting at the bus stop for your own children or enjoying a quiet evening on the couch! 

How do you use this feature available on the Google Classroom iPad App? Check out my video below: 


Stop, Drop, and Roll Virtual Brain Break Template in Google Docs

There are tons of cool brain breaks out there! Whether you create your own or are using pre-made breaks on Teachers Pay Teachers or GoNoodle,  brain breaks are an effective strategy for getting students refocused and priming their brains for learning. 


Lately, I have seen quite a few brain breaks that use dice! In the spirit of hybrid and virtual learning, I was inspired to create my own interpretation in the following Google Doc! I call it Stop, Drop, and Roll Your Virtual Brain Break!  

Feel free to click here to access your own copy and customize it to your needs.


How Does It Work? 

Did you know that you can visit Google and type in "Roll Dice" to get virtual dice? This might be a great way to complete this activity or give students the opportunity to complete this activity independently. 


First, use Google's "Roll Dice" feature to "roll" the dice on what to complete in the first physical activity. 


Next, roll the dice again to determine your gratitude activity. Gratitude is an excellent strategy to change your mindset and focus on the positive things. 
 

Finally, roll the dice one last time to complete your mindful breathing activity, which is a helpful strategy for relaxing the body and priming the brain for learning. Students complete an activity based on whether they rolled an even or odd number. 


Listen, Do, and Watch Choice Board

Although choice boards have been around for quite some time, they are gaining popularity in remote and hybrid learning situations. Why are they gaining such popularity? Choice boards help differentiate instruction by providing structured choice, provide flexibility, student autonomy, and increased engagement. 

Listen, Do, and Watch Choice Board

I created the following Listen, Do, and Watch Choice Board (feel free to use for your own copy) to provide students with different options for learning about a concept. Brain research suggests that students need multiple representations of new concepts in order to solidify its meaning. The following activity capitalizes on using video, audio, and hands-on learning activities. Plus it provides opportunities to reflect on their learning. 


How Does This Work? 

Prior to students completing the activity, you will want to add the name and a link to 3 different audio clips (or Podcasts), 3 activities, and 3 video clips. 

Then, post the choice board to Google Classroom (or the learning management system of your choice). Make sure that you make a copy for each student! 


Next, have students complete the assignment. Students can click on the link to your audio clip, video clip, or link to an activity. After they have completed the activity, have students reflect on the appropriate slide. Students can click on the icons to automatically link to the appropriate slide. 


As an added bonus, students can drag the X on top of the items that they have completed! This will help students keep track of what they have or have not completed! 


3 Tips to Make Better Google Classroom Assignments

Want to take your Google Classroom assignments to the next level? Here are three tips for creating better assignments in Google Classroom:


  Tip # 1 - Break out Emojis!

Add emojis to instructions to serve as bullets or help key instructions stand out! Our students are visual creatures, which is why apps like Instagram and Snapchat are much more engaging to our kiddos! An awesome way to get emojis is through Joy Pixel's Emoji Keyboard Chrome extension.

Tip # 2 - Don't get too attached! 

Too many attachments is difficult to manage for students. A good rule of thumb is to use no more than 3 attachments in a post. What if you need more attachments? Consider embedding additional resources like websites, templates, etc. in a Google Doc with instructions.

Need a sample? Check out my UDL Essay instructions. You will notice that it contains:

  • The Lesson Goal
  • Suggested Steps to Complete Assignment
  • FAQ's
  • Rubric


Bonus Tip!

Did you know that you can force students to make a copy of a Google Doc by clicking a link? Check out how here! This is a great way to make optional templates available for students, so that they can make as many copies as they would like. 

Force a copy with one simple step!


Tip # 3 - Screencast to save your voice and hair!

Add a screencast with instructions. A one to two minute screencast might be a helpful way for students to remember what to do or help parents understand an assignment. Simply attach your screencast to your assignment so that students know what to expect, how to complete, and how to submit.  

One of my favorite tools is Screencastify! It is quick, easy, and saves to Google Classroom! 

It might sound like extra work to record yourself; however, you could record yourself while you are already giving your class instructions or have a student do it. The point is to have something available for students who might be working remotely, need to hear it again, or weren't paying attention. 


Back to Basics: Create a Google Form in 3 Minutes

 Need a crash course on creating your first Google Form? Check out my 3-minute tutorial, which will teach you how to create, share, and analyze results from your form. 

Need to Know Graphic Organizer in Google Drawings

 Did you know that Google Drawings is a great tool for helping students organize their thoughts? If you are teaching virtually or want to design a printable graphic organizers, Google Drawings might be a great tool! Whether students are constructing an essay or a video response, helping organize their thoughts can help solidify their argument or understanding of the topic.  

I designed the following graphic organizer called "Need to Know" using Google Drawings. It contains three different components:

  • What Do I Already Know? This is a great way for students to begin thinking about what they already know about a topic. Connecting background knowledge is a great way for students to connect with their topic. 
  • What Do I Need to Know? The following section helps students develop questions on what they need to know about their topic. I love including the 5 W's and How questions.
  • What Do You Need to Know? This portion helps students think about their audience as they construct and organize their essay. Students organize their information in a hamburger-type organizer.
Want your own copy? Feel free to click here. 

Create Your Own Bitmoji Virtual Classroom in 10-Minutes

 There have been a ton of Bitmoji or virtual classroom ideas available to educators since the Spring. Although this tool is great for remote learning situations, it can be helpful in hybrid and face-to-face learning situations too. The idea behind a Bitmoji classroom is to replicate your own classroom and make resources, news, and tools available to students in virtual settings. 

Considerations

Here are several considerations to keep in mind when designing your own virtual classroom:

1. Use the Bitmoji extension to add an animated version of you! 

2. Consider adding links to homework, resources, tutorials, and classroom news!

3. Don't forget about navigation! Use icons or pictures to link to slides. It might be helpful to add an icon to return back to your "home" screen or classroom.  

4. Make sure that you publish your classroom to the web! This makes it easier to access regardless of device.  


How Did I Do It? 

Want to create your own? Here is a brief tutorial on how to create your own Bitmoji classroom:


Want Your Own Copy? 

Want your own copy? Check out my TPT site to purchase your own copy of my template. The template contains everything you see in the preview from above. 


Mundo: A Safe AI Tool for Students

As our world continues to advance in its application of AI, it is important to educate our students and teachers on the potential of generat...